Craggy Edge Old Fashioned Sour Cream Donuts
Ingredients
Method
- Sift the cake flour, baking powder, salt, and nutmeg together in a small bowl.
- Beat the butter and sugar in a large mixing bowl until well combined and sandy. Add the egg yolks and mix thoroughly.
- Incorporate the dry ingredients in three batches, alternating with the sour cream and finishing with the flour mixture.
- Wrap the dough in plastic wrap and refrigerate for 1 hour.
- Remove the dough from the refrigerator and roll it out on a floured surface to a 1/2-inch thickness. Cut out approximately 12 donuts using a donut cutter or two round biscuit cutters.
- Pour 2 inches of canola oil into a heavy-bottomed pot and heat to 325°F. Fry 2 to 3 donuts at a time for 2 minutes per side, then transfer them to a paper towel-lined plate.
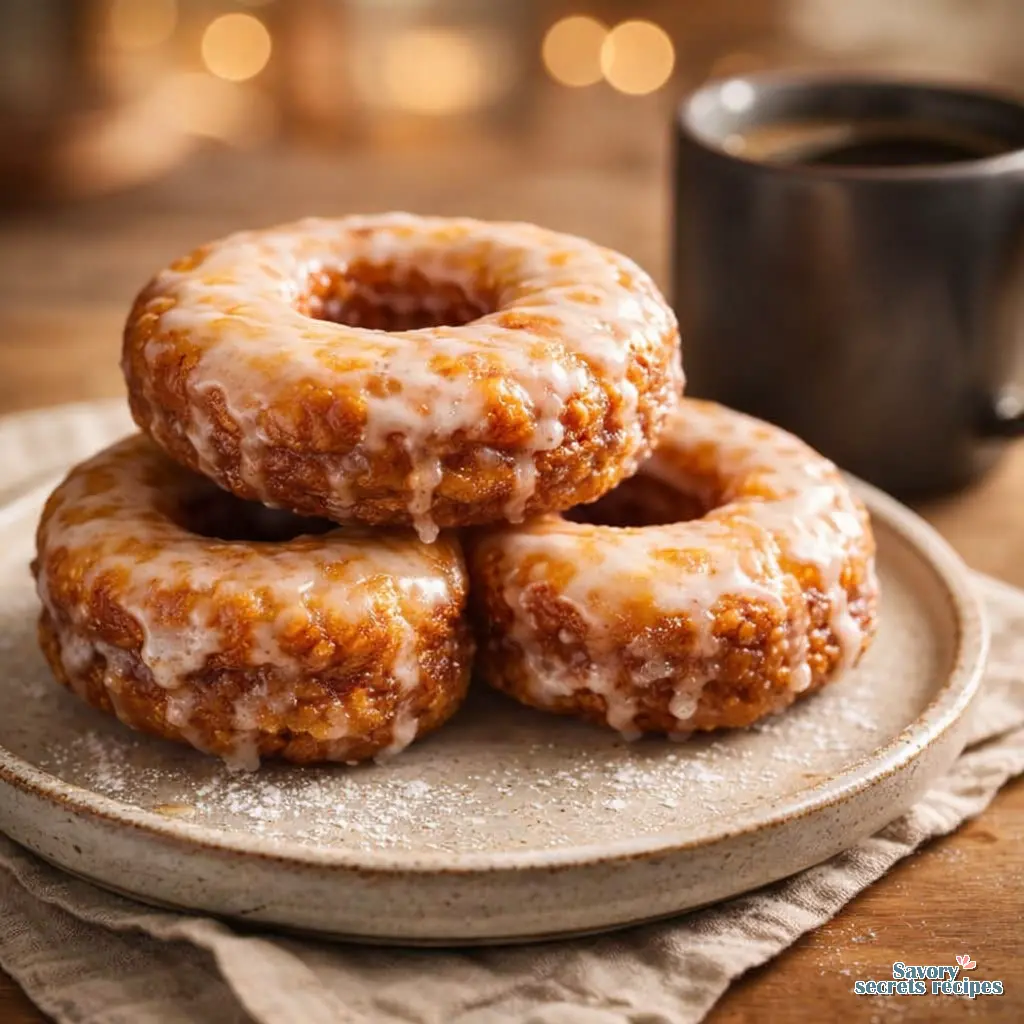
- Whisk the glaze ingredients in a shallow bowl until smooth. Place a wire cooling rack over a sheet pan. Dip each donut in the glaze to coat both sides, then rest on the rack for 15 to 20 minutes until the glaze sets.
Nutrition
Notes
The Anatomy of Perfect Old Fashioned Sour Cream Donuts
There is a very specific crunch you want to hear when you bite into a proper cake donut. It should sound almost like shattering thin glass, followed immediately by a soft, tangy crumb that melts on your tongue. I remember standing on a step stool in Babcia’s kitchen back in Milwaukee, watching her measure ingredients for her weekend baking. She always told me that you trust your hands, but you verify with your tools. I still think about that every time I measure out a batch of dough.
Making old fashioned sour cream donuts at home is a technical bake. It is active biology and chemistry, not magic. But I promise it is easier than it looks if you follow the rules. You are crafting a nostalgic masterpiece right in your own kitchen. Let me give you the quick wins that will guarantee your success before we get into the details.
First, use a digital scale to weigh your flour. I know it is an extra step, but measuring by volume can add up to 30 extra grams of flour, which leaves you with a dry, heavy brick. Second, use a clip-on fry thermometer. Frying without one is like driving with your eyes closed. Third, chill your dough for at least one full hour. You cannot negotiate with time, and warm dough is completely impossible to handle.
Cake Flour vs. All-Purpose: The Crumb Texture Rule
I frequently see people trying to substitute standard all-purpose flour in their old fashioned sour cream donuts. I’d probably want to test that first before recommending it, but the data suggests it is a bad idea. You really need real bleached cake flour for the softest, most delicate crumb texture.
Bleached cake flour absorbs moisture differently than unbleached or all-purpose flours. It has a lower protein content, which means less gluten development when you mix the wet and dry ingredients. If you use all-purpose flour, your donuts will end up dense and tough. Just to be safe, buy a box of Swans Down or a similar brand. If you are absolutely in a pinch, you can make a substitute using two cups of all-purpose flour minus a third of a cup, replaced with cornstarch. But honestly, the real thing is better.
Why Chilled Dough is Non-Negotiable
Let me double-check that you understand this part, because it is crucial. The dough for these donuts is incredibly sticky when first mixed. You might panic and think you need to add more flour. Do not do it. Adding more flour ruins the delicate balance we just talked about.
Instead, you must chill the dough. Keeping the dough cold inhibits gluten formation and prevents the early leavening reaction from the baking powder. This is also where we see the magic of sour cream vs milk in donut batter. The acidity in the sour cream reacts with the chemical leavening agents to give the dough its lift, while the high fat content creates that signature tangy flavor. Chilling gives the flour time to hydrate and the fats time to firm up, making the dough manageable to roll and cut.
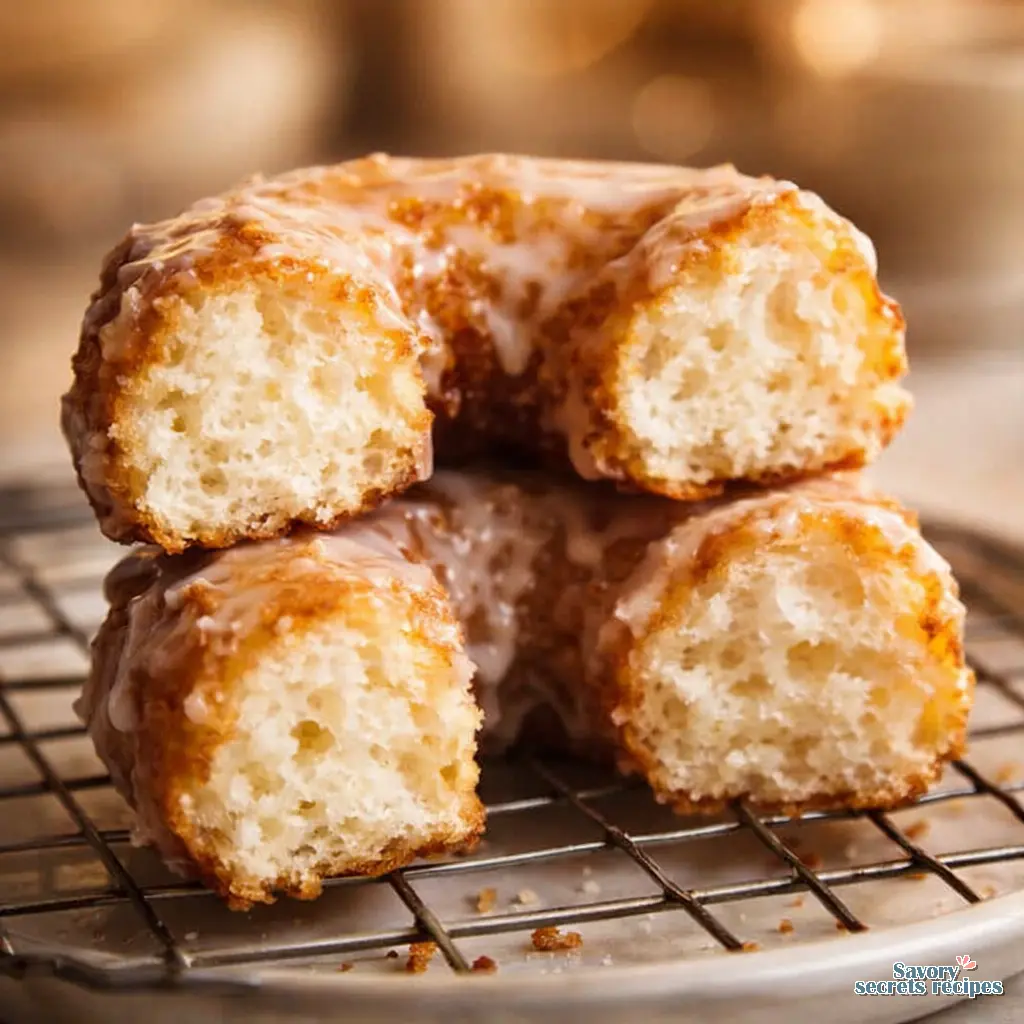
The Science of the Craggy Edges (And Frying Temperatures)
The most common question I get is how to get craggy edges on old fashioned donuts. That beautiful, cracked top is the hallmark of this recipe. It happens because of thermal dynamics. When the cold dough hits the hot oil, the exterior sets quickly. Meanwhile, the chemical leavening inside is still expanding. The inside pushes outward, tearing the set crust and creating those glorious, crunchy ridges.
This only works if your oil temperature stays strictly between 350°F and 360°F. If the oil is too hot, the crust sets too thick and the donut will not crack. If it is too cold, the donut absorbs the oil and becomes a greasy sponge. Use your clip-on fry thermometer for constant monitoring. Fry in small batches to prevent the oil temperature from dropping drastically. Better to err on the side of caution and wait a minute between batches for the oil to recover.
Visual Doneness Guide for Cake Donuts Homemade
I know watching a thermometer is stressful, so let us talk about visual cues. When you gently drop the cut dough into the oil, it will sink to the bottom for a few seconds. Do not panic. It will float to the surface as the baking powder activates.
Watch the edges. After about two minutes, you will see the edges turn a deep golden brown, and the center will start to crack open. That is your textbook reaction right there. Flip them gently using a spider strainer or chopsticks. Fry for another minute or two on the second side. You want a color that resembles dark peanut butter. If you are unsure, use a cake tester to check for doneness in the thickest part of the ring. It should come out completely clean.

Air Fryer Tested Method (The Data)
People always ask if they can make these in an air fryer. I am hesitant to say definitively without more data, so I ran some tests. The short answer is yes, but with caveats. An air fryer is essentially a convection oven, not a fryer.
If you choose this route, spray your air fryer basket with a tallow-free vegetable oil spray. Brush the chilled dough rings generously with melted butter or canola oil. Bake at 350°F for about 8 to 10 minutes. Will you get the exact same craggy edges? No. The rapid expansion from deep frying just cannot be replicated perfectly in dry heat. However, they will still be delicious, slightly denser, and perfectly acceptable for a quick weekend breakfast.
Oil Disposal and Cleanup Tips
Frying at home deters a lot of people because of the cleanup. I completely understand. But if you manage your workspace, it is not a big deal. Always shake off excess flour from your dough rings before dropping them into the fryer. Loose flour burns at the bottom of the pot and gives the oil a bitter, rancid flavor.
Once you finish making your old fashioned sour cream donuts, let the oil cool completely. I usually leave it on the stove overnight. The next morning, strain it through a fine mesh sieve lined with cheesecloth into a clean glass jar. You can reuse this oil one or two more times for sweet bakes. When it is time to throw it away, pour it into an old milk carton and toss it in the regular trash. Never pour oil down your sink.
Common Mistakes & Fixes
Mistake: The donuts are incredibly greasy.
Solution: Your oil temperature dropped below 350°F. The dough absorbed the oil instead of frying in it. Wait for the temperature to recover before adding the next batch.
Mistake: The outside is burnt but the inside is raw dough.
Solution: Your oil was too hot (above 370°F). The crust set and browned before the heat could penetrate the center. Lower the heat and test with a scrap piece of dough.
Mistake: The dough is impossible to cut and sticks to everything.
Solution: You skipped the chilling step or overworked the dough. Put it back in the refrigerator for another 45 minutes to let the fats firm up.
Mistake: The glaze melted off completely and turned soggy.
Solution: You glazed them straight out of the hot oil, or you put them in a sealed container while still warm. Let them cool slightly before glazing, and cool completely before storing.
Storage & Freezing Guide for Old Fashioned Sour Cream Donuts
Proper storage is essential because moisture is the enemy of a crisp glaze. For the first 24 hours, keep your old fashioned sour cream donuts at room temperature, completely uncovered or very loosely vented. If you put them in an airtight container immediately, the moisture from the cake will migrate to the surface and melt your beautiful double glaze into a sticky puddle.
If you need to store them longer, you can place them in a vented container in the refrigerator for up to one week. They will lose their exterior crunch, but the flavor remains excellent. For long-term storage, freeze the unglazed donuts in an airtight container for up to three months. When you are ready to eat them, warm them in a 300°F oven for a few minutes, then apply the fresh glaze.
Frequently Asked Questions
There is something deeply satisfying about mastering a technical recipe like this. When you pull that first batch out of the oil, perfectly cracked and golden, it is a moment of genuine pride. I highly recommend brewing a strong pot of dark roast coffee to pair with these. The slight bitterness of the coffee cuts through the sweet vanilla glaze and highlights the tang of the crumb beautifully.
If you try making these old fashioned sour cream donuts this weekend, take your time, trust your thermometer, and enjoy the process. For more inspiration, check out my Pinterest boards where I save all my favorite weekend baking projects.
Reference: Original Source
Can I air fry these donuts?
Yes, you can air fry them, though I prefer the traditional method. Spray your basket well, brush the chilled dough with oil, and bake at 350°F for 8 to 10 minutes. They won’t develop the exact same craggy edges, but they still taste wonderfully tangy.
Do I need to chill the dough before frying?
Absolutely. Skipping the chill time is a guaranteed disaster. The dough is incredibly sticky when first mixed. Chilling it for at least one hour allows the flour to hydrate and the fats to firm up, making it possible to roll and cut without adding excess flour.
Can you make sour cream cake donuts ahead?
You certainly can prepare the dough in advance. According to the guidelines I follow, you can mix the dough and leave it covered in the refrigerator for up to three days before rolling and frying. It actually improves the flavor development.
Why won’t my old fashioned sour cream donuts crack?
If your old fashioned sour cream donuts aren’t developing those signature cracks, your oil is likely too hot. Above 360°F, the exterior crust sets immediately before the interior leavening can expand and push outward. Always use a fry thermometer to maintain 350°F.
Can I freeze sour cream donuts?
Yes, they freeze beautifully. I recommend freezing them unglazed in an airtight container for up to three months. Thaw them at room temperature, warm them briefly in the oven, and dip them in fresh glaze right before serving for the best texture.
Do I need a deep fryer?
Not at all. I rarely use a dedicated appliance for this. A heavy-bottomed Dutch oven or a wide cast-iron skillet works perfectly. The only non-negotiable tool you need is a reliable clip-on thermometer to monitor your oil temperature constantly.
How do I store leftovers?
Store leftover old fashioned sour cream donuts at room temperature, loosely covered or vented, for the first day to protect the crisp glaze. After that, move them to a slightly more sealed container. Avoid tight plastic wrap, which makes them soggy.
What is the difference between cake and yeast donuts?
Cake donuts rely on chemical leavening like baking powder for their rise, resulting in a dense, crumbly texture similar to a muffin. Yeast donuts use active biology (yeast) to ferment and rise, creating a light, airy, and chewy interior.