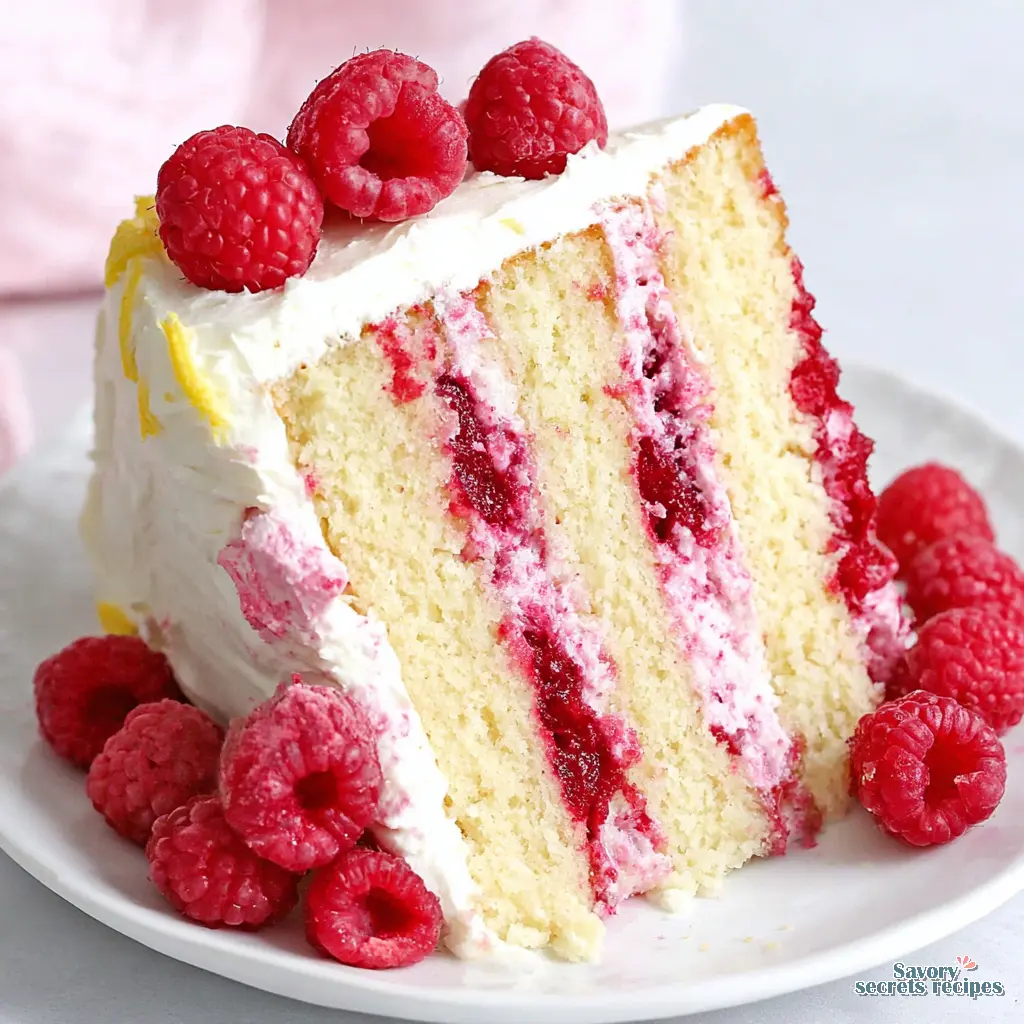
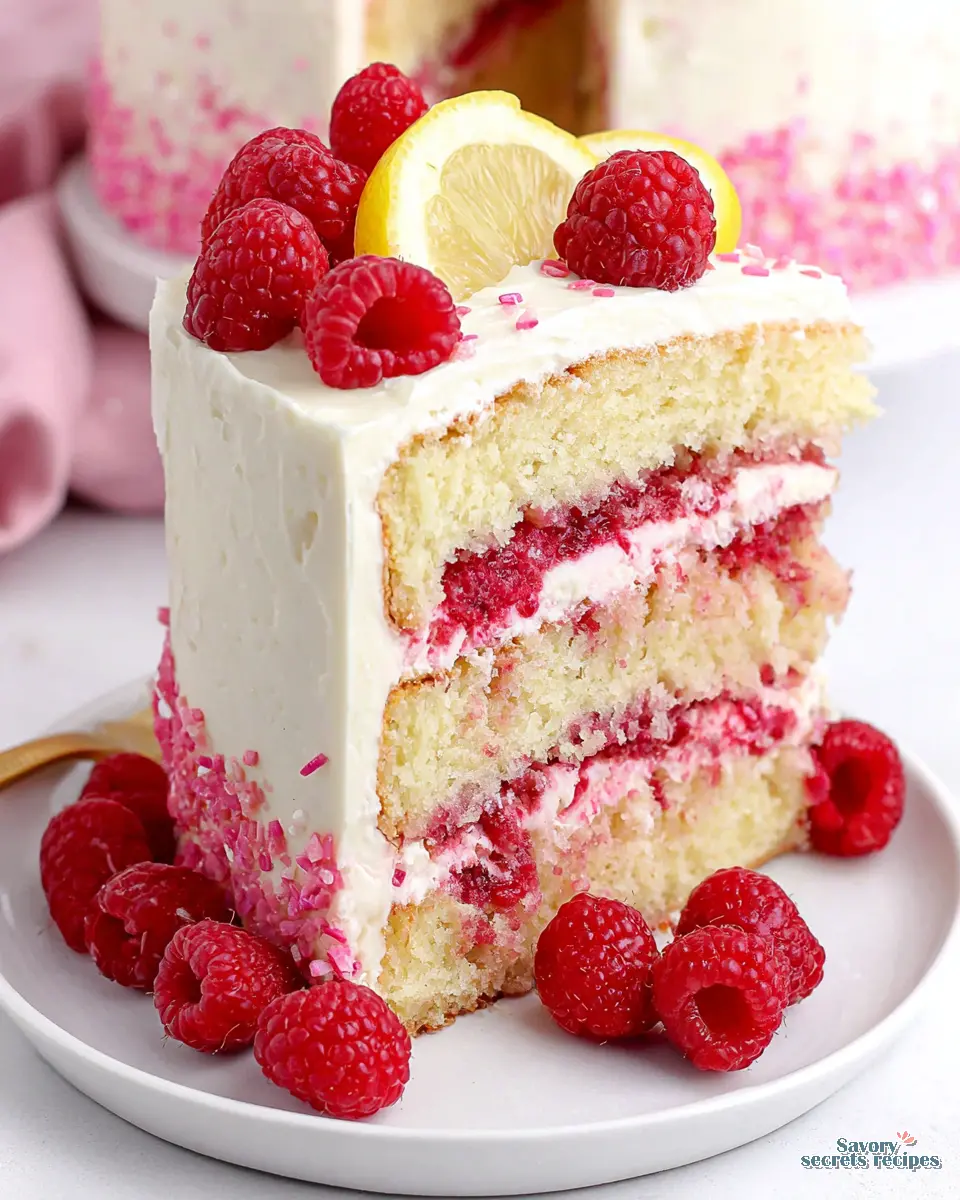
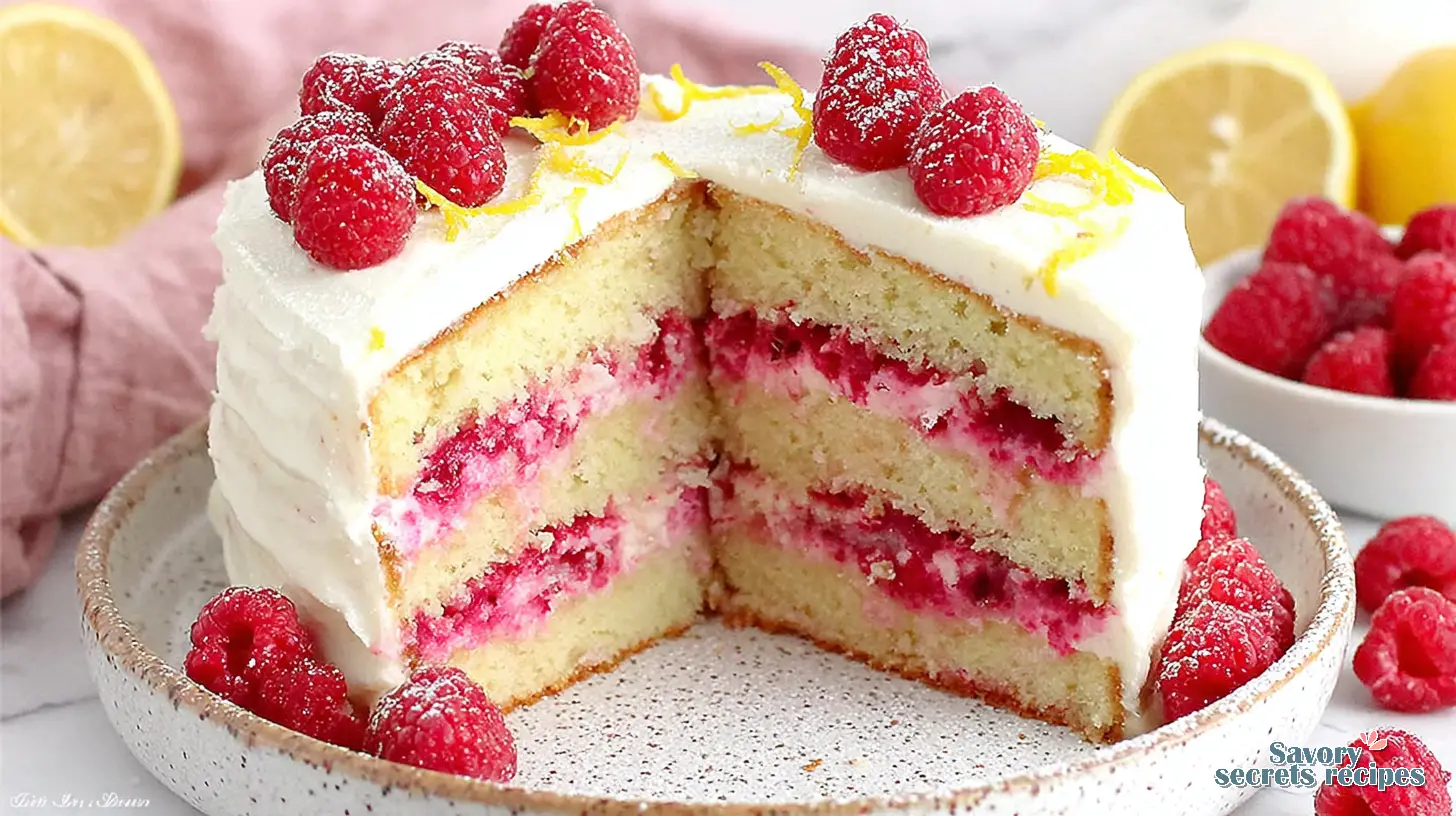
Special Occasion Lemon Raspberry Layer Cake
Ingredients
Method
- Preheat oven to 350°F (175°C). Grease and flour three 8-inch round cake pans. Line bottoms with parchment paper.
- In a large bowl, sift together flour, granulated sugar, baking powder, and salt.
- Add softened butter to the dry ingredients. Mix on low speed with an electric mixer until crumbly and resembling wet sand.
- In a separate medium bowl, whisk together eggs, whole milk, lemon zest, and vanilla extract.
- Gradually add the wet ingredients to the dry ingredients, mixing on medium-low speed until just combined and smooth. Do not overmix.
- Divide batter evenly among the three prepared cake pans.
- Bake for 25-30 minutes, or until a wooden skewer inserted into the center comes out clean.
- Let cakes cool in pans for 10-15 minutes before inverting onto a wire cooling rack to cool completely.
- While cakes cool, combine granulated sugar and water in a small saucepan over medium heat. Stir until sugar dissolves.
- Remove from heat and stir in fresh lemon juice. Set aside to cool completely.
- In a medium saucepan, combine raspberries and granulated sugar. Cook over medium heat, stirring occasionally, until raspberries break down and release their juices (about 5-7 minutes).
- In a small bowl, whisk together cornstarch and water until smooth.
- Pour the cornstarch slurry into the raspberry mixture, stirring constantly. Continue to cook for 1-2 minutes, until the mixture thickens.
- Remove from heat and stir in lemon juice. Transfer to a heatproof bowl and let cool completely, then refrigerate until firm (at least 30 minutes).
- In a large bowl, beat softened cream cheese and butter with an electric mixer on medium-high speed until light and fluffy (about 2-3 minutes).
- Gradually add sifted powdered sugar, 1 cup at a time, mixing on low speed until incorporated, then increasing to medium-high until smooth and fluffy.
- Beat in fresh lemon juice, lemon zest, and vanilla extract until just combined. Be careful not to overmix, as it can make the frosting too thin.
- If the frosting is too soft, refrigerate for 15-30 minutes to firm up slightly before frosting.
- Once cake layers are completely cool, use a pastry brush to evenly brush the lemon simple syrup over the tops of all three cake layers.
- Place one cake layer on your serving plate or cake stand. Spread about 1/2 cup of frosting evenly over the top, leaving a small border.
- Pipe or spread a dam of frosting around the edge of the first layer to hold the raspberry filling.
- Spoon half of the cooled raspberry filling inside the frosting dam.
- Carefully place the second cake layer on top. Repeat with another layer of frosting, a dam, and the remaining raspberry filling.
- Place the third cake layer on top.
- Apply a thin "crumb coat" of frosting all over the cake to seal in any loose crumbs. Refrigerate for 15-20 minutes to set the crumb coat.
- Finish frosting the entire cake with the remaining Lemon Cream Cheese Frosting.
- Decorate with fresh raspberries and additional lemon zest, if desired.
Nutrition
Notes
Why You’ll Love This Lemon Raspberry Cake
Layer cakes can seem daunting, right? I mean, all those steps, the chilling, the fear of it toppling over. Honestly, I get it. For years, I avoided them, sticking to simpler desserts, even though I secretly yearned for that showstopper moment. But I learned this the hard way: some things just need a bit of precision, and a truly beautiful Lemon Raspberry Layer Cake is one of them. What if I told you that creating a stunning, moist, and utterly delicious citrus berry layered cake isn’t nearly as intimidating as you think?
This isn’t just any cake; it’s a celebration of fresh spring flavors, perfect for those mild LA afternoons when you’re craving something bright and zesty. It’s got that delicate balance of tangy lemon and sweet raspberries, all wrapped up in a tender crumb that just melts in your mouth. You’ll be amazed at how achievable this impressive dessert really is. That’s the sweet spot we’re after here, isn’t it?
My grandmother, Lalla Fatima, always said that patience with ingredients pays off. That tracks with what I’ve seen in my own kitchen in Astoria, Queens. This Lemon Raspberry Layer Cake is a testament to that philosophy. It’s truly worth the effort, and you’ll feel so incredibly proud when you slice into it.
Gather Your Ingredients
Before we even think about turning on the mixer, let’s get everything in order. This isn’t being fussy; it’s the difference between a smooth baking experience and a frantic search for the baking powder mid-recipe. You’ll want all your cold ingredients, like unsalted butter, large eggs, and whole milk, to be at room temperature. Temperature is doing the heavy lifting here, ensuring everything emulsifies properly for that light, fluffy texture.
We’re talking about all-purpose flour, granulated sugar, baking powder, and a touch of salt for the structure. For that vibrant lemon kick, we’ll use both fresh lemon juice and plenty of lemon zest. And, of course, the star of the show: fresh or frozen raspberries. Make sure your cream cheese and butter for the cream cheese frosting are also softened. This needs time to hydrate properly, so plan ahead a little. I mean, you can’t rush perfection, can you?
Prepare Your Cake Pans
Okay, this step is non-negotiable, trust me. There’s nothing worse than a perfectly baked cake that refuses to release from the pan. We’re going for three 8-inch round cake pans here. You’ll want to grease them generously with butter or a baking spray, then dust them with a little all-purpose flour, tapping out any excess. This creates a non-stick barrier that’s truly reliable.
For an extra layer of security, I always cut out parchment paper circles to fit the bottom of each pan. Just trace the bottom of your pan onto the parchment, cut it out, and press it into the greased bottom. It’s a small step, but it makes a world of difference. You’ll thank me later when those beautiful cake layers slide right out.
Mastering the Lemon Raspberry Cake Technique
This is where we really get into the heart of creating a tender crumb and a moist cake. It’s not just about mixing ingredients; it’s about understanding how they interact. We’re aiming for a cake that’s light, airy, but still substantial enough to hold up to layers of filling and a fluffy frosting.
Making the Cake Batter
First, you’ll cream together the softened unsalted butter and granulated sugar until it’s light and fluffy. You’re looking for that ribbon stage, where it’s pale yellow and almost doubled in volume. This incorporates air, which is crucial for a tender texture. Then, we’ll add the eggs one at a time, making sure each is fully incorporated before adding the next. This prevents the batter from curdling, which can affect the final texture.
Now, for the dry ingredients: all-purpose flour, baking powder, and salt. We’ll alternate adding these with the whole milk, starting and ending with the flour mixture. This helps develop the gluten just enough without making the cake tough. And here’s the real secret for our Lemon Raspberry Layer Cake: when it comes to the raspberries, if you’re using fresh, tear them into smaller pieces by hand. Don’t chop them with a knife; that releases too much juice. Then, gently toss them with a tablespoon of flour before folding them into the batter. This prevents them from sinking to the bottom and minimizes bleeding. If you’re using frozen raspberries, they’re already easy to break apart, and you’ll still coat them in flour. That’s the sweet spot for keeping those vibrant berry bursts suspended throughout the cake.
Baking the Layers
Pour your beautiful batter evenly into the prepared cake pans. I always give them a gentle tap on the counter to release any large air bubbles. Pop them into your preheated oven at 350°F (175°C). You’ll bake them for around 25-30 minutes, but honestly, your oven might run hotter or colder, so keep an eye on it. The cakes are done when a wooden skewer inserted into the center comes out clean, and the tops spring back when gently pressed. That’s what works in my kitchen, but test it yourself.
Once they’re baked, let them cool in the pans for about 10-15 minutes on a cooling rack. This allows the cake to set properly and prevents it from tearing when you invert it. Then, carefully turn them out onto the cooling rack to cool completely. This is critical. I sometimes wonder if I’m too focused on precision, but frosting a warm cake is a mistake you only make once. It’s so satisfying when they come out perfectly golden, smelling of fresh lemon and sweet sponge.
Crafting Zesty Lemon Cream Cheese Frosting
What’s a Lemon Raspberry Layer Cake without an incredible cream cheese frosting? This isn’t just any frosting; it’s got that perfect balance of tangy, sweet, and creamy, making it the ideal complement to our zesty layered cake slice. The texture should read smooth when you drag a spoon through, not grainy or runny.
You’ll start by creaming together softened cream cheese and unsalted butter. This is another moment where room temperature is doing the heavy lifting. If your cream cheese is too cold, you’ll get lumps. If it’s too warm, your frosting might be too soft. Beat them together until they’re really light and fluffy, almost cloud-like. Now we’re getting somewhere!
Then, gradually add the powdered sugar, a cup at a time, beating well after each addition until smooth. This prevents a powdered sugar explosion in your kitchen, which I’ve definitely experienced. Finally, stir in the fresh lemon juice, lemon zest, and vanilla extract. This combination gives us that bright, zesty flavor. If your frosting gets too warm during this process, especially in a warm LA kitchen, pop it in the refrigerator for about 15-20 minutes to firm up slightly. Give it a minute to settle, then re-whip it before you use it. You want it spreadable, but firm enough to hold its shape.
Assembling Your Lemon Raspberry Layer Cake
Alright, this is the part I love, where all our hard work comes together. Layer cake assembly can seem like a big deal, but honestly, it’s just a sequence of careful steps. You’ve got this.
Layering the Cake
First, make sure your cake layers are completely cool. I mean, totally cold. If you’re really worried about stability, you can even freeze the cake layers for about 30 minutes to make them sturdy for assembly. This is what works in my kitchen, though yours might differ depending on your freezer. Place your first cake layer on your serving plate or cake stand.
Now, for the magic that prevents raspberry compote from oozing out: pipe a buttercream border, or “dam,” around the edge of the first layer. This little wall will contain our delicious raspberry filling. Spoon about half of the raspberry filling inside the dam and spread it evenly. Place the second cake layer on top, gently pressing to secure. Repeat the dam and filling process. Finally, top with the third cake layer.
Frosting Techniques
With your layers stacked, it’s time for a crumb coat. This is a thin layer of frosting that traps any loose crumbs, giving you a smooth finish. Apply a thin layer all over the cake, then refrigerate it for about 20-30 minutes until it’s firm. That’s the sweet spot. Once the crumb coat is set, apply the remaining cream cheese frosting. Use an offset spatula to spread it smoothly over the top and sides. Don’t worry if it’s not absolutely perfect; homemade cakes have character. That texture is exactly what we’re after, and it’s so satisfying when it comes together.
Expert Tips for Baking with Raspberries
Baking with fresh berries, especially raspberries, can be a little tricky because of their delicate nature and high water content. But once you understand a few simple principles, you’ll be a pro. This isn’t being fussy; it’s the difference between vibrant berry pockets and a soggy, pink-streaked cake.
Fresh vs. Frozen Raspberries
For incorporating raspberries directly into the cake batter, I actually prefer frozen raspberries. They’re easy to break apart and less prone to leaking juice into the batter during mixing. If you’re using fresh raspberries, and you absolutely want to, tear them into smaller pieces by hand. Please, don’t chop them with a knife; that just bruises them and releases too much liquid. After tearing, coat the pieces lightly in a tablespoon of all-purpose flour before folding them into the batter. This helps them stay suspended and prevents them from sinking to the bottom of your Lemon Raspberry Layer Cake layers.
Another option for fresh berries, if you have the time, is to flash-freeze them briefly after tearing and flour-coating. Just spread them on a tray and pop them in the freezer for about 15-20 minutes until they’re firm. This extra step really helps maintain their shape and prevents that dreaded juice leakage. In my experience, though yours might differ, it makes a big difference in the final appearance of your fresh berry lemon cake.
Preventing Bleeding
Beyond the flour coating for berries in the batter, the key to preventing bleeding in your final assembled Lemon Raspberry Layer Cake is that buttercream dam. It acts as a barrier, keeping your raspberry compote neatly tucked between the cake layers. Without it, the filling can seep into the cake or, even worse, ooze out the sides, making your beautiful cake look a little messy.
Also, ensure your cake layers are completely cool before you even think about assembly. Warm cake and cold filling and frosting are a recipe for disaster. Temperature is doing the heavy lifting here, ensuring everything stays where it should. Give it a minute to settle after each step, and you’ll be fine.
Choosing the Right Cake Pans
The type and size of your cake pans might seem like a minor detail, but it profoundly impacts your baking success. For this Lemon Raspberry Layer Cake, I specify three 8-inch round cake pans. This size gives you layers that are substantial enough to stack beautifully without being too tall or too thin.
Using the correct pan size ensures your cake bakes evenly and rises to the appropriate height. If you use pans that are too large, your layers will be thin and might dry out. Too small, and your batter could overflow, or the cake might dome excessively and undercook in the middle. I tend to find that light-colored aluminum pans work best for even baking, as darker pans can sometimes cause the edges to over-brown. This isn’t being fussy; it’s about giving your cake the best chance at success.
Variations & Customizations
One of the best things about baking at home is making a recipe truly your own. This Lemon Raspberry Layer Cake recipe is wonderfully adaptable. Your mileage may vary depending on your freezer, but these variations are pretty solid.
If you’re looking for a slight twist, consider a Lemon Blueberry version. Just swap out the raspberry compote for a homemade blueberry jam or compote and top with fresh blueberries. Or, for a more aromatic profile, try Raspberry Almond. Omit the lemon zest and juice, and instead, use almond extract in both the cake batter and the cream cheese frosting. It gives it a wonderful, nutty depth. A Strawberry Lemon cake is also lovely; simply substitute the raspberry compote with a vibrant strawberry jam and garnish with macerated strawberry slices. Each variation brings its own charm to this sweet raspberry lemon sponge.
For substitutions, if whole milk isn’t an option, soy milk or even full-fat buttermilk can work beautifully. For the raspberries in the cake, as I mentioned, frozen raspberries are often the easiest to work with, but fresh can be used if torn by hand and coated in flour. If you don’t have freeze-dried raspberries for the frosting, you can use a reduced raspberry purée from fresh or frozen berries and add a touch of lemon extract to boost the flavor. For a Dairy-Free option, soy milk can substitute for whole milk in the cake, and you’d need to explore dairy-free cream cheese and butter alternatives for the frosting.
Troubleshooting Common Cake Issues
Common Mistakes & Fixes for Your Lemon Raspberry Layer Cake
Mistake: Raspberries sank to the bottom or bled excessively.
Solution: This usually happens if the berries weren’t broken up or coated in flour. Remember, tear fresh berries by hand, coat all berries (fresh or frozen) in a tablespoon of flour before folding into the batter. This helps them stay suspended. I learned this the hard way, trust me.
Mistake: Cake layers are dry.
Solution: You might have overbaked them. Ovens vary, so start checking earlier than the recipe suggests. A wooden skewer should come out clean, but no sooner. Also, make sure all your wet ingredients were at room temperature; it really does make a difference for a moist cake.
Mistake: Cream cheese frosting is too runny.
Solution: This is almost always due to cream cheese or butter being too warm, or overmixing. Chill the frosting for 20-30 minutes, then re-whip it. If it’s still too soft, add a little more powdered sugar, a tablespoon at a time, until it reaches the right consistency. Don’t worry, we can troubleshoot together.
Mistake: Raspberry filling oozed out during assembly.
Solution: You probably skipped the buttercream dam. That little ring of frosting around the edge of each layer is critical for containing the compote. It’s not being fussy; it’s the difference between a clean slice and a messy one.
Mistake: Cake layers are crumbly or fall apart when handled.
Solution: This can happen if they’re still warm, or if they were underbaked. Ensure they’re completely cool before handling, and bake until a toothpick comes out clean. Freezing them briefly before assembly can also help firm them up.
Storing Your Lemon Raspberry Cake
You’ve put in all that effort to create this beautiful Lemon Raspberry Layer Cake, so let’s make sure it stays fresh and delicious. Proper storage is key, whether you’re making components ahead or saving leftovers.
Cake layers, once completely cooled, can be wrapped tightly in plastic wrap and stored at room temperature for up to 2 days. If you’re planning further ahead, you can freeze them for up to 2 months. Just wrap them well in plastic wrap, then foil, and pop them into an airtight container. The raspberry filling can be stored in an airtight container in the refrigerator for up to 1 week. Your cream cheese frosting also keeps well in an airtight container in the refrigerator for up to 1 week; just bring it to room temperature and re-mix it until fluffy before using.
For the assembled and decorated Lemon Raspberry Layer Cake, store it in the refrigerator. It’ll stay fresh for up to 5 days. Since this cake uses cream cheese frosting, refrigeration is mandatory. When you’re ready to serve, I recommend letting the refrigerated cake sit at room temperature for about 30 minutes to 2 hours. This allows the cake layers to soften slightly and the flavors to truly shine. Some people prefer it cold from the refrigerator, but I think that room temperature is the sweet spot for the best taste and texture.
Serving Suggestions
You’ve made this incredible Lemon Raspberry Layer Cake, now let’s make it look as good as it tastes. Presentation really does matter, especially for a homemade cake that looks professionally made. I’m keeping an eye on it to make sure it’s perfect for your spring gatherings or weekend brunch with friends.
For an elegant touch, garnish your slices or the entire cake with a few fresh raspberries and a thin slice of lemon. A few sprigs of fresh mint or a sprinkle of lemon zest can add a beautiful pop of color and aroma. If you’re serving it for a special occasion, edible flowers can make it truly stunning. And remember, that room temperature serving is usually best for showcasing that tender crumb and fluffy frosting. It’s so satisfying when it comes together!
Frequently Asked Questions (FAQ)
Conclusion
When you make this Lemon Raspberry Layer Cake, you’ll be amazed at the compliments you receive. It’s truly a rewarding experience to create something so beautiful and delicious from scratch, especially when it tastes like pure spring sunshine. You’ll feel that satisfaction of mastering a seemingly complex baking project, and the joy of sharing it with loved ones is just priceless.
So, grab your lemons and raspberries on your next Ralphs or Trader Joe’s run. You’ve got all the tools and tips you need right here. Don’t hesitate to let me know how it goes in the comments below; I love hearing about your baking triumphs!
For more inspiration, check out my Pinterest boards.
Source: Nutritional Information
What makes this Lemon Raspberry Layer Cake perfect for special occasions?
It’s the vibrant flavors of fresh lemon and sweet raspberries, combined with its impressive layered appearance. This Lemon Raspberry Layer Cake looks sophisticated but is surprisingly approachable to bake, making it a showstopper for spring celebrations, birthdays, or any gathering where you want to impress without advanced culinary skills. That’s the sweet spot for a special occasion.
Can you use frozen raspberries when making a Lemon Raspberry Layer Cake?
Absolutely, you can! I actually recommend using frozen raspberries for the cake batter itself. They’re easier to break apart and less prone to bleeding juice, which helps keep your cake layers beautifully colored and moist. Just remember to coat them lightly in flour before folding them in; that’s what works in my kitchen for preventing sinking.
What are the secrets to achieving moist lemon cake layers?
The key is having all your cold ingredients, like butter, eggs, and milk, at room temperature before mixing. This ensures proper emulsification, leading to a tender crumb. Don’t overmix the batter once the flour is added, as that can develop too much gluten and result in a dry cake. Baking to just the right doneness is also critical; overbaking will dry it out.
How should I store leftover Lemon Raspberry Layer Cake to keep it fresh?
Store any leftover Lemon Raspberry Layer Cake tightly covered in the refrigerator. Because it has a cream cheese frosting, it needs to be kept cold. It’ll stay fresh for up to 5 days. For the best flavor and texture, let it sit at room temperature for 30 minutes to an hour before serving; the cake softens beautifully.
Is there a way to adjust the tanginess of the lemon cream cheese frosting?
Yes, absolutely. If you prefer a less tangy frosting, you can slightly reduce the amount of fresh lemon juice or lemon zest. For more tang, just add a little extra zest, or a few more drops of juice, tasting as you go. That’s the sweet spot for finding your perfect balance. I tend to find, but test it yourself!