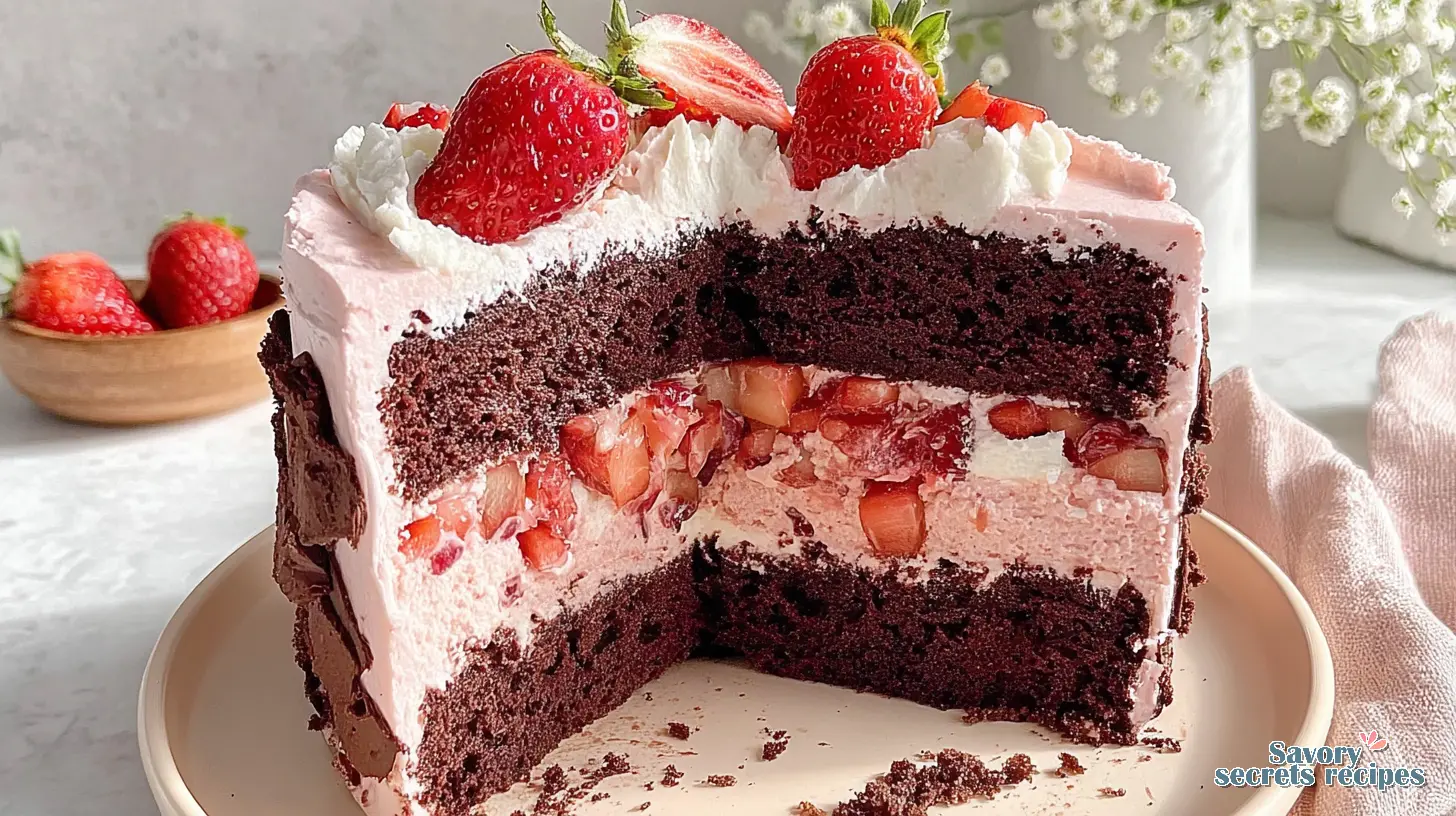
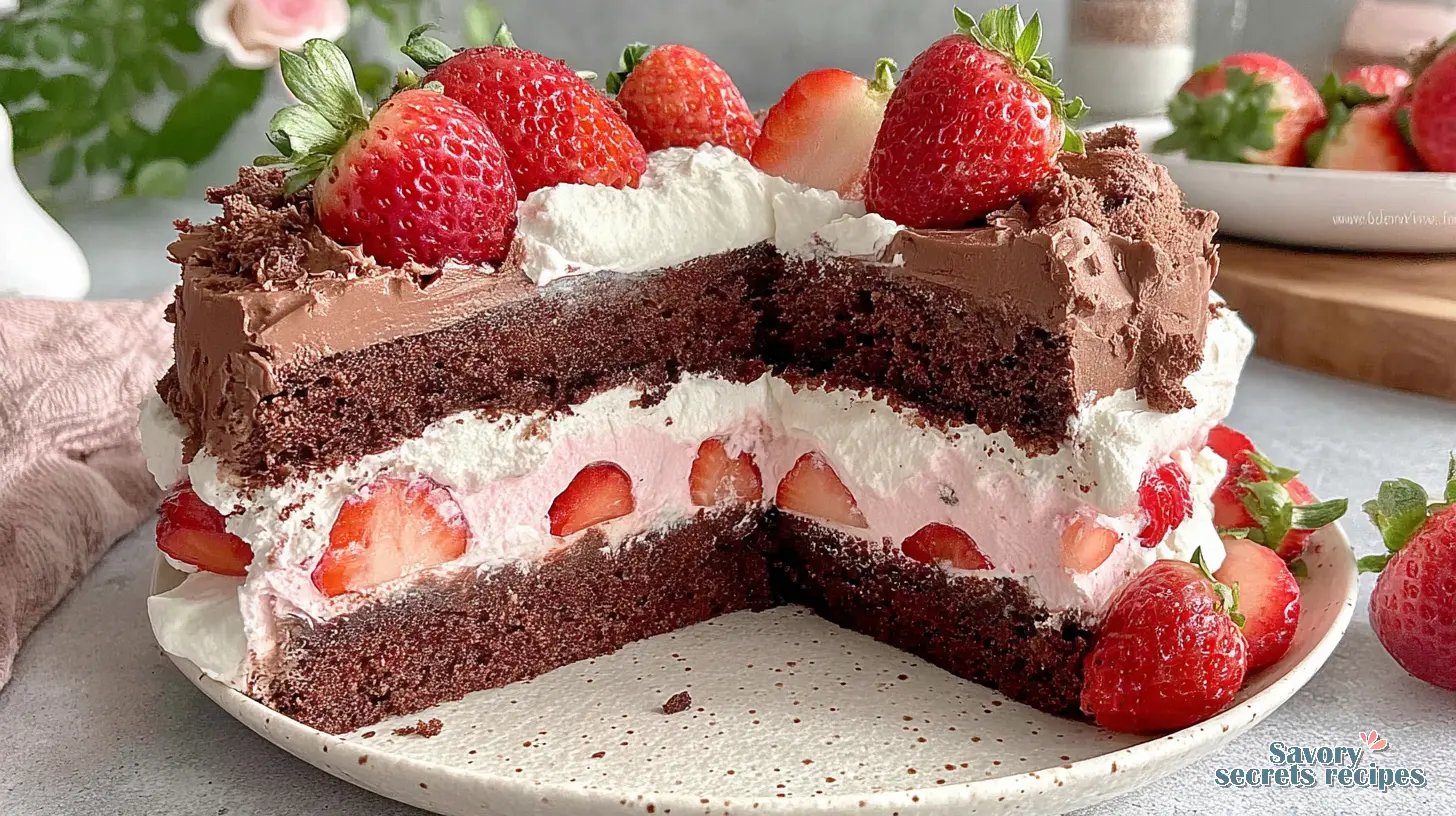
Rich Chocolate Strawberry Layer Cake
Ingredients
Method
- Note the recipe update on March 29, 2026, for improved texture, flavor, and consistency.
- Preheat the oven to 350°F (175°C); then grease and line two 6-inch (15 cm) round cake pans with baking paper.
- Combine milk, apple cider vinegar (or lemon juice), and yogurt in a bowl to create homemade buttermilk.
- Add cane sugar, light brown sugar, vanilla extract, and vegetable oil; whisk until combined and the sugar dissolves.
- Sift in all-purpose flour, cocoa powder, baking soda, baking powder, and salt; then mix to combine.
- Gradually add boiling water or brewed coffee, and mix until the batter is smooth.
- Divide the batter evenly between the two cake pans.
- Bake for 30-35 minutes, or until a toothpick inserted into the center comes out clean.
- Allow the cakes to cool completely on a wire rack. Once cooled, use a serrated knife to slice each cake into two layers, or wrap each cake layer in plastic wrap to cut the following day.
- In a sauce pot, combine and stir the diced strawberries with sugar and a splash of water. Let the mixture sit for 10 minutes to allow the strawberries to release their natural juices.
- Bring the mixture to a simmer over low-medium heat, stirring occasionally. Simmer for about 7-10 minutes.
- Once the strawberries are soft and mushy, mix cornstarch with water to create a slurry. Add this slurry to the simmering strawberries.
- Let the filling boil on low heat for an additional 1 minute, stirring occasionally; then remove from the heat. Mix in the lemon juice.
- Transfer the filling into a bowl. Cover the surface with plastic wrap to prevent a skin from forming. Chill the filling completely for 1-2 hours before use.
- In a mixing bowl, whip the butter using a paddle attachment or an electric whisk until light and fluffy.
- Gradually add the powdered sugar in 2-3 parts, followed by the vanilla extract. Mix until smooth.
- Add the cream cheese and continue mixing until the mixture is smooth and well combined.
- Incorporate the cooled strawberry filling and whip the frosting until smooth, fluffy, and well blended. Add pink food coloring if desired.
- Once the cake layers are fully cooled, use a serrated knife to slice each layer into two even layers, creating four layers in total.
- Place the first cake layer on your serving plate or cake board. Spread a layer of frosting on the cake, and pipe or spoon a thick border of frosting around the edges.
- Spread a generous layer of strawberry filling (about 4-6 tablespoons).
- Add the second cake layer on top. Repeat the process: spread strawberry frosting, make a border, and add strawberry filling. Continue layering until all layers are stacked.
- Place the final cake layer on top.
- Spread a thin layer of strawberry frosting over the top and sides of the cake to crumb coat it. Place the cake in the fridge for 1 hour.
- Add the remaining frosting all over the cake and smooth it with a spatula. Decorate as desired with extra strawberry frosting, fresh strawberries dipped in chocolate, or other decorations.
- Chill the assembled cake to help the frosting set before serving.
- Store the cake in an airtight container in the fridge for up to 3 days.
Nutrition
Notes
- Cup vs weighing scale: The US customary cup measurement serves as a rough estimate, as it can have uncertainties, so for precise results, it's recommended to weigh your ingredients using a digital scale in grams. -Before you start to make any recipe, measure and prepare your ingredients so the process will go smoothly and easily.
- For teaspoon (tsp) and tablespoon (tbsp) measurements, please use measuring spoons and not the type of spoons you eat with for accuracy.
- Milk: You can use any dairy-free unsweetened milk (like almond, soy, oat) or dairy based whole milk.
- Butter: Dairy-free salted butter sticks or any salted butter of your choice.
- Lemon Juice: You can substitute with Apple Cider Vinegar / White Vinegar and vice-versa.
- Whipping Cream: Use Dairy-free unsweetened whipping cream for vegan and dairy-free or any full fat whipping cream of choice).
- Sugar: Cane sugar can be substituted with granulated sugar or castor sugar. Ensure the sugar is vegan-friendly (some sugars are processed with bone char) or organic cane sugar.
- Cream Cheese: For dairy-free / vegan cream cheese use violife or tofutti for great results.
Why This Strawberry Chocolate Layer Cake Will Be Your New Favorite
You know that feeling, right? You’re scrolling through social media, seeing all these gorgeous, towering cakes. You think, “I could never make something like that.” I’ve been there. I mean, who hasn’t stared at a multi-layered dessert and felt a little overwhelmed? Especially when you’re dreaming of something truly special, like a Strawberry Chocolate Layer Cake, for a spring gathering or maybe just a treat after a long week.
The thing is, creating a show-stopping cake, one that earns those amazed “oohs” and “aahs,” isn’t as intimidating as it looks. I’m going to walk you through exactly how to achieve a bakery-quality Strawberry Chocolate Layer Cake right in your own kitchen. This isn’t just a recipe, it’s a journey to newfound confidence in your baking skills, I promise.
This cake is perfect for celebrating the arrival of spring, showcasing those beautiful, fresh strawberries. It’s an indulgent dessert that still feels light thanks to the fresh fruit, ideal for those mild California evenings when you want something impressive without being too heavy.
Key Ingredients & Why They Matter
Every ingredient plays a part here, and understanding that is the detail that changes everything. We’re not just throwing things in a bowl. We’re building flavor and texture with intention. For instance, the cocoa powder isn’t just for color, it’s for that deep, rich chocolate flavor we’re after in our moist chocolate cake layers.
You’ll notice we’re using **Dutch-processed cocoa powder** in this recipe. This isn’t being fussy, it’s the difference between perfectly risen layers and flat ones. Dutch-processed cocoa is less acidic than natural cocoa, and it works with the baking soda and baking powder to give us that beautiful lift. Natural cocoa would likely result in flat layers due to its acidity difference, and nobody wants that after all that effort.
For the buttermilk, if you don’t have any on hand, you can make a quick DIY version. Just add a tablespoon of apple cider vinegar to your milk and let it sit for about five minutes. It’s not quite the same, but it’ll do the trick in a pinch. This is where most recipes skip the detail, but I’ve found it makes a real difference in the tenderness of the chocolate sponge cake.
How to Pick the Best Strawberries
Fresh strawberries are the star of this berry chocolate dessert cake, so picking good ones is essential. Look for berries that are bright red all over, with green caps still attached. They should smell sweet and fragrant, even before you cut into them. If they look dull or have white patches, they probably won’t have that vibrant flavor we’re looking for.
For the fresh strawberry cake filling, you can use frozen strawberries if berries aren’t in season. They cook down faster and are easier to mash, which tracks with what I’ve seen in my own kitchen. But for decorating the top, you really want those fresh, juicy ones, trust me on this. That’s for the visual appeal, you know?
Essential Equipment for a Layer Cake
Having the right tools makes all the difference, especially when you’re tackling something like a homemade layer cake. You don’t need a professional kitchen, but a few key pieces of equipment will make your life so much easier. I mean, we want this to be enjoyable, not a struggle, right?
First off, a **kitchen scale** is a game-changer for baking. I prefer working with weight measurements exclusively. Volume is too variable for the precision these cake layers need, and I won’t publish a recipe without gram amounts. It makes sure you don’t add too much flour, which can lead to a dense, tough cake. If you don’t have a scale, fluff your flour with a spoon and then spoon it into your measuring cups before leveling it off with a knife. That’s the spoon-level method, and it’s much better than just scooping.
You’ll also want a good **stand mixer** or a powerful hand mixer for the frosting. It’ll save your arm and ensure you get that light, fluffy strawberry buttercream or cream cheese frosting. An **offset spatula** is another must-have for smoothly applying frosting and getting those crisp edges. And of course, quality **cake pans** are crucial. Using cake strips around your pans can help your layers bake up evenly, which means less trimming later. This is the detail that changes everything for stable layers.
How to Make Your Best Strawberry Chocolate Layer Cake
Creating this rich chocolate strawberry layers cake is all about breaking it down into manageable steps. Don’t worry if it feels like a lot, we’re going through it together. You’ve got this, and the end result is so worth it.
Prepare Your Moist Chocolate Cake Layers
The foundation of any great layer cake is, well, the layers! For a truly moist chocolate berry sponge, room temperature ingredients are key. I’ve found this creates a smooth, fully blended batter, uniform texture, and even baking. It’s a small step, but it makes a huge impact. Combine your wet ingredients, then add your dry ones, being careful not to overmix.
Don’t overmix the cake batter! I learned this the hard way once, and the dough punished me for it. Over-developing gluten leads to a tough, dry, and dense cake. Whisk until just combined, until those dry streaks disappear. That’s exactly the texture we’re after. Pour your batter into prepared cake pans. If your cake tops come out a little domed, don’t fret. A serrated knife can shave off the domes for easy stacking. This might vary depending on your oven, but it’s a common trick.
Make the Fresh Strawberry Filling
This fresh berry cocoa cake needs a vibrant, tangy filling to balance the rich chocolate. We’re using fresh strawberries, sugar, cornstarch, water, and a touch of lemon juice. The cornstarch helps thicken the filling so it doesn’t make your layers soggy. The lemon juice? That’s what makes the strawberry filling tangy, cutting through the sweetness and really making the berry flavor pop.
Cook it down gently until it thickens, watching for the shimmer in the syrup as it starts to coat the back of your spoon. If you prefer a completely seedless filling, you can strain it after cooking. I mean, you could skip this, but it does give a smoother texture, which is nice for a polished look. Let it cool completely before using, that’s crucial for stability.
Whip Up the Decadent Chocolate Frosting
A rich, smooth chocolate frosting is what brings this Strawberry Chocolate Layer Cake together. We’re making a cream cheese frosting here, which adds a lovely tang to the sweetness. Make sure your butter and cream cheese are at room temperature. This is another one of those “temperature matters more than time here” moments. Cold ingredients won’t emulsify properly, and you’ll end up with a lumpy frosting, which isn’t what we want for a smooth finish.
Whip the butter and cream cheese until light and fluffy, then gradually add the powdered sugar and cocoa powder. Make sure to sift the cocoa powder to ensure it is lump-free and combines easily. Add vanilla extract, and then your strawberry filling. You can even add a tiny bit of pink food coloring for a more vibrant hue, if that’s your thing. If your strawberries aren’t super flavorful, you can substitute a quarter cup of good quality strawberry jam for some of the fresh strawberries in the frosting. I’ve seen this go both ways, but sometimes the jam just boosts that berry punch.
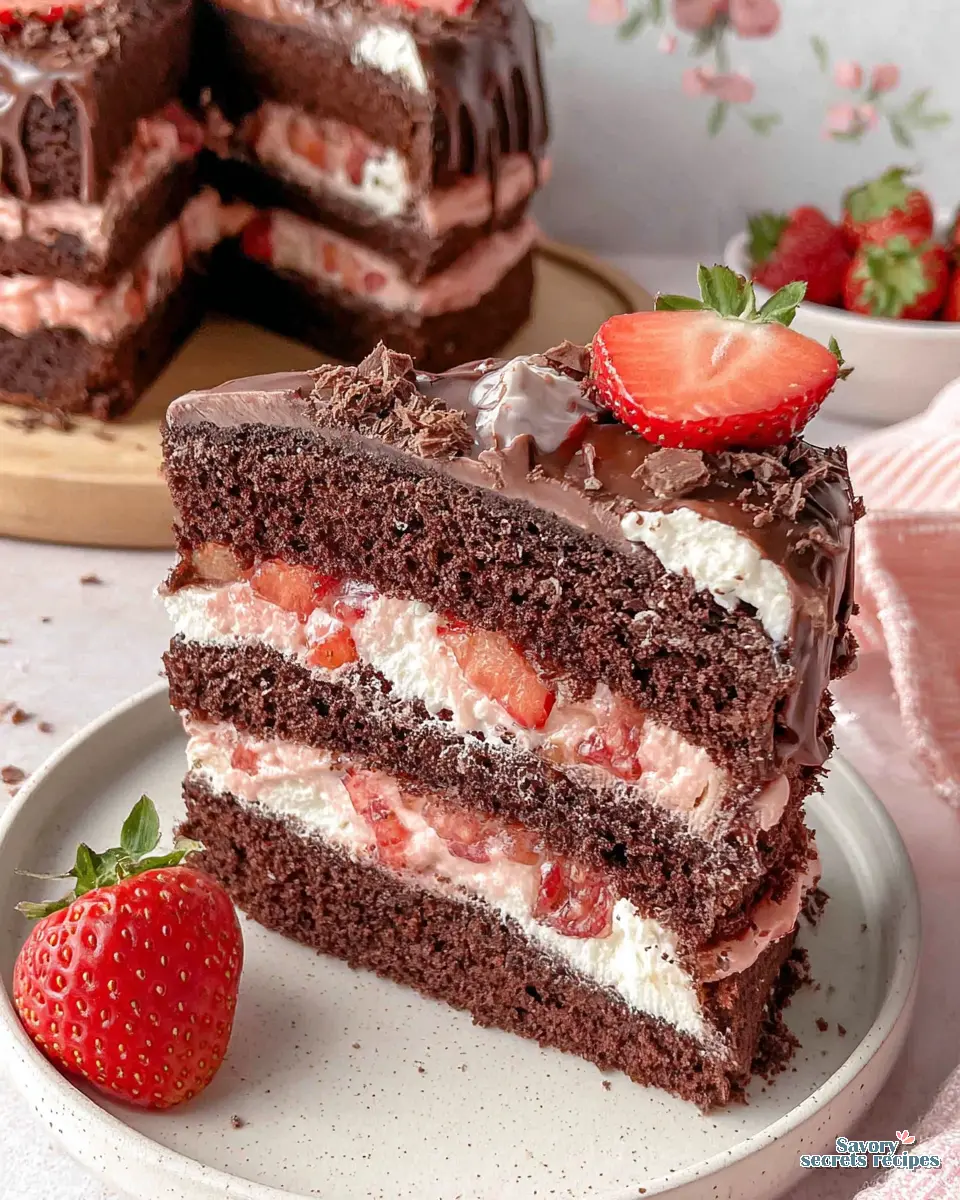
Assemble Your Layer Cake
Now for the fun part: stacking this beautiful berry chocolate dessert. Once your cake layers are completely cool and your filling and frosting are ready, you’re set. Start with a thin layer of frosting on your cake stand or serving plate to secure the first layer. Place your first chocolate sponge cake layer down, then pipe a dam of frosting around the edge.
Fill the center with your fresh strawberry cake filling. You can add a strawberry filling by laying thinly sliced, patted-dry strawberries on top of the frosting in a single layer between the cake layers for extra fresh fruit goodness. Place the next cake layer on top, press gently, and repeat. Once all layers are stacked, apply a thin crumb coat of frosting all over the cake. This traps any loose crumbs. Chill the cake for about 15-20 minutes, then apply your final, thicker layer of frosting. Now we’re getting somewhere!
Tips for the Perfect Layer Cake
Achieving a picture-perfect Strawberry Chocolate Layer Cake isn’t just about following the steps, it’s about understanding the nuances. Here are a few things I’ve picked up over the years that make all the difference, things I wish someone had told me when I was first starting out.
Always use room temperature ingredients for your cake batter and frosting. This ensures a smooth, fully blended batter and a uniform texture. That tracks with what I’ve seen in my teta’s kitchen, where everything was always left out on the counter. Also, measure your dry ingredients properly using the spoon-level method or, for best results, a kitchen scale. This prevents a dense cake from too much flour.
When it comes to the ganache drip, chill the frosted cake before adding it. This helps the ganache set quickly and prevents it from dripping all the way to the bottom, giving you that beautiful, controlled drip effect. Let the ganache set at room temperature for a bit before chilling the whole cake to prevent any cracking. Your hands know before your eyes do sometimes, so feel for that slight tackiness before moving it.
Don’t be afraid to shave off the domed tops of your cake layers with a serrated knife if they’re not perfectly flat. Even layers are key for a stable, professional-looking cake. This isn’t cheating, it’s smart baking. And if you’re adding fresh strawberries between layers, thinly slice them and pat them dry. Extra liquid from un-patted-dry strawberries can affect the frosting’s thickness and stability, and nobody wants a sliding cake.
Strawberry Chocolate Cake Variations
This Strawberry Chocolate Layer Cake recipe is incredibly versatile, and you can adapt it to fit different occasions or preferences. I mean, that’s the beauty of baking, isn’t it? It’s not just about following rules, it’s about making it your own.
If you’re hosting a smaller gathering, you could cut the recipe in half and make a **6-inch, three-layer cake**. You’ll bake it for a shorter time, probably around 20 to 25 minutes. For a larger crowd, use **8-inch round pans** (you’ll need three) and increase the bake time by about 5 to 10 minutes, as the layers will be taller. Or, for an easier serving option, make a **9×13-inch sheet cake**, increasing bake time by 5 to 10 minutes. This is great for a potluck dinner when you’re tired from holiday traffic, especially if you’re picking up your ingredients after a Trader Joe’s run.
You can also turn this into **cupcakes**! Fill paper liners with about a quarter cup of batter, making roughly 24 cupcakes. Bake for 20 to 25 minutes, then pipe frosting and drizzle ganache or add sprinkles. For a different fruit twist, substitute the strawberries for blackberries, blueberries, raspberries, or even cherries. I’m still working out the best approach for different fruit textures, but the principle is the same. For a gluten-free option, several readers have had perfect results using gluten-free baking flour like Cup4Cup or King Arthur’s GF flour. For dairy-free, use an alternative milk (with a tablespoon of lemon juice) and dairy-free butter for the frosting, just double check your chocolate ingredients for the ganache.
Troubleshooting Common Cake Issues
Baking can sometimes feel like a science experiment with unexpected results, and that’s okay! I once made kunafa for a potluck and didn’t drain the cheese enough. The whole thing was soggy, and I had to watch people politely take small pieces. I learned a lot from that. Here are some common issues you might run into with a Strawberry Chocolate Layer Cake and how to fix them.
Common Mistakes & Fixes
Mistake: Cake layers are dry and dense.
Solution: This usually happens from overmixing the batter or adding too much flour. Remember to whisk until just combined and measure flour by weight for best results.
Mistake: Frosting is too thin or runny.
Solution: Ensure butter and cream cheese are at room temperature, not melted. If using fresh strawberries in the frosting, make sure they are well-patted dry. You can add a little more powdered sugar, a tablespoon at a time, to thicken it.
Mistake: Ganache is cracking or not setting.
Solution: Ganache can crack if it’s chilled too quickly after being applied. Let it set at room temperature for a bit before refrigerating the cake. If it’s too thin, it might need more chocolate. If it’s too thick, gently warm it a little. This is where most recipes skip the detail, but it’s important.
Mistake: Cake layers are lopsided or domed.
Solution: Use cake strips around your pans for even baking. If you don’t have them, simply level off the domed tops with a serrated knife after the cakes are completely cool. It’s perfectly fine, and makes for a much more stable cake assembly.
Mistake: Filling makes the cake soggy.
Solution: Make sure your strawberry filling is completely cooled before assembling the cake. Also, a dam of frosting around the edge of each layer helps contain the filling and prevents it from seeping into the cake.
Storage & Freezing Instructions
So, you’ve made this incredible Strawberry Chocolate Layer Cake. Now, how do you keep it fresh? Because, honestly, sometimes you want to savor it over a few days, or maybe you’re making it ahead for a special occasion. That tracks with what I’ve seen with busy schedules.
For best results, store your assembled and frosted cake in the refrigerator. The fresh strawberries and cream cheese frosting mean it needs to stay chilled. Cover it gently with plastic wrap or a cake dome to prevent the frosting from getting marred or drying out. It’ll stay fresh for up to five days. When you’re ready to serve, I usually let it sit at room temperature for about 30 minutes to an hour. This ensures the cake layers are soft and the frosting isn’t too firm.
If you want to make components ahead, you absolutely can! Baked cake layers, once completely cooled, can be wrapped tightly in plastic wrap and kept at room temperature for two days, or frozen for up to a month. The strawberry buttercream can be stored in an airtight container in the fridge for three days, or frozen for a month. The chocolate ganache also keeps well in an airtight container in the fridge for a week, or frozen for a month. Just thaw it in the fridge and gently rewarm and whisk before using. You can freeze the entire uncut cake, too, without the fresh berry garnish, wrapped well for up to a month. Thaw it in the fridge overnight before decorating and serving. That’s a great make-ahead strategy for when you’re meal planning for busy December schedules, even if it’s spring now!
Common Questions About This Cake
And there you have it. When you present this masterpiece, this gorgeous Strawberry Chocolate Layer Cake, you’ll feel that incredible sense of pride and accomplishment. It’s not just a cake, it’s proof of what you can create with a little patience and the right guidance. I mean, who doesn’t love the feeling of mastering a seemingly complex baking challenge? I love the problem-solving aspect of baking, every failed batch is just data, and eventually the data tells you exactly what needs to change. Now, go ahead and grab those beautiful spring strawberries from Ralphs or your local Santa Monica Farmers Market, and get baking!
For more inspiration, check out my Pinterest boards. I share tons of variations there if you want more ideas.
Source: Nutritional Information
Can I freeze the assembled Strawberry Chocolate Layer Cake?
Yes, you can! Wrap the frosted cake tightly in plastic wrap, without the fresh berry garnish or ganache drip, and freeze for up to one month. Thaw it in the refrigerator overnight before adding the ganache and fresh strawberries. Individual slices also freeze well for 1-2 months.
Why is there coffee in the chocolate cake?
Coffee is a secret ingredient that truly enhances the chocolate flavor without making the cake taste like coffee itself. It deepens the cocoa notes, making the chocolate more intense and rich. It’s a trick I’ve found works beautifully in many chocolate desserts.
Do I have to use coffee in the strawberry chocolate layer cake?
No, you don’t have to use coffee if you prefer not to. You can easily substitute it with an equal amount of hot water. If you still want a bit of that depth, a teaspoon of espresso powder dissolved in hot water also works wonderfully.
Help! I’m out of buttermilk!
Don’t worry, it’s an easy fix! You can make your own buttermilk substitute by adding 1 tablespoon of apple cider vinegar to a liquid measuring cup, then filling the rest with milk until it reaches 1 cup. Let it sit for about five minutes until it slightly curdles.
Can I use frozen strawberries for this berry chocolate dessert cake?
For the filling and the frosting, yes, frozen strawberries work great. Thaw them first and pat them very dry to avoid adding excess moisture. However, for decorating the top of your fresh berry cocoa cake, I really recommend using fresh strawberries for the best appearance and texture.
Can I bake one large cake instead of two 9-inch pans and then slice it?
You could, but I’ve found it’s not ideal for this recipe. Baking one thick cake will significantly increase the baking time and might result in a less evenly baked cake, possibly dry edges or a sunken center. It’s better to stick with two pans for optimal results.
Can I make the chocolate sponge cake and frosting a couple days ahead of time?
Absolutely! The cake layers can be baked, cooled, wrapped tightly, and refrigerated for up to 3-5 days. The chocolate ganache and strawberry buttercream can be made and stored in airtight containers in the fridge for up to 3 days. This is a great make-ahead strategy.
Can you use different kinds of fruit for this layer cake recipe?
Yes, you can! This recipe is quite adaptable. Blackberries, raspberries, blueberries, or even cherries would work beautifully for the filling and as a garnish. Just remember to adjust sweetness levels if your chosen fruit is more tart or sweet than strawberries.
I have to make this rich chocolate strawberry layers cake the night before it will be auctioned off the next morning. Do I leave it out all night, or put it in the fridge?
Definitely refrigerate it! Because of the fresh strawberries and cream cheese frosting, it needs to be kept cold. Cover it loosely with plastic wrap or a cake dome. Take it out about an hour before serving to let it come to room temperature for the best texture.
I’d like to make this homemade layer cake next time with cherry pie filling in the middle. Do you think that would work?
That sounds like a fun swap! I haven’t personally tried it, but I think it would work well. Just make sure to use a good quality, thicker cherry pie filling so it doesn’t make your cake layers too soggy. A frosting dam around the edge is still a good idea.
Best chocolate cake recipe ever! Can you swap for gluten free flour?
I’m so glad you love it! Yes, many readers have had fantastic results using a 1:1 gluten-free baking flour blend, such as Cup4Cup or King Arthur’s Measure for Measure. It’s often a straightforward swap, but watch for the dough will tell you when it’s ready, as baking times might vary slightly.
How do I adjust the baking time and temperature using a different size cake pan for this special occasion cake?
For a 9×13-inch sheet cake, increase baking time by 5-10 minutes. For an 8-inch round cake (3 pans), increase bake time by 5-10 minutes. Baking temperature usually stays the same at 350°F. Always use a toothpick test for doneness.
Can I use all-purpose flour instead of cake flour in this moist chocolate cake?
This recipe calls for all-purpose flour, so you’re already set! Cake flour has a lower protein content and would result in a slightly different, more tender crumb. For this particular Strawberry Chocolate Layer Cake, all-purpose flour gives it a great texture and stability.
What brand of cocoa powder do you recommend for the fresh berry cocoa cake?
I highly recommend using a good quality Dutch-processed cocoa powder. Ghirardelli, Hershey’s Special Dark, or Droste are all excellent choices that will give you that deep, rich chocolate flavor and beautiful dark color in your chocolate sponge cake.
How long should I let the cake cool before frosting it?
This is crucial: your cake layers must be completely cool before you even think about frosting them. Warm cake will melt your frosting, leading to a runny mess. Give them at least 1-2 hours at room temperature, or even pop them in the fridge for 30 minutes to speed things up.
Should I refrigerate the Strawberry Chocolate Layer Cake, or can it be stored at room temperature?
Due to the fresh strawberries and cream cheese frosting, this Strawberry Chocolate Layer Cake needs to be refrigerated. Store it in an airtight container or under a cake dome. It will keep well in the fridge for up to 5 days, ensuring everything stays fresh and delicious.