


Mild Kimchi Recipe for a Gentle Flavor
Ingredients
Method
- Cut the cabbage into half then quadrants. Sprinkle the salt directly on the white part of the cabbage and pour the pickling brine onto the cabbage. Place a heavy object (e.g. a large salad bowl full of water) onto the cabbage to stop the cabbage floating and to help with the pickling process. Leave it at room temperature until the white part of the cabbage is flexible (for about 1 hour 30 mins). During this time turn the cabbage over a few times to change the position (e.g. every 30 mins). Rinse the cabbage a few times in running water. Rinse off any residue salt. Drain and place on a strainer to drain off the water for 10 to 20 mins.
- Prepare kimchi fillings during step 1 per instruction above (ingredients section). Also, prepare the kimchi brine. Mix the water and salt in a large bowl. Puree Korean pear, apple, onion, garlic and ginger in a blender. Place the blended ingredients into the strainer / cheese cloth and clip the top so that the food content doesn’t come out. Put it into the bowl (salty water from earlier) and soak the strainer / cheese cloth. Squeeze out all the juice from the strainer / cloth to dissolve into the water.
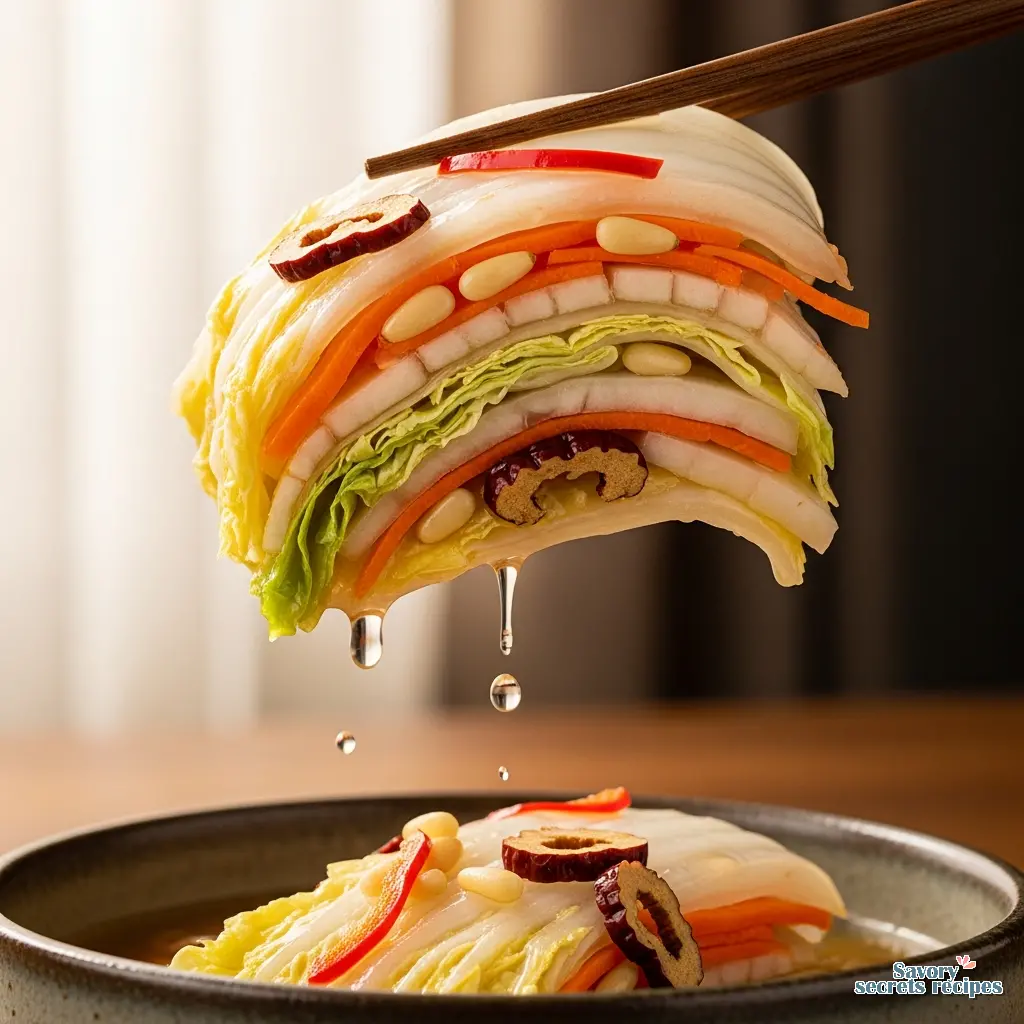
- Place the pickled cabbage (from step 1) onto a clean board. Starting from the bottom leaves, fill the cabbage with kimchi fillings, evenly, one layer of cabbage at a time. Once done, place the kimchi into a large container, facing down. (I used a 5L container for this recipe.) Repeat this step with the remaining ingredients.
- Pour the Kimchi brine (from step 2) into the kimchi container. Place a heavy stone or a plate on top to stop the kimchi floating and submerge the kimchi well in the brine. Close the lid. Leave at room temperature for 12 hrs (in summer) / 24 hrs (in winter) then transfer it to the fridge.
- You can start serving the kimchi from about day 3. Though it tastes better as it ages (from about day 7) but before it turns too sour. Cut the kimchi as you need before serving. (I normally cut one whole quadrant slice at a time.) Serve the sliced kimchi on a plate and add a few scoops of the kimchi brine on top of the kimchi.
Nutrition
Notes
Why You Need Mild Kimchi in Your Refrigerator
Let’s be clear about this. I love bold flavors. But there was a moment last winter, standing in the aisle of a Korean grocery store in Los Angeles, when I realized that not every meal needs to be a endurance test. I had just recovered from a bout of flu, and my usual spicy kimchi felt like an assault rather than a comfort. I wanted the probiotic crunch. I wanted the funk. But I didn’t want the fire. That is where mild kimchi enters the conversation. If you have ever hesitated to make your own fermented vegetables because you are worried about the heat level or the complexity, this is your entry point. It is essentially the sourdough starter of the vegetable world. It is alive, it evolves, and once you understand the variables, you control the outcome. My grandmother Zoya taught me that cooking isn’t magic, it is math you can eat. Fermentation is the same. It is biology you can taste. This recipe for mild kimchi gives you that satisfying, effervescent crunch and the gut-healthy benefits of traditional kimchi without the aggressive spice that scares off children or sensitive palates. We are trading the heavy hand of gochugaru (chili flakes) for the subtle sweetness of Korean pear and the vibrant color of red bell peppers. It is precise, it is manageable, and frankly, it is delicious.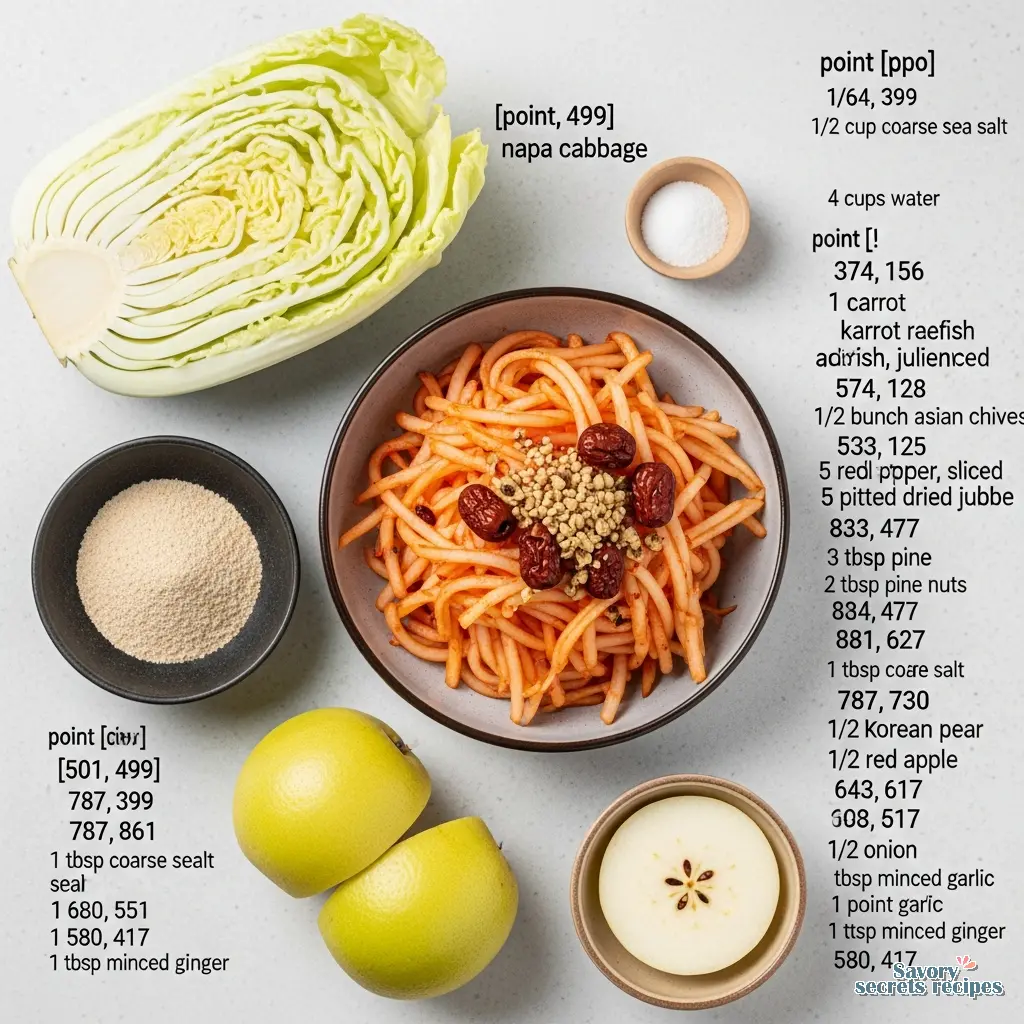
The Science: Why This Actually Works
You might be thinking, “Elena, if I take out the chili, is it still kimchi?” The answer is yes. The soul of kimchi isn’t the spice. It is the fermentation. When we make mild kimchi, we are relying on *Lactobacillus* bacteria. These friendly microbes are naturally present on the surface of the napa cabbage. By submerging the cabbage in a brine (salt water), we create an anaerobic environment where bad bacteria cannot survive, but *Lactobacillus* thrives. As they eat the sugars from the apple, pear, and vegetables, they produce lactic acid. This acid preserves the cabbage and gives it that signature tangy flavor. Temperature matters here. If your kitchen is too hot (above 75°F), the fermentation rushes, the texture gets mushy, and the flavor becomes overly sour too quickly. If it is too cold (below 55°F), the bacteria go dormant. The sweet spot is between 60°F and 65°F. It is just like proving dough. You have to watch the environment, not just the clock. Also, we use a “porridge” or slurry made from glutinous rice powder (or sometimes cooked white rice blended up) to thicken the brine. This helps the seasoning cling to the leaves. In spicy kimchi, it holds the chili paste. In our mild version, it helps distribute the garlic, ginger, and fruit flavors evenly so every bite is balanced.Step-by-Step: Managing the Salting Process
The most critical step in any kimchi recipe is salting the cabbage. This is where most beginners fail. I need you to show me your process here because if you get this wrong, no amount of seasoning will fix it. 1. **The Cut:** Cut the cabbage lengthwise into quarters. Do not chop it yet. Keeping the leaves attached to the core helps keep things organized during the salting phase. 2. **The Brine:** Dissolve your coarse sea salt in water. Dip the cabbage quarters in this water to wet them. 3. **The Sprinkle:** Lift a leaf, sprinkle salt near the thick white stem. Lift the next leaf, repeat. We focus on the stems because they are thick and water-heavy. The leafy greens need almost no direct salt as they will wilt instantly from the brine contact alone. 4. **The Wait:** Let it sit. But don’t just walk away for four hours. Every 30 minutes, rotate the cabbage pieces from bottom to top. This ensures even brining. You are looking for a specific texture. The cabbage stem should bend without snapping. If it snaps, it is not ready. If it feels like a wet rag, you have gone too far. It is similar to the windowpane test in bread making. Your hands will know when it is right.Flavoring Without the Fire
Since we are skipping the heavy gochugaru, we need to build flavor differently. We cannot just have salty cabbage. That is boring. * **Fruit is Key:** I use Korean pear and red apple. They provide the sugars that feed the fermentation and balance the saltiness. If you cannot find Korean pear (the large, round, brown ones), a Bosc pear works as a substitute. * **Aromatics:** Garlic and ginger are non-negotiable. They provide the “heat” that isn’t spicy but warming. * **Visuals:** We eat with our eyes. Traditional kimchi is red. To mimic that without the burn, I like to use red bell pepper blended into the brine or sliced thinly. It gives a beautiful color and a fresh, vegetal sweetness. * **Texture Add-ins:** Pine nuts are a traditional addition in royal court cuisine. They add a subtle richness. Dried jujubes (dates) add a deep, molasses-like sweetness that is very sophisticated.
Fermentation: The Waiting Game
This is the part that makes people nervous. I get emails all the time asking, “Is it rotting or fermenting?” Here is how you tell the difference. Pack your kimchi into a glass jar. Press it down firmly. You want to eliminate air pockets. Air is the enemy here. Leave about an inch or two of headspace at the top because as it ferments, it will bubble and rise. If you fill it to the brim, you will have a mess on your counter. Trust me, I learned this the hard way with a batch of beets that exploded purple juice all over my white cabinets. **Day 1:** It just looks like wet vegetables. **Day 2:** You might see small bubbles rising to the top. This is good. It means the bacteria are waking up. **Day 3:** Open the jar. Do you hear a faint hiss? Do you smell something sour and tangy? That is success. If you see white film on top, don’t panic. It is often just Kahm yeast. It is harmless but tastes bad. Scrape it off. However, if you see fuzzy mold (green, black, or pink), throw it out. It breaks my heart to waste food, but safety comes first.Common Mistakes & Troubleshooting
Mistake → Solution
Mistake: The kimchi is too salty.
Solution: You likely didn’t rinse the cabbage enough after the salting stage. Rinse it three times in cold water. If it is already fermented and salty, add sliced radish or more pear to absorb the salt.
Mistake: The cabbage is mushy.
Solution: It fermented at too high a temperature. Next time, find a cooler spot or move it to the fridge sooner. Also, ensure your salt concentration was high enough during the initial brine.
Mistake: It isn’t fermenting.
Solution: Your kitchen might be too cold. Move the jar to a warmer spot, like on top of the fridge (not inside) or inside the oven (turned off!) with the light on for a few hours.
Serving & Storage
Once your mild kimchi tastes right to you usually after 2 to 3 days at room temperature put it in the refrigerator. This slows down the fermentation but doesn’t stop it. It will continue to get more sour over time. I store mine in glass jars. Plastic containers will absorb the smell and stain, and you will never get that garlic odor out. **Serving Ideas:** * **The Classic:** Serve it as a side dish (banchan) with grilled meat or tofu. * **The Kid-Friendly:** Chop it up and mix it into fried rice. The heat of the pan mellows the flavor even more. * **The Breakfast:** It is incredible with eggs. Try it in an omelet or just on the side of scrambled eggs. * **The Snack:** I honestly just eat it straight from the jar while standing in front of the open fridge. Don’t judge me.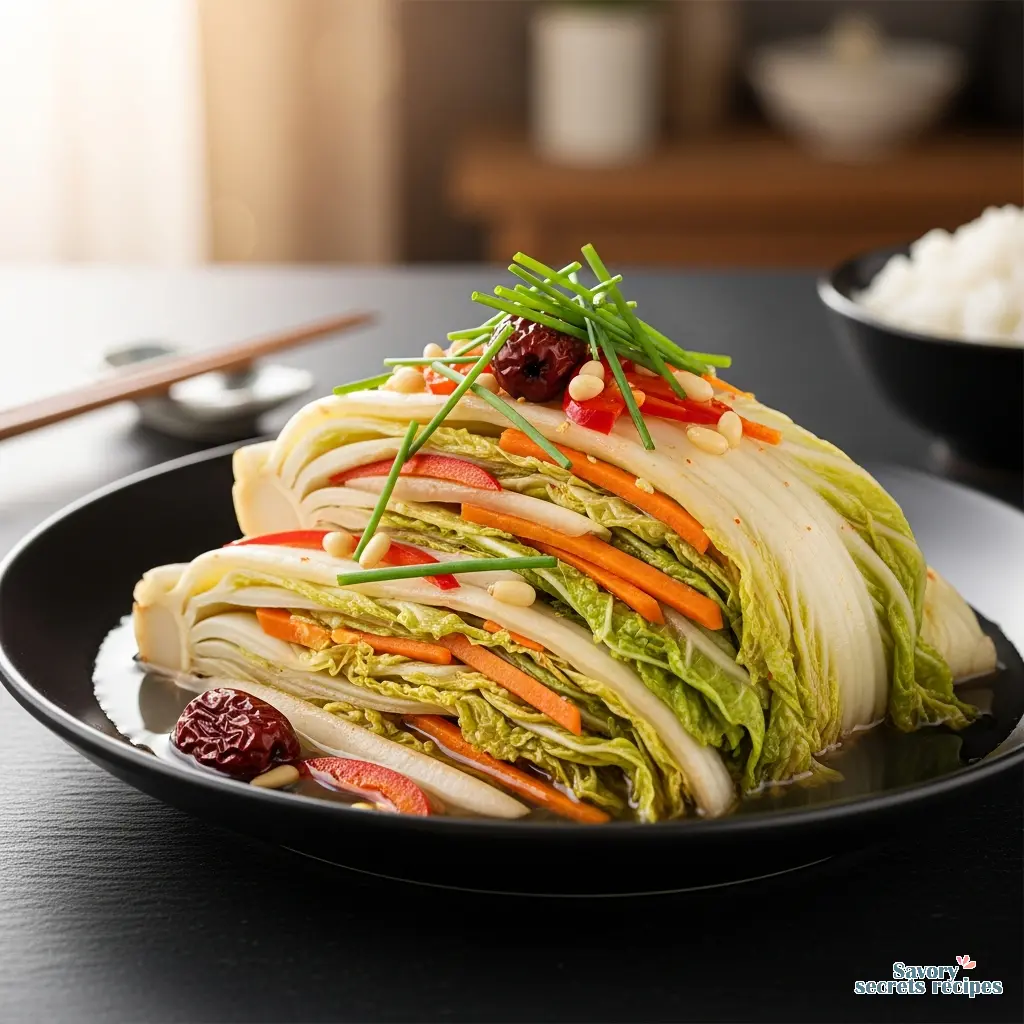
Frequently Asked Questions
When your mild kimchi is finally ready, and you hear that satisfying crunch on the first bite, you will understand why I insist on making this. It is a staple that brings life to simple bowls of rice and eggs. It is healthy, it is vibrant, and best of all, you made it yourself. I share tons of variations on Pinterest if you want ideas for what to do with your leftovers. You’ve just mastered a kitchen staple that has been nourishing families for centuries. Now, go check your jar.
Reference: Original Source
What is mild kimchi and how does it differ from traditional spicy versions?
Mild kimchi, often called Baek Kimchi (white kimchi) or simply a non-spicy variation, skips the generous amount of hot chili flakes (gochugaru) found in traditional recipes. Instead, it relies on fruit like pears, aromatics like garlic and ginger, and salt to create a flavorful, tangy profile without the heat.
How can I make an easy mild kimchi recipe that still tastes authentic?
Authenticity comes from the fermentation process, not just the spice. Use traditional ingredients like napa cabbage, Korean radish, garlic, ginger, and fish sauce (or a vegan alternative). Focus on the salting technique to get the texture right. The sour, funky taste of fermentation is the true authentic flavor marker.
What are the main ingredients used to flavor non-spicy Baek Kimchi?
We use a blend of savory and sweet. Garlic, ginger, and onions provide the savory base. For sweetness and balance, we add Korean pear, apple, and sometimes jujubes (dates). Red bell pepper or thin chili threads can be used for color without adding significant heat.
How long does homemade mild kimchi stay fresh in the refrigerator?
It can last for months, but the flavor profile changes. For the first 2 to 4 weeks, it is crisp and mildly sour. After a month, it becomes much more sour and softer. I prefer to eat it within the first 6 weeks for the best texture, but it is safe to eat much longer if stored properly.
Is this mild kimchi recipe suitable for children or people with a low spice tolerance?
Absolutely. This is the perfect introduction to fermented foods for kids. It has zero spicy heat if you omit the chili threads entirely. It is crunchy, slightly sweet from the fruit, and tangy like a pickle. My daughter calls it “crunchy salad” and eats it by the bowlful.
Can I use regular chili flakes if I don’t have Gochugaru?
Please don’t. Regular red pepper flakes (like for pizza) are mostly seeds and skin, which are bitter and too hot. Gochugaru has a specific sweet, smoky, and fruity flavor profile that defines kimchi. If you want a mild red version, just use a tiny amount of real Gochugaru or stick to paprika/bell pepper for color.


