Simple Yeolmu Kimchi Young Radish Recipe
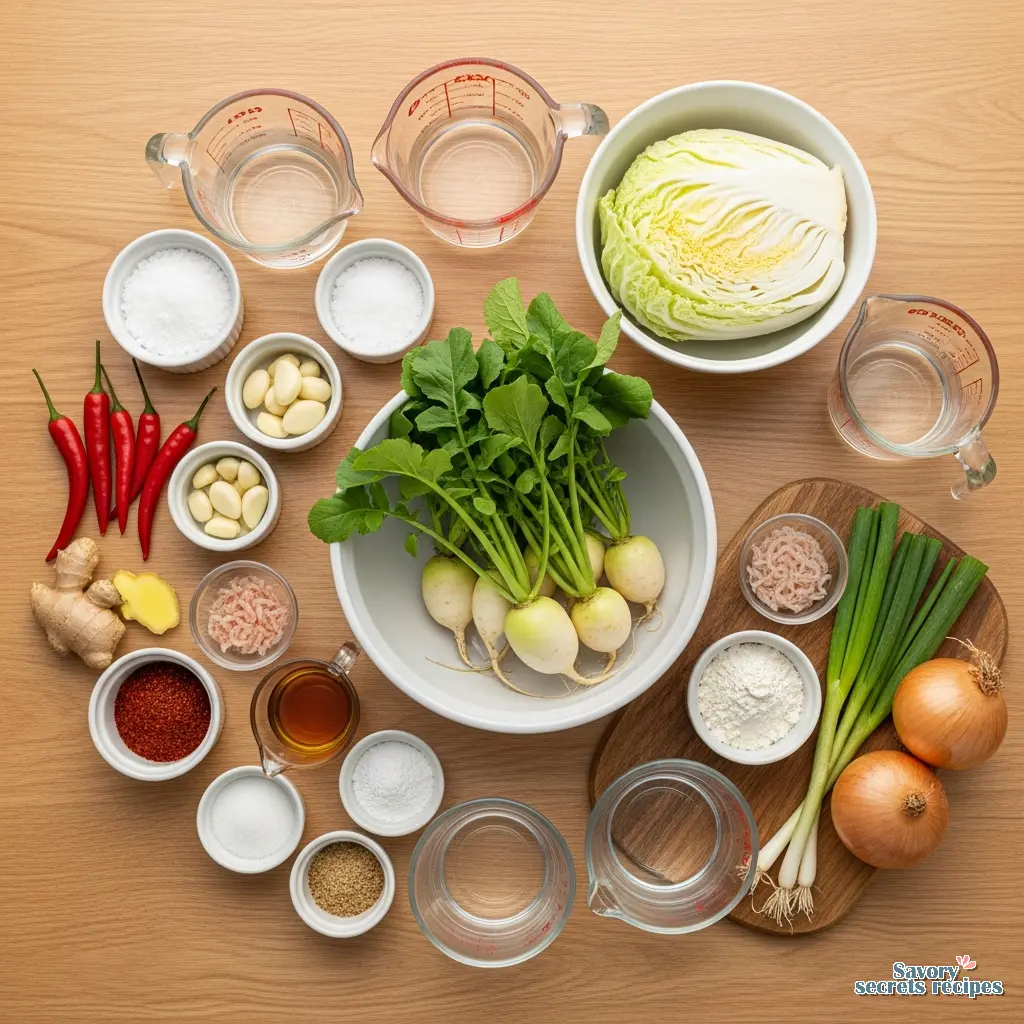
Ingredients
Method
- Trim the root ends of the radishes, scraping away any impurities with a small knife. Remove any damaged stems and cut the greens into 3-inch pieces, then transfer them to a large bowl.
- Trim the roots from the young cabbages. Cut the cabbages into 3-inch pieces and place them in a separate large bowl.
- Submerge the radish greens in water and let them soak for 10 minutes to loosen dirt. Gently agitate the greens by hand, rinse several times, and drain. Repeat this cleaning process for the young cabbages.
- Dissolve 6 tablespoons of salt in 4 cups of water. Layer the radish greens back into the large bowl, sprinkling each layer with the salt water until all greens are used. For the young cabbages, repeat the process in a separate bowl using 3 tablespoons of salt dissolved in 2 cups of water.
- Let the vegetables sit for 40 to 60 minutes until they become slightly flexible, flipping them once or twice during the salting period.
- Whisk the flour and water together, then boil over medium heat while stirring to create a smooth paste. Set aside to cool.
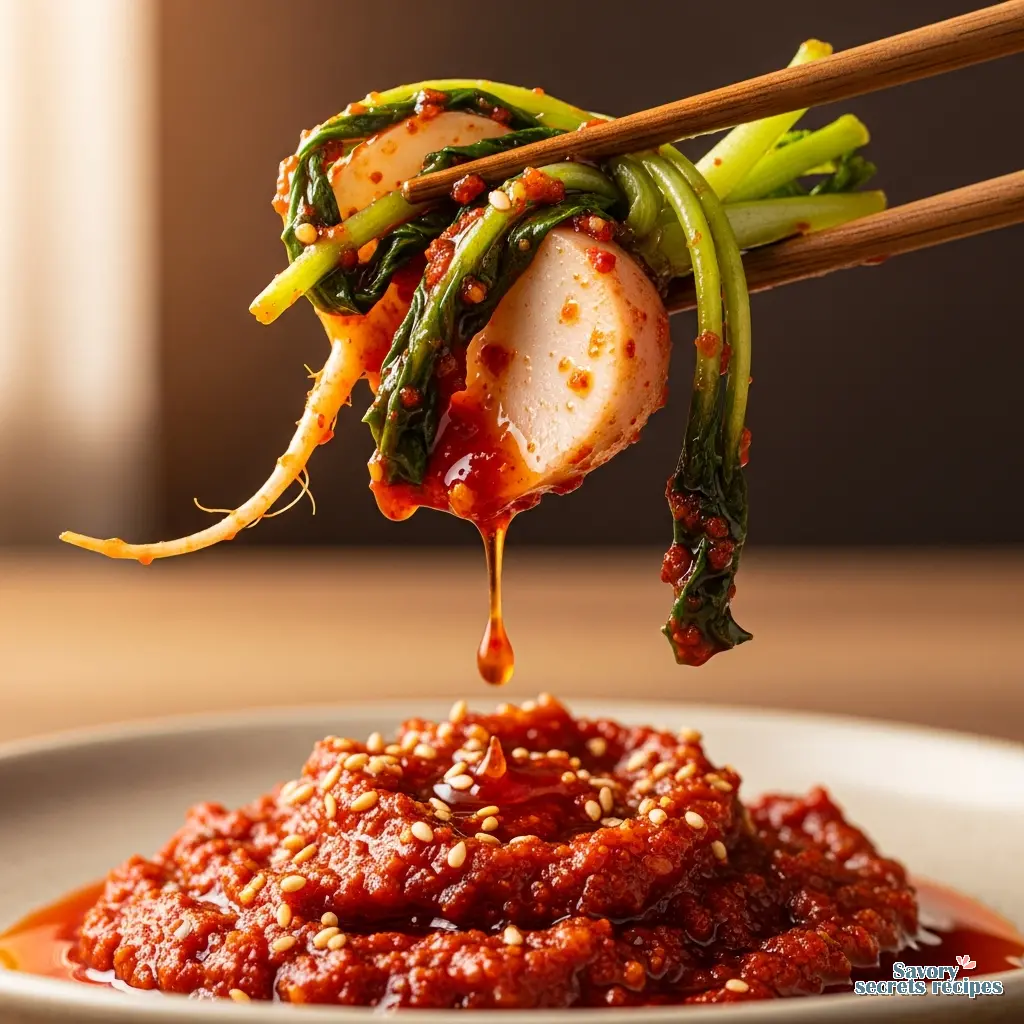
- Coarsely blend the chili peppers, garlic, ginger, and saewujeot with 1/2 cup of water. Combine this mixture with the fish sauce, gochugaru, sugar, and the cooled flour paste.
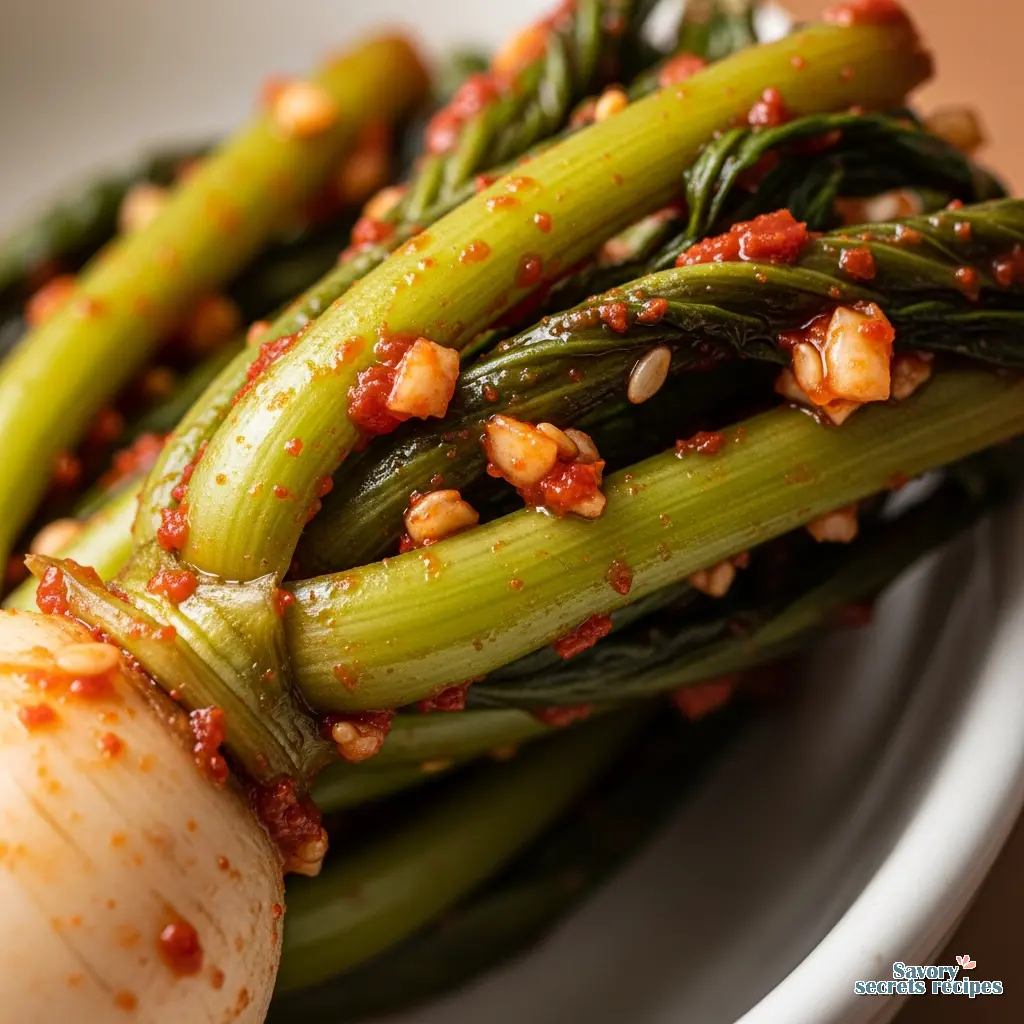
- Gently rinse the salted radish greens and cabbages separately in cold water and drain thoroughly.
- Layer the radish greens and cabbages in the large bowl in several batches, adding seasoning mix to each layer. Add the scallions and onions, then toss gently by hand until everything is evenly coated.
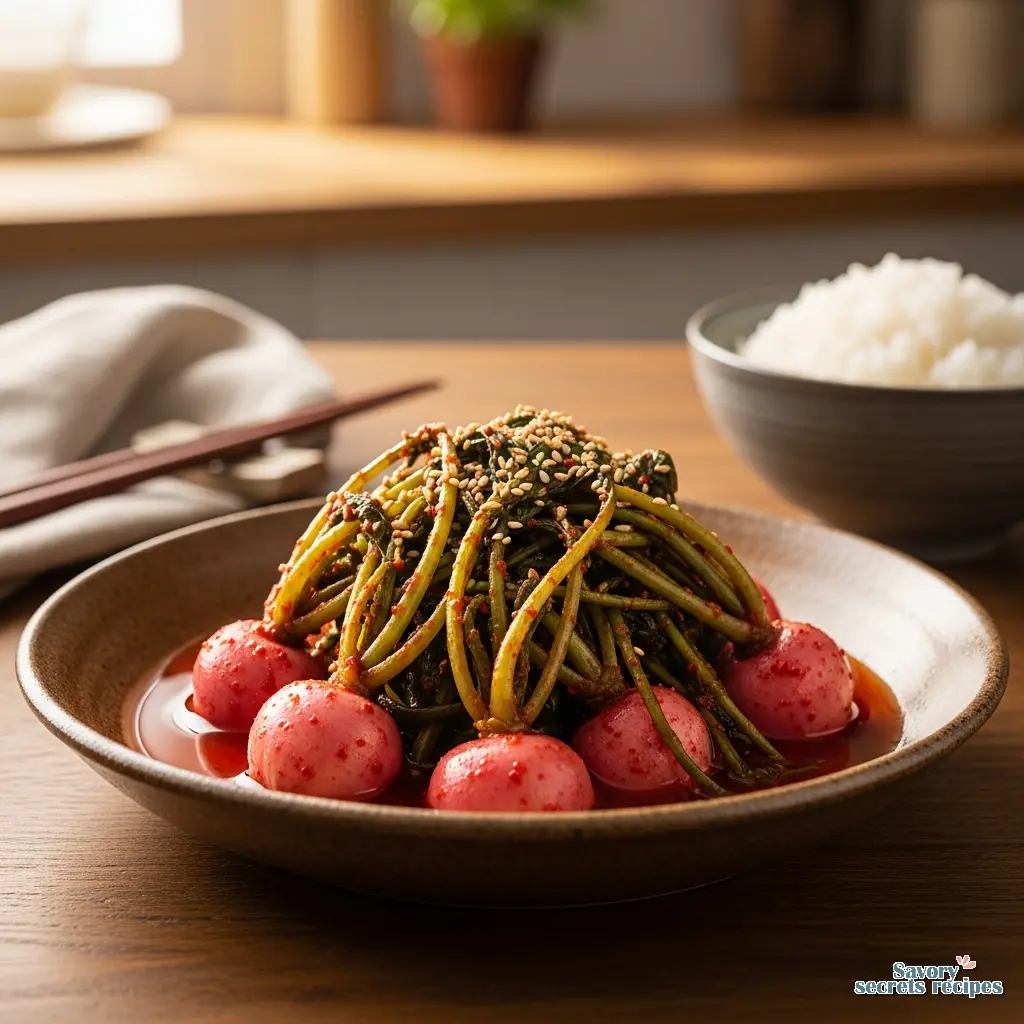
- Transfer the kimchi to a 1-gallon airtight container. Leave it at room temperature for several hours before refrigerating. Allow the flavors to develop in the fridge for a few days for the best results.
Notes
The Science (and Soul) of Summer Fermentation
I still remember the specific sound of my nani’s kitchen in Chandigarh during the summer. It wasn’t just the clatter of steel thalis. It was the silence of fermentation jars sitting on the terrace, doing their invisible work. She never used a timer. She would just tap the jar, listen to the dull thud, and somehow know the mangoes were ready. That tracks with what I’ve seen in the lab years later: fermentation is biological, not mechanical. It refuses to run on a clock. While waiting for the jars to ferment, I often prepare a simple gochugaru cucumber salad for a quick, spicy side dish.
When I moved to Edison, I tried to replicate those flavors. But let’s be honest, finding green mangoes in New Jersey in February is a challenge. That is when I discovered baby radish kimchi, or yeolmu kimchi. It hits that same biological crave point. It is crunchy, cooling, and deeply probiotic. And unlike the heavy, winter cabbage kimchi that takes months to mature, this young radish kimchi is ready in days. It is the perfect entry point if you are intimidated by fermentation. If you enjoy these refreshing flavors, you should also try making cucumber kimchi as another great summer side dish. Alternatively, a simple korean pickled cucumber recipe is a great non-fermented option for beginners.
I know the price of store-bought kimchi has skyrocketed lately. I saw a small jar for nine dollars at the market last week, which is objectively wild for what is essentially salted vegetables and time. Making it at home is not just cheaper. It is a way to control the microbiome of your food. You are cultivating Lactobacillus bacteria right on your counter. This recipe is my “n of 1” experiment that has become a staple. It is scientifically sound, forgiving, and honestly, it tastes better than anything in a plastic tub.
The Raw Material: Selecting Your Yeolmu
In practical terms, the success of your baby radish kimchi depends almost entirely on the radish you buy. You are looking for “yeolmu” (young summer radish). These are not the fully grown, thick daikon radishes you might use for kkakdugi. These are slender, leafy, and tender.
When I’m at the Asian market, I look for greens that are vibrant and stems that look thin. If the radish root itself is thick and tough, walk away. I’d want to see roots that are barely the size of a pinky finger. The leaves should not be yellowing. Yellow leaves indicate the plant is stressed or old, which means the cell walls are breaking down, leading to a mushy final product. We want turgidity. We want crunch.
The Chemistry of “Putnae” (And How to Avoid It)
Here is where the science gets interesting. If you have ever made baby radish kimchi that tasted weirdly grassy or like raw chlorophyll, you fell victim to “putnae.” This happens when the leaves are bruised. When you crush the plant cells, you release enzymes (specifically polyphenol oxidase and peroxidase) that react with oxygen and create off-flavors. It is the same mechanism that turns an apple brown, but flavor-wise.
My nani taught me to handle herbs gently, “like a sleeping baby,” she’d say. She was right. When you wash the yeolmu, do not scrub it. Do not squeeze it. Gently swish it in the water. I treat this step like I’m handling a volatile chemical sample in the lab. Gentle agitation only. If you bruise the greens, there is no fixing it. The grassy taste will persist through fermentation.
Salting Science: Osmosis in Action
Salting is not just about seasoning. It is about osmosis. We are using salt to draw moisture out of the plant cells to create a crunchy texture. For this baby radish kimchi, I use a wet brine method rather than just dry sprinkling. Why? Because the leaves are so delicate, dry salt can burn them or draw moisture too unevenly.
Dissolve your coarse sea salt in water. Please use Korean coarse sea salt if you can find it. The grain size affects the dissolution rate. Fine table salt dissolves instantly and penetrates too fast, making the radish salty on the outside and raw on the inside. Coarse salt gives you a controlled diffusion. I usually let it sit for about an hour or two. You’ll know it’s ready when the stems bend without snapping. That flexibility is your data point. It means the turgor pressure in the cells has dropped sufficiently.
The Microbial Fuel: Why You Need Porridge
You might see “flour porridge” or “glutinous rice paste” in the recipe and think, “Can I skip this?” In practical terms, no. This paste, or “pul,” isn’t just a thickener. It is a carbohydrate source for the bacteria. We are trying to cultivate Lactobacillus, and they need fuel to kickstart fermentation, especially in the early stages before the vegetable sugars fully break down.
I make a quick slurry with water and flour (or sweet rice flour if you are gluten-free). Simmer it until it bubbles. It should look like thin glue. This starch provides the readily available energy the bacteria need to multiply rapidly. This rapid multiplication is crucial because it lowers the pH quickly, preventing bad bacteria from taking hold. It is basically a starter culture booster.
Fermentation Timeline: What to Expect
This is where my daughter usually loses interest, but where I get excited. Fermentation is a living process. When you first mix everything, it will taste raw. The flavors haven’t melded. The magic happens over the next 24 to 48 hours.
Leave the jar on the counter. I usually put it in a dark corner away from direct sunlight. In the summer (or a warm LA kitchen), fermentation happens fast. Within 12 hours, you might see small bubbles rising to the surface. This is CO2, a byproduct of the bacteria consuming the sugars. It is a good sign. It means your culture is alive.
I usually taste it after 24 hours. It should have a slight tang, a bit like yogurt. If it tastes just salty and spicy, let it sit longer. Once it hits that sour note pH dropping below 4.6 roughly move it to the fridge. The cold slows down the bacteria but doesn’t stop them. The flavor will deepen over the next week. It’s not unlike aging cheese, just much faster.
Troubleshooting: When Good Fermentation Goes Sideways
Even with good data, things can go wrong. I’ve had batches fail. It happens.
Problem: It’s too salty.
This usually means the initial brining was too aggressive or you didn’t rinse enough. To fix it, add sliced Korean radish (mu) or even more raw yeolmu if you have it. The fresh vegetables will absorb the excess salt. You can also add a bit more water to the brine, though this dilutes the flavor.
Problem: It’s bitter.
Bitterness often comes from the radish itself (summer radishes can be pungent) or from handling the greens too roughly (putnae). If it is the radish, the bitterness usually mellows out as it ferments and acid levels rise. Give it time. If it’s from bruising, there isn’t much you can do to remove the flavor, but you can mask it by letting the kimchi get very sour and using it in stews.
Problem: It’s mushy.
This is usually temperature related. If it fermented too hot and too fast, the enzymes break down the pectin in the cell walls too quickly. Next time, use a bit more salt or ferment at a cooler temperature. Mushy kimchi is not great for eating fresh, but it is totally fine for blending into sauces or stews. You can also use older, sour batches to make a delicious kimchi pancake using a traditional jeon recipe.
Frequently Asked Questions
Storage & Serving Strategy
Once your baby radish kimchi has fermented to your liking, move it to the fridge. The cold temperature slows down the bacterial activity, preserving that perfect balance of sour and spicy. I keep mine in glass jars. Plastic tends to absorb the smell and stain red forever. Trust me, you don’t want your Tupperware permanently smelling like garlic.
Serving this is the best part. In the summer, my favorite way to eat this is Yeolmu Bibimbap. I take a big bowl of barley rice, top it with a generous amount of the kimchi, a drizzle of sesame oil, and a fried egg. The acidity of the kimchi cuts right through the richness of the yolk. It is simple, nutritionally balanced, and incredibly satisfying. You can also serve it as a side dish (banchan) to fatty pork or grilled meats. The digestive enzymes in the fermentation help break down heavy meals. If you have leftovers that have become quite sour, learning how to make kimchi bokkeumbap is the perfect way to use them up.
When you make this, you’ll realize that fermentation isn’t magic. It’s just biology that tastes good. I’d love to hear how your batch turns out especially if you managed to avoid the dreaded “putnae.” Let me know in the comments.
For more inspiration, check out my Pinterest boards where I pin all my fermentation experiments.
Reference: Original Source
Can I make baby radish kimchi without fish sauce?
Yes, you can. In practical terms, you just need to replace the sodium and umami. I use soy sauce or soup soy sauce (guk-ganjang) as a substitute. The flavor profile will be cleaner and less funky, but still delicious. Just ensure you check the salt levels since fish sauce is quite salty.
Why is my baby radish kimchi bitter?
The evidence here usually points to two things: either the summer radishes themselves were harvested late and are naturally bitter, or the greens were bruised during washing. If it’s the radish, the bitterness often fades as fermentation acidity increases. Give it a few more days in the fridge.
How long does baby radish kimchi last?
Technically, it can last for months because of the low pH. However, yeolmu is a soft vegetable. I find the texture is best within the first 3 to 4 weeks. After that, it gets a bit soft and very sour. That’s when I use it for cooking rather than eating raw.
Can I use flour instead of rice flour for the porridge?
Absolutely. The bacteria aren’t picky about the carbohydrate source; they just need simple starches to consume. I’ve used all-purpose wheat flour, sweet rice flour, and even cooked potato blended with water. They all work to kickstart the lacto-fermentation process effectively.
Do I really need to leave it out on the counter?
If you want fermentation to start, yes. The Lactobacillus bacteria are most active between 65°F and 75°F. Putting it straight into the fridge will slow the process dramatically, and it might take weeks to develop the right flavor. I recommend 1 to 2 days at room temp first.
What is the difference between yeolmu and regular radish?
Yeolmu is young summer radish harvested early for its tender greens, whereas regular Korean radish (mu) is harvested for its large, thick root. Yeolmu kimchi focuses on the leafy stems. The texture is crunchier and more fibrous compared to the dense crunch of a mature radish root.