Hobo Casserole Easy Meals With Ground Beef
Ingredients
Method
- Preheat the oven to 375°F (190°C) and grease a 9x13-inch baking dish with cooking spray or olive oil.
- Heat olive oil in a large skillet over medium heat. Add ground beef and cook for 5-7 minutes, breaking it apart with a spoon, until browned and cooked through. Drain any excess fat if needed.
- Add chopped onion and minced garlic to the skillet. Cook for 3-4 minutes until the onion is soft and translucent.
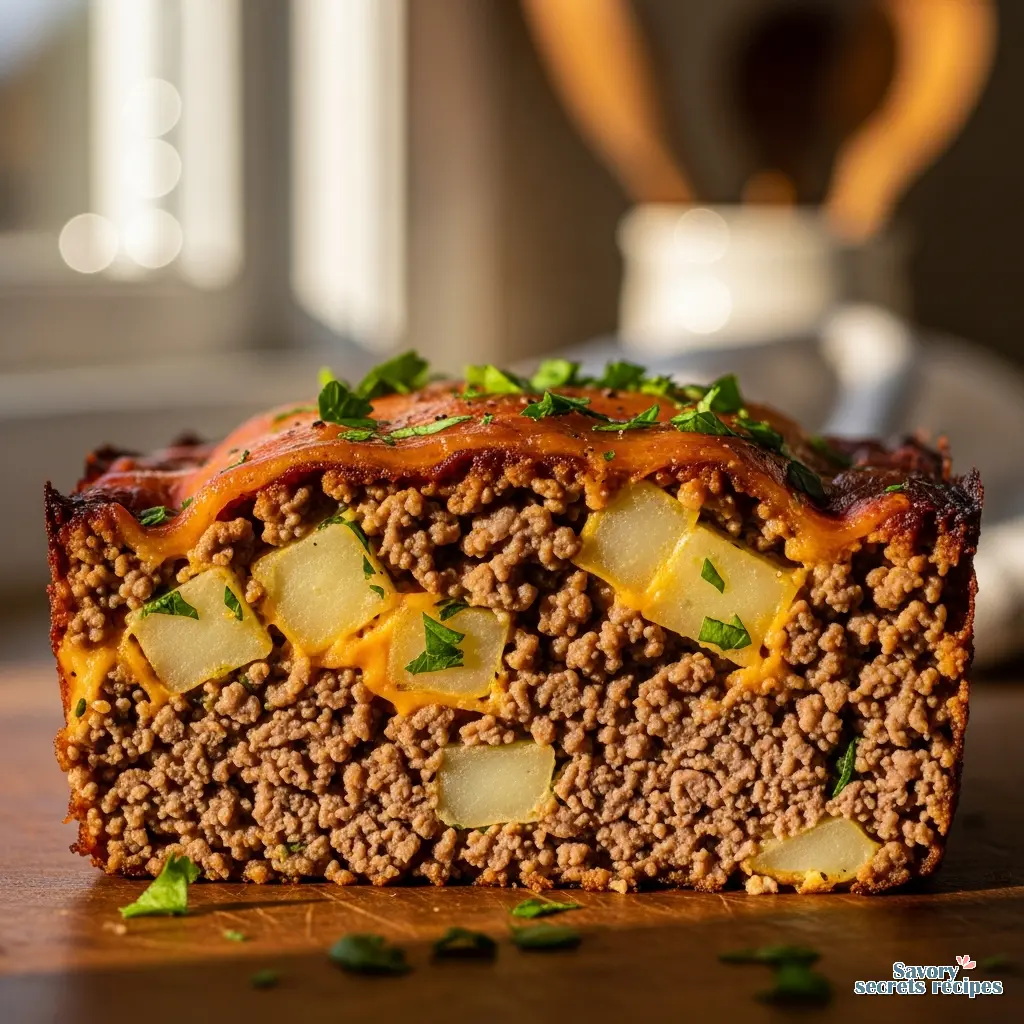
- Spread the ground beef mixture evenly in the bottom of the prepared baking dish. Layer thinly sliced potatoes on top and season with salt, pepper, Italian seasoning, and paprika.
- Sprinkle shredded cheddar and grated Parmesan over the beef. Pour beef broth or water around the edges of the casserole and drizzle with milk for extra creaminess, if desired.
- Cover the casserole with aluminum foil and bake for 30 minutes. Remove the foil and bake for an additional 15-20 minutes until the potatoes are tender and the cheese is bubbly and golden.
- Garnish with fresh parsley, if desired, and serve hot.
Notes
The 5 PM Light and the Empty Fridge
I remember my grandmother Elaine standing in her Pasadena kitchen, staring at a pound of ground beef like it was an unexposed roll of film. She’d say, “Maya, it’s not about what you have. It’s about how you frame it.” She was talking about dinner, but she was teaching me composition. That’s usually where I find myself on a Tuesday at 5:30 PM. The light is fading, Dash is waiting for his walk, and I need a clean read on dinner before the chaos sets in. Ground beef recipes are the unsung heroes of the freezer. They are the high-contrast, reliable shots that save the portfolio.
There is a panic that sets in when you realize you have hungry people and zero plans. I get it. The takeout apps are tempting, but the delivery fees are basically robbery at this point. This isn’t just about saving money, though. It’s about that sensory shift from “stressed” to “handled.” When you hear that sizzle hit the cast iron skillet, the mood in the kitchen changes. It goes from muddy and confused to a sharp, focused image. We’re going to build a meal that looks like you planned it all along, even if you just pulled the meat from the freezer twenty minutes ago.
The Palette: Understanding Your Medium
In photography, if your exposure is off, the whole image falls apart. In cooking ground beef recipes, your fat ratio is your exposure setting. You can’t just grab any package and expect the same result. It depends on your light. Or rather, your end goal.
80/20 Lean Beef (The High Contrast Choice)
This is my go-to. It has enough fat to keep things moist during a hard sear. If you are making burgers, meatloaf, or anything where the beef stands alone, you need this fat. It renders out, creating that incredible Maillard reaction the browning that equals flavor. Without it, your image is flat. Tasteless.
90/10 or Leaner (The Soft Focus Choice)
Use this when you are building heavy layers. If you’re adding a rich cream sauce, lots of cheese, or dumping it into a slow cooker beef recipe where the grease has nowhere to go, lean is better. Otherwise, your final dish looks greasy. Too muddy. You want the flavor, not the oil slick.
The Science of Browning (Don’t Crowd the Frame)
I see this mistake constantly. It’s like trying to fit twenty people into a portrait meant for five. When you throw a pound of cold meat into a lukewarm pan, you don’t get browning. You get steaming. The meat turns this sad, pale grey color. Visually unappealing. Flavor-wise? Boring.
To get that deep, umami flavor, you need space. I use a large Dutch oven or my widest skillet. Let the pan get hot. I mean, properly hot. When the meat hits, it should sound aggressive. Don’t touch it immediately. Let it sit. Let the crust form. Elaine used to smack my hand if I poked the meat too early. “Let it develop,” she’d say. She was right. That brown crust is where all the flavor lives. If you crowd the pan, the moisture releases and pools, boiling the meat instead of searing it. Pull back a bit. Cook in batches if you have to. It’s worth the extra four minutes.
Global Flavor Variations
Ground beef is a blank canvas. You can style it a dozen different ways depending on what pantry staples you have on hand. It’s all about the color story you want to tell.
The Korean-Style Edit
I love this for a quick dinner idea. It’s all about high contrast. Brown the beef hard. Then add soy sauce (or coconut aminos), sesame oil, lots of garlic, and a hit of brown sugar. The sugar caramelizes and makes the meat glossy and dark. Beautiful. Serve it over rice with quick-pickled cucumbers for a pop of bright green. If you want to get fancy, top it with a fried egg. The yellow yolk against the dark beef? Perfect contrast.
The Tex-Mex Skillet
This is my “lazy dinners” staple. Taco seasoning doesn’t have to be boring. I bulk this up with black beans and corn fire-roasted if I can find them because those char marks add visual depth. If you have a can of Rotel or diced tomatoes, throw it in. It’s vibrant, red, and gold. Finish with fresh cilantro. Always fresh. Dried herbs just disappear visually.
The Mediterranean Light
Think warm tones. Cinnamon, oregano, maybe a pinch of allspice. I toss in diced zucchini or spinach right at the end so it stays bright green and doesn’t turn to mush. Top with feta cheese. The white cheese against the spiced meat is a classic look. It’s a healthy dinner recipe that doesn’t feel like deprivation.
One-Pan Cleanup & Grease Management
I have a rule in my studio and my kitchen: clean as you go. Visual clutter kills my creativity. The beauty of many ground beef recipes is the one-pot pasta or skillet potential. But you have to manage the grease. If you’re using that 80/20 blend we talked about, you’ll have excess liquid. Don’t just leave it. It makes the final dish look greasy and unappetizing.
Here’s a trick. I keep a small foil-lined bowl next to the stove. I tilt the pan, spoon out the excess fat into the bowl, and let it solidify. Then toss the foil. Never down the drain. That’s a plumbing disaster waiting to happen. If you’re adding aromatic vegetables like onions or peppers, drain the grease before you add them. Otherwise, they just boil in oil. We want them to sauté, to get some color.
Pro Tip: The Sauerkraut Secret
This sounds weird, I know. But if you want that depth of flavor that usually takes hours, stir in a half-cup of drained sauerkraut near the end of cooking. It disappears into the meat visually, but the acidity and umami it adds? Incredible. It cuts through the richness of the beef. Just chop it fine so it doesn’t mess up your texture. It’s a secret weapon for easy meals with ground beef.
Storage & Freezing: The Meal Prep Edit
I treat my freezer like a digital archive. Everything needs to be labeled and stored correctly, or it’s useless later. Ground beef recipes are incredibly freezer friendly, but texture is the enemy here. If you freeze cooked potatoes in a casserole, they can get mealy. Not great. If I’m doing meal prep containers, I often leave the potatoes out and roast them fresh while the beef reheats.
Freezing the Base
I often cook five pounds of meat at once (batch processing, just like editing photos). I brown it with onions and garlic, drain it, and freeze it in flat Ziploc bags. Why flat? Because they stack like books, and they thaw in ten minutes in a bowl of cold water. It cuts your dinner prep time in half.
Reheating Without Drying Out
This is crucial. Reheated beef can taste metallic and dry. When you reheat, add a splash of beef broth or even water to the pan. It brings the moisture back. It revives the colors. If it’s a pasta dish, I always save a little pasta water to splash in during reheating. It helps the sauce emulsify again.
Serving Suggestions to Complete the Frame
You have your hero element (the beef), but you need the supporting cast. The styling props.
- Rice Bowls: Start your rice cooker the second you walk in the door. By the time the meat is browned and sauced, the rice is fluffy. Perfect timing.
- Lettuce Wraps: For a lighter, keto ground beef option, use butter lettuce or romaine hearts. The crunch and the cold temperature of the lettuce against the hot, savory beef is a texture contrast I love.
- Noodles: Udon or rice noodles work fast. If I’m really rushing, I’ve been known to use instant ramen noodles (ditch the packet) and toss them with the beef and some scallions.
Frequently Asked Questions
The Final Frame
When you put this bowl on the table, take a second. Look at the steam rising (but not too much steam, we want to see the food), the colors, the way the light hits the sauce. You made something from nothing. You took a cold, basic ingredient and turned it into warmth. That’s the art. Whether it’s Hamburger Helper alternative night or something that feels a bit more elevated, you fed your people. And you did it without losing your mind.
Pour yourself a glass of something nice. You’ve earned it. And hey, if you snap a photo of your dinner, tag me. I want to see your composition. For more visual inspiration and quick dinner ideas, check out my Pinterest boards.
You’ve got this, Chef.
Reference: Original Source
How long can I store leftover Ground Beef Recipes in the fridge?
I’d say you have a solid 3 to 4 days. Keep it in an airtight container. If you push it to day 5, check the smell. If it’s off, toss it. It’s not worth the risk. I usually meal prep on Sunday and eat it through Wednesday.
Can I freeze ground beef after it is cooked?
Absolutely. In fact, it freezes better than raw meat in my opinion. Brown it, drain the fat, let it cool completely (this prevents ice crystals), and bag it up. It keeps for about 3 months. It’s a lifesaver for quick dinner ideas.
How do I prevent reheated beef from getting dry?
Moisture is key. Add a splash of beef broth or water to the skillet or microwave dish. Cover it while reheating to trap the steam. If you just blast it uncovered, you’ll end up with rubbery meat. Not a good texture.
Can I use ground turkey instead of beef?
You can, but you’ll lose some richness. Turkey is leaner. To compensate, I add a little more olive oil or maybe some Worcestershire sauce to boost the umami. Season it heavily. Turkey needs a bit more help to shine than beef does.
How can I make the sauce thicker?
If your sauce looks too thin or watery, mix a teaspoon of cornstarch with a splash of cold water (a slurry) and stir it into the bubbling sauce. Let it simmer for a minute. It’ll gloss up and thicken beautifully. Clean read.