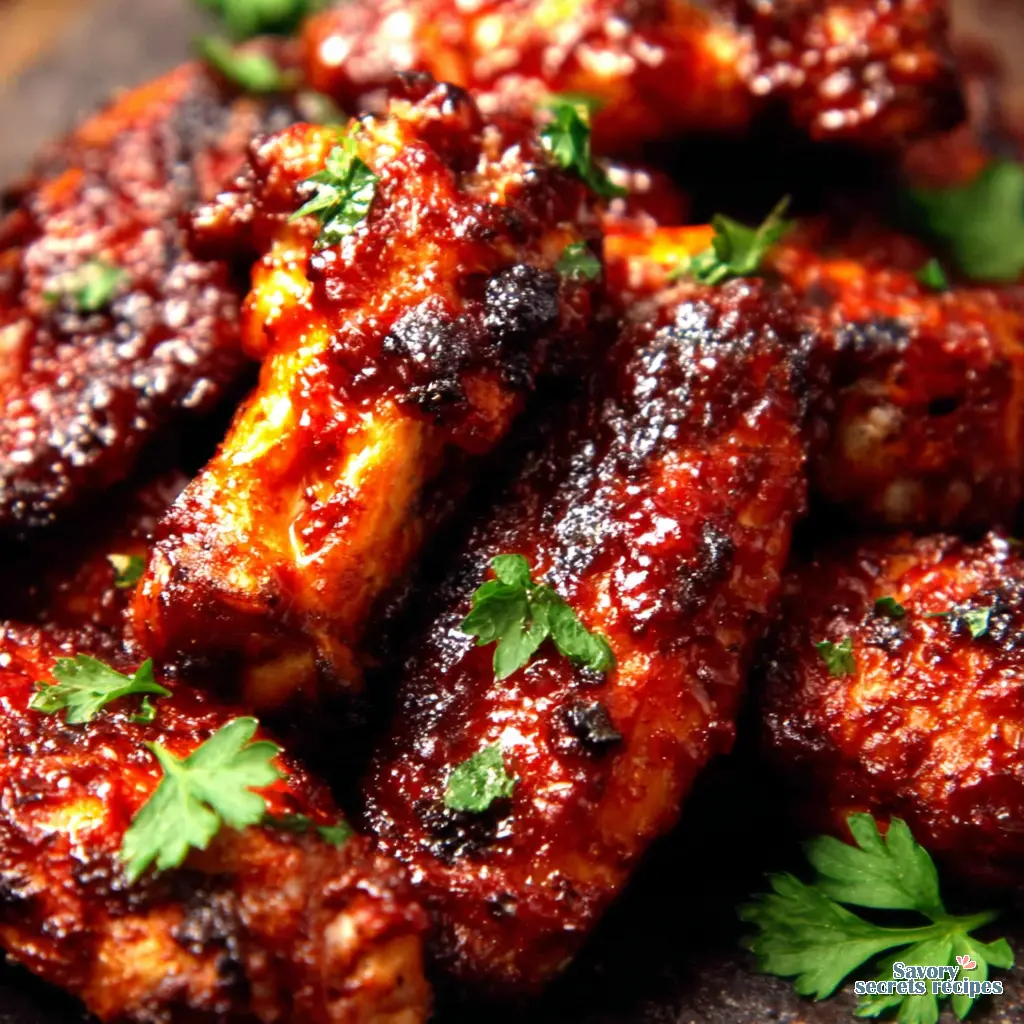
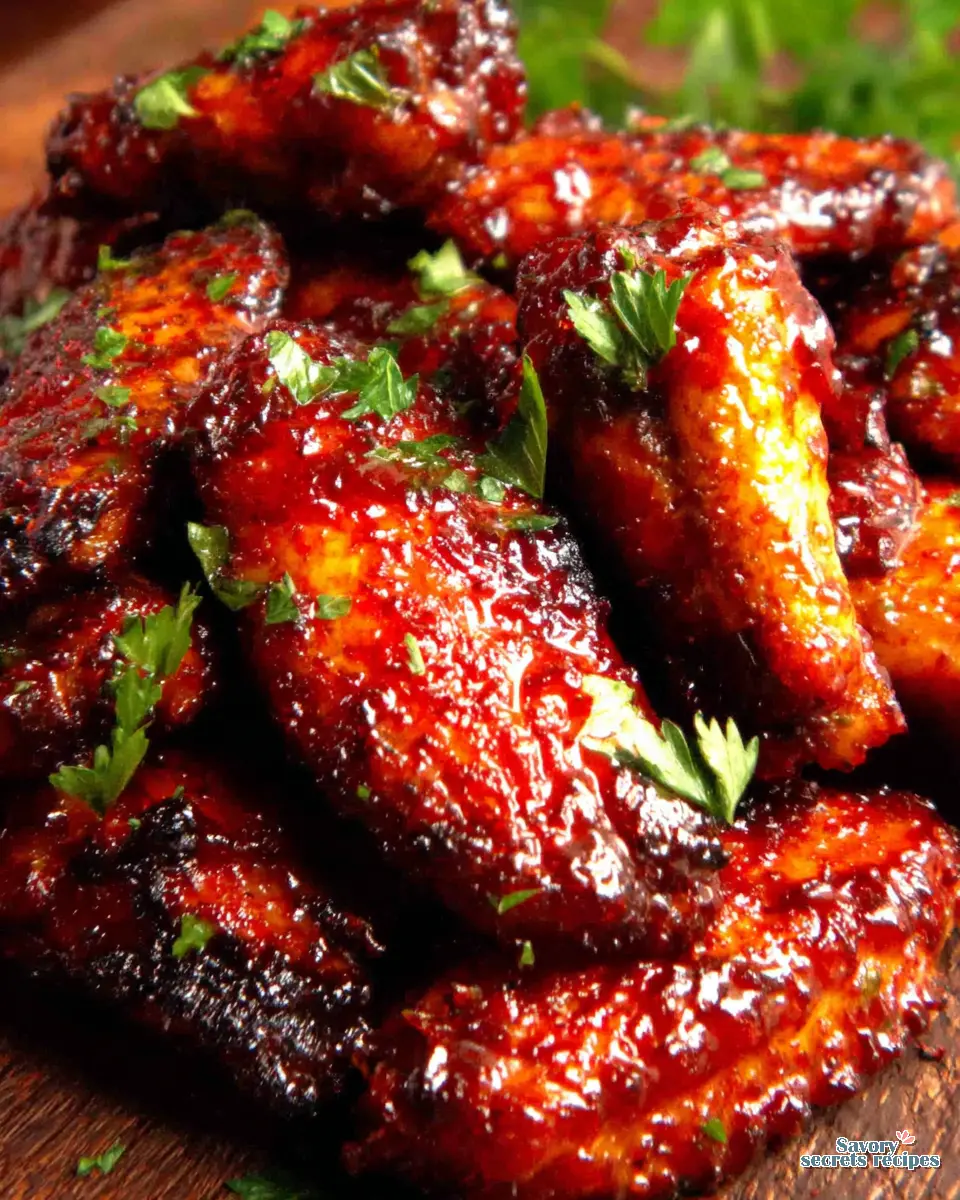
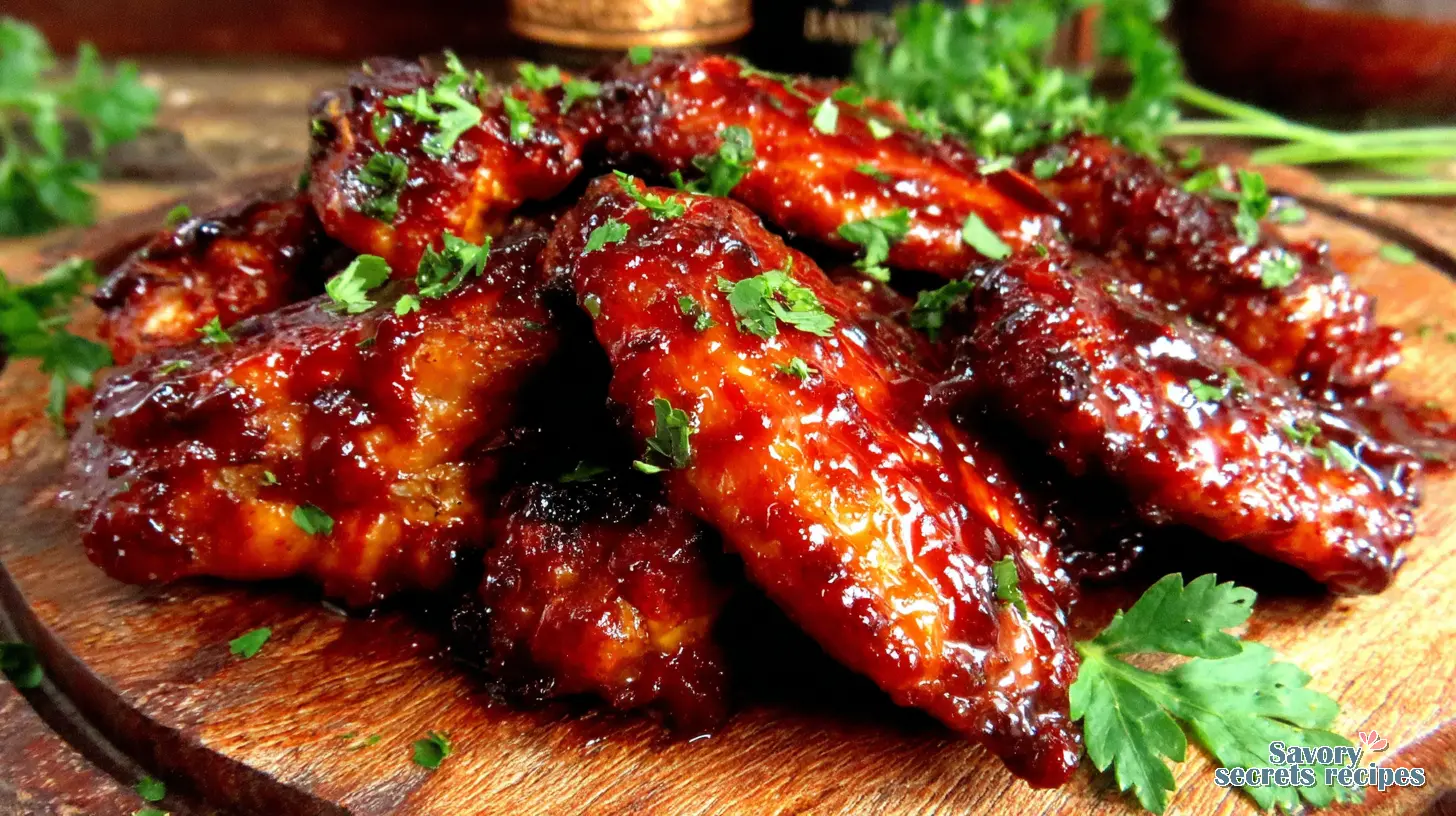
Sticky Crispy Oven BBQ Honey Chicken Wings
Ingredients
Method
- Preheat oven to 400°F (200°C).
- Rinse wings under cold water and pat dry with paper towels.
- Combine honey, BBQ sauce, garlic powder, onion powder, smoked paprika, black pepper, and salt in a small bowl. Stir until well combined.
- Add chicken wings to a large bowl, then pour the sauce mixture over them. Toss until fully coated.
- Place coated wings in a single layer on a parchment-lined baking sheet. Bake for about 40 minutes, flipping halfway through.
- Remove golden and crispy wings from the oven and let cool for a few minutes. Garnish with fresh parsley before serving.
Nutrition
Notes
Why These BBQ Honey Chicken Wings Are a Game Changer
You know that feeling, right? It’s a Tuesday evening in Los Angeles, maybe the weather’s finally cooled down to a crisp 60 degrees, and you’re craving something truly satisfying. I’m talking about those sticky, sweet, savory, and perfectly crispy chicken wings that just make you close your eyes and sigh. I’ve been there, staring at a sad plate of takeout wings, thinking, “I could do better.” And honestly, you can. These BBQ Honey Chicken Wings aren’t just a recipe; they’re a revelation.
I’ll admit, I used to think making really good wings at home was too much fuss for a weeknight. I mean, my kitchen isn’t huge, and who wants to deal with deep frying? That’s the thing, though. My Gran Nora, she taught me that good food doesn’t have to be complicated or expensive. She could stretch a pot roast into three different meals, and her philosophy was always about making the most of what you’ve got. These BBQ Honey Chicken Wings embody that spirit: simple ingredients, clever techniques, and results that taste like you spent hours.
This recipe for BBQ Honey Chicken Wings is the one. It delivers on that perfect balance: juicy chicken, a sweet and savory honey BBQ glaze that clings like a dream, and skin so crispy you’ll wonder how it came out of your oven. It’s a family favorite around here, and I’m not sure everyone will agree, but it definitely rivals any restaurant version. You’ve got this!
Getting Your Ingredients and Tools Ready
Before we dive into the deliciousness, let’s talk about what you’ll need. Don’t worry, we’re not talking about anything fancy here. I’m probably not the person to ask about fancy techniques; I’m more about getting dinner on the table than impressing anyone with obscure gadgets. You’ll want a good baking sheet, and honestly, a wire rack is worth every penny for this recipe. It’s truly a game-changer for crispy wings, letting the air circulate all around them.
For ingredients, you’ll need your chicken wings, of course. I usually grab a big pack when they’re on sale at Ralphs or Vons, then break them down into drumettes and wingettes myself if they’re whole wings. It’s a simple way to save a few bucks, and Gran would approve. You’ll also need a good quality BBQ sauce. I’m partial to Sweet Baby Ray’s, but use your favorite brand. We’ll be adding honey, garlic powder, onion powder, smoked paprika, salt, and black pepper to build that incredible sweet bbq wings glaze. Simple ingredients, right?
A basting brush will come in handy for coating those wings later. Other than that, just your basic mixing bowls and measuring spoons. See? Nothing intimidating. It’s simpler than you thought, isn’t it?
The Secret to Seriously Crispy Oven Baked Wings
Okay, let’s get down to business. The biggest pain point I hear about oven baked wings is the crispiness factor. Nobody wants soggy wings, right? I’ve learned this the hard way: the secret isn’t magic, it’s actually pretty basic food science. It’s all about drying out that chicken skin.
First, give your chicken wings a good rinse. My grandmother Nora always insisted on washing chicken, saying it removed any fatty residue. Pat them *really* dry with paper towels. I mean, like you’re trying to absorb every single drop of moisture. If you’re short on time, that’ll do it. But for truly superior crispy baked wings, here’s what actually works: after patting them dry, place them uncovered on a wire rack set over a baking sheet. Stick that whole tray in the refrigerator for 1 to 3 hours. Or even overnight, if you’re thinking ahead for meal prep. This air-dries the skin, and that’s your golden ticket to crunch. Trust me on this. It avoids soggy wings and is far better than just paper towels.
Once your wings are nice and dry, it’s time for seasoning. You want to get those savory wing snack plate flavors deep into the chicken. In a bowl, toss your chicken wings with garlic powder, onion powder, smoked paprika, salt, and black pepper. Make sure they’re coated evenly. I like to add the seasoning blend in portions, tossing well after each addition to ensure every single wingette and drumette gets some love. If you wanted to, you could even cover these seasoned wings and refrigerate them overnight to enhance that flavor even more. That’s good bones for later, as Gran would say.
Baking Your Golden Chicken Wings to Perfection
Now for the cooking part. Preheat your oven to a nice high temperature, around 400°F (200°C). Remember that wire rack we talked about? Place your seasoned, dried wings on it, making sure there’s space between each one. This is key for crispy skin, preventing sauce pooling and burning later on. Nobody wants a burnt sticky chicken wing dish. I’m not sure everyone will agree, but crowding the pan is a classic mistake.
Bake the wings for about 40-50 minutes, flipping them halfway through. You want them to be golden and cooked through. While they’re baking, let’s get that sweet bbq wings glaze ready. In a saucepan, combine your favorite BBQ sauce and honey. Simmer it over medium-low heat, stirring occasionally, until it’s slightly thickened and smells absolutely incredible. This sticky glaze recipe is truly simple. Don’t let it boil too vigorously; we’re just coaxing those flavors together.
Once the wings are golden and cooked, pull them out. Now, here’s where the magic happens for those sticky chicken wing dish vibes. Toss the hot wings in your warm honey BBQ glaze until they’re completely coated. Then, put them back on that wire rack on the baking sheet. Pop them under the broiler for just a few minutes, maybe 3-5 minutes per side. You need to keep a close eye on them here. That honey in the glaze can burn quickly, and nobody wants that. You’ll see the glaze caramelize and get beautifully sticky and slightly charred in spots. This is the one. That’s the thing, though, if you prefer your sauce wet, not sticky, you can skip the broiler altogether.
The smell in your kitchen right now should be fantastic. That sweet and savory aroma, the sight of those golden chicken wings meal ready to go. I could eat this weekly, honestly. The skin will be crispy, the meat tender, and that honey BBQ glaze? Perfection. You’ll know they’re done when they’re glossy, sticky, and you can barely resist grabbing one straight off the tray. I mean, it’s not fancy, but it’s brilliant.
Expert Tips for Your Best BBQ Honey Chicken Wings
I’ve made my fair share of BBQ Honey Chicken Wings, and I’ve picked up a few tricks along the way. These aren’t fussy steps, just things that make a real difference. For that ultimate crispy texture, that drying step in the fridge is key, as I mentioned. It’s a small effort but makes a huge impact. Using that baking rack helps air circulate, preventing the wings from steaming instead of crisping. This is why it works.
When you’re tossing the wings with the seasoning, don’t rush it. You want every single piece coated for a savory wing snack plate. And for the glaze, if it gets too thick while simmering, you can add a tiny splash of water or even a bit more BBQ sauce to thin it out. If you find the glaze is too sweet for your liking, you can always use a little less honey or choose a less sweet BBQ sauce to begin with. Your mileage may vary on sweetness preferences, but it’s easy to adjust.
Keep a close watch on those wings under the broiler. Honey can go from perfect to burnt in a flash. Honestly, it’s a split-second thing. If you’re nervous, just go for a shorter broil, or even skip it and just enjoy them tossed in the warm glaze. For a different crispy texture, you could try air fryer wings or even grilling chicken wings. Both methods give you that delicious exterior, though the grill adds a lovely smoky char.
Common Mistakes & Fixes for BBQ Honey Chicken Wings
Mistake: Soggy wings after baking.
Solution: You probably didn’t dry them enough. Pat them *really* dry, and if you have time, let them air-dry in the fridge on a wire rack for an hour or two. That’s the real secret.
Mistake: Burnt sauce under the broiler.
Solution: The honey in the glaze caramelizes fast. Keep a super close eye on them, and don’t walk away. A minute too long can make all the difference. Reduce cooking time to 5 minutes at 500°F if you’re worried about burning.
Mistake: Glaze isn’t sticking to the wings.
Solution: Make sure the wings are hot when you toss them in the warm glaze. The heat helps the sauce adhere. The broiling step also helps the glaze cling and caramelize.
Mistake: Wings are too sweet.
Solution: Use less honey next time, or opt for a more savory BBQ sauce. You can also add a pinch of cayenne pepper or chili flakes to the glaze for a spicy kick to balance the sweetness.
Mistake: Wings are undercooked inside.
Solution: A meat thermometer is your best friend here. Chicken wings should reach an internal temperature of 165°F (74°C). If they’re not there yet, keep baking until they are. They’ll probably still be juicy, don’t worry.
Serving Up Your Sticky Crispy Oven BBQ Honey Chicken Wings
These BBQ Honey Chicken Wings are perfect for so many occasions. They’re an easy weeknight dinner, a fantastic party appetizer, or the ultimate game day food. My daughter loves them for a savory wing snack plate on weekends. They go great with a simple side salad, some homemade mac and cheese, or even just a pile of celery sticks and a good dipping sauce. I mean, who doesn’t love a good wing?
For storage, if you actually have any leftovers (which is rare in my house!), let the wings cool completely. Store them in an airtight container in the refrigerator for up to 3-4 days. When you’re ready to reheat, place them on a baking sheet at 400°F (200°C) for about 10 minutes, brushing with a little extra warm honey BBQ glaze halfway through. They might not be quite as crispy as fresh, but they’ll still be delicious. You can prepare the components ahead of time too: the seasoning rub up to 3 days, wings dried in the fridge for 24 hours, and the sauce up to a week. That’s good bones for later, and great for meal prep.
I genuinely love the feeling of knowing I’ve got a batch of these ready, or that I can whip them up quickly. There’s something deeply satisfying about feeding your family well on less money than takeout would cost. It never gets old.
Delicious Variations & Make-Ahead Tips
I prefer recipes that give you options rather than strict rules; use what you have, swap what you need to, make it work for your family. If you’re looking to change things up with your BBQ Honey Chicken Wings, there are a few simple ways. For a little heat, add a pinch of cayenne pepper or a dash of your favorite hot sauce to the glaze. Fair enough, right? It just gives it a little kick without overpowering the sweet and savory notes.
For make-ahead convenience, you can definitely season your chicken wings a day in advance and keep them in the fridge. That air-drying step is perfect for overnight chilling too. You can also whip up the honey BBQ glaze a few days ahead and store it in the fridge. Just gently reheat it before tossing with your cooked wings. It’s like a gift from past me, having those components ready to go for a quick chicken recipe. Stretch it another night, I always say!
I’ll admit I sometimes skip steps that seem fussy. But for this recipe, getting those wings dry and using the wire rack are two things I’d never skip. They truly make the difference between good wings and great BBQ Honey Chicken Wings. Worth every penny, that rack.
Frequently Asked Questions
Ready to Make Some Magic?
So there you have it: the secret to truly amazing BBQ Honey Chicken Wings. When you make this, get ready for rave reviews. Your family will think you’ve spent hours in the kitchen, but we both know it’s our little secret. It’s the kind of satisfying, flavorful homemade dish that rivals takeout, without the fuss. It smells exactly like my mother’s kitchen on Saturday mornings, when she’d have three things going at once and the windows would fog up from the steam.
Go ahead, grab some chicken wings on your next Trader Joe’s run. You’re going to transform your weeknight meal into something special. I can’t wait to hear how much you love them! Tag me in your photos; I can’t wait to see them! For more inspiration, check out my Pinterest boards.
Source: Nutritional Information
How can I make the BBQ Honey Chicken Wings more crispy?
The best way is to pat the wings very dry and then let them air-dry uncovered on a wire rack in the refrigerator for 1-3 hours before baking. This removes surface moisture for a super crispy skin.
Does it matter if the chicken wings are frozen or thawed?
Yes, it absolutely matters. Always start with fully thawed chicken wings. Frozen wings will release too much moisture and won’t get crispy. Make sure they’re completely thawed and then dried well.
Does hot sauce mean Frank’s Red Hot or Tabasco or something else?
When I mention hot sauce for a spicy kick, I’m usually thinking about a classic cayenne pepper sauce like Frank’s Red Hot. But honestly, use whatever hot sauce you enjoy the most. Your mileage may vary on heat levels!
Does it matter if it’s brown or white sugar in the BBQ sauce?
Our recipe uses a store-bought BBQ sauce, which typically already has sugar. If you were making a homemade BBQ sauce, brown sugar would add a deeper, molasses-like flavor, while white sugar would be a cleaner sweetness.
How long should I cook chicken thighs and legs for this recipe?
For chicken thighs and legs, you’ll need a longer cooking time. They’re thicker, so bake them at 400°F (200°C) for about 35-45 minutes, or until the internal temperature reaches 165°F (74°C).
How do you get chicken wings crispy without frying?
The key steps are drying the wings thoroughly, baking them on a wire rack at a high temperature (400°F), and finishing them under the broiler to caramelize the sweet bbq wings glaze and crisp the skin.
How do you get the sauce to stick to honey barbecue chicken wings?
Tossing the hot wings in the warm glaze immediately after baking helps. Then, a quick broil caramelizes the honey and sugars in the BBQ sauce, making it incredibly sticky and ensuring it clings beautifully to every part of your BBQ Honey Chicken Wings.
Can you prepare BBQ Honey Chicken Wings in advance or store them once cooked?
Yes! You can season wings and make the sauce up to a day or two ahead. Cooked wings store well in the fridge for 3-4 days. Reheat on a baking sheet at 400°F for about 10 minutes, brushing with extra sauce halfway.