Impressive Chocolate Orange Cake: Easy Steps
Ingredients
Method
- Preheat oven to 350°F (175°C) and grease a 6-inch cake pan.
- Whisk together flour, cocoa powder, sugar, baking soda, and salt in a medium bowl.
- In another bowl, whisk vegetable oil, eggs, orange juice, and zest until combined and frothy.
- Slowly pour the wet mixture into the dry ingredients and stir gently until smooth.
- Pour batter into the prepared pan and spread evenly.
- Bake for 25-30 minutes, then check doneness with a toothpick.
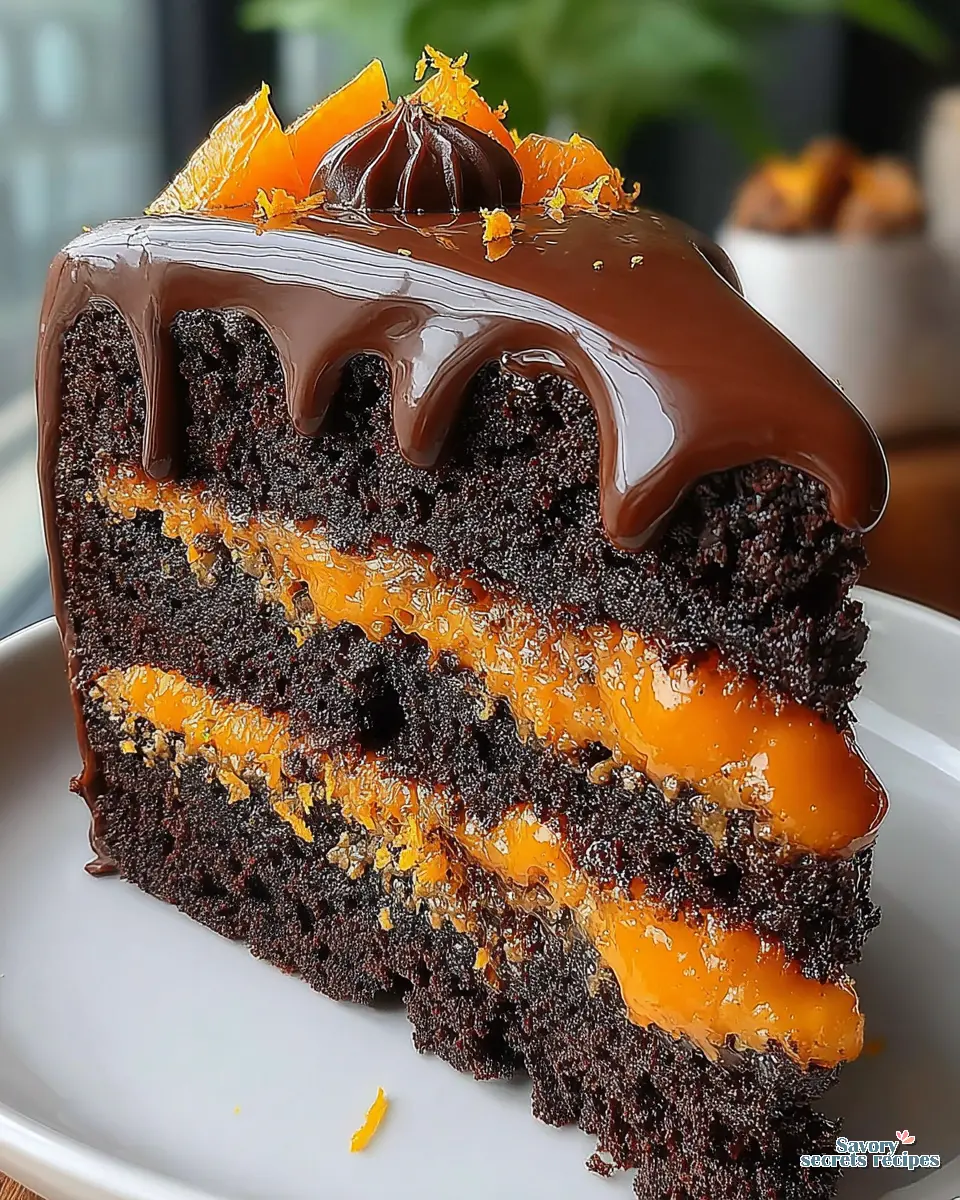
- Cool the cake completely before slicing horizontally into two layers.
- Spread a layer of orange curd, then whipped cream, between the two cake halves.
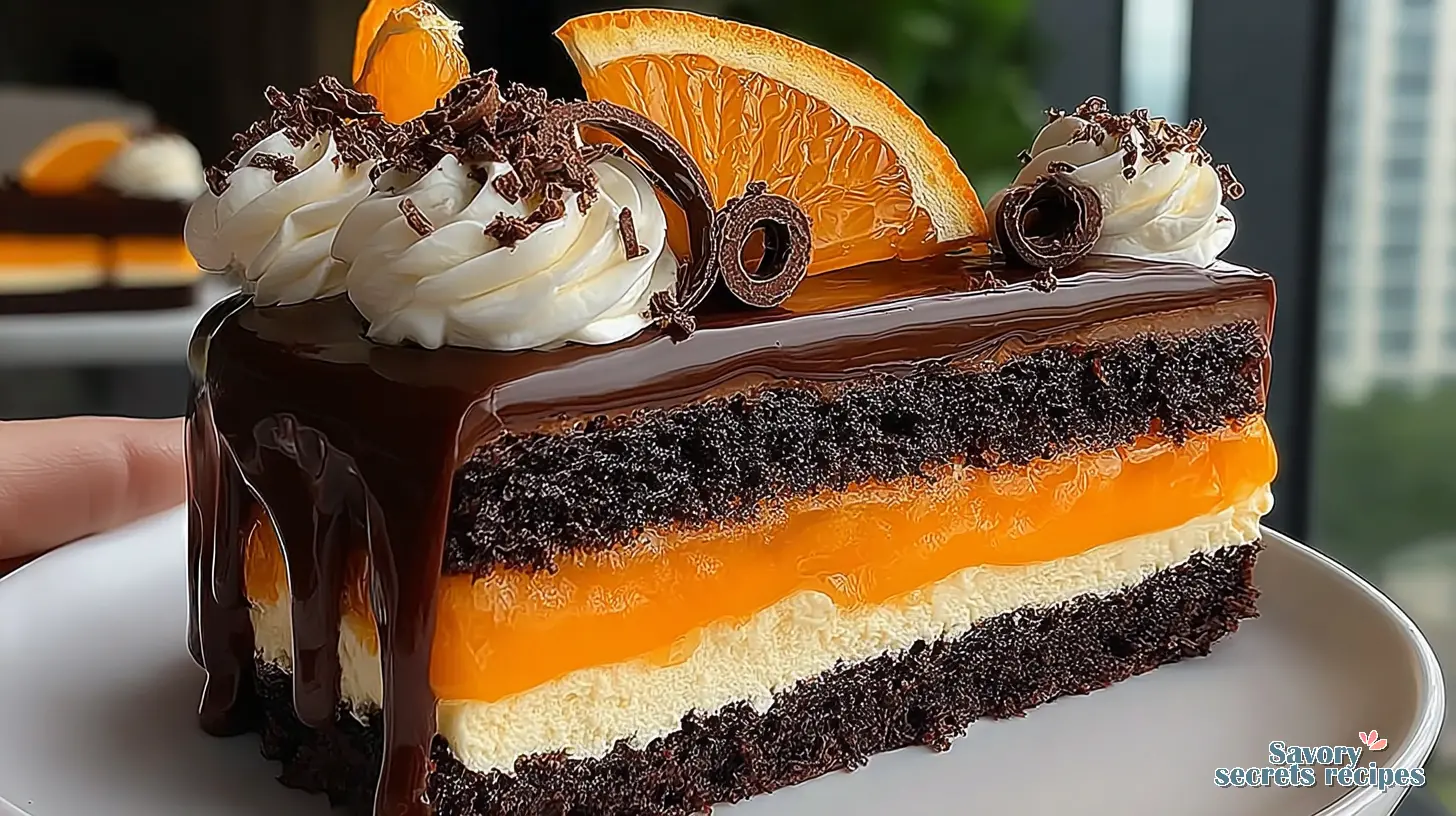
- Cover the entire cake with dark chocolate ganache and decorate with candied orange slices and chocolate curls.
Nutrition
Notes
Why This Chocolate Orange Cake?
Imagine this: a slice of dark chocolate cake, rich and impossibly moist, with a vibrant, zesty orange whisper that cuts through the cocoa. It’s not just a dessert, it’s an experience. That first bite, the way the fluffy crumb melts, followed by the bright citrus notes and the luxurious dark chocolate ganache, it’s truly something special. This isn’t just any chocolate orange cake; it’s the one you’ll keep coming back to.
I know what you’re thinking. A layered cake, with ganache and candied orange? It sounds like a weekend project, maybe something you’d tackle when the LA winter actually feels like winter and you’ve got hours to spare. But here’s the thing: this recipe is designed for maximum impact with manageable steps, perfect for a mild spring evening when you want something impressive without the fuss. I learned percentages before fractions because Zoya made me calculate baker’s percentages for her blini batter. She’d stand there with her arms crossed while I did the math on paper, and if I got it wrong, we’d start from the beginning. I was seven. I hated it then, but now I realize she was teaching me that baking isn’t magic it’s math you can eat. That precision is what makes this chocolate orange cake so reliable.
Let’s be clear about this: success in baking often comes down to a few key principles. First, **temperature matters here**. Room temperature eggs and orange juice integrate smoothly, creating an emulsion that holds air and moisture. Cold ingredients just won’t do that. Second, **measure your flour correctly**. You don’t scoop directly from the bag; you spoon it into the cup and then level it. That’s the difference between a tender cake and a dry, dense one. Third, **don’t overmix your batter**. Once the flour goes in, mix just until combined. Overmixing develops too much gluten, and you’ll end up with a tough cake, not a fluffy crumb. Finally, always **zest your oranges before you juice them**. It’s the correct instinct for getting maximum flavor and avoiding a watery mess.
The Science Behind a Moist Chocolate Orange Cake
Making a truly moist chocolate orange cake isn’t about luck; it’s about understanding what your ingredients do. We’re using vegetable oil in this recipe, and that’s not a substitution for butter. It’s a choice. Oil creates a moister cake with a more tender crumb, especially when refrigerated, because it stays liquid at cooler temperatures. Butter, on the other hand, solidifies, which can make cakes feel dense and dry.
The cocoa powder and orange juice are critical here, not just for flavor, but for structure. The orange juice provides the necessary acid to react with the baking soda, giving your cake that beautiful lift and tender texture. It’s a delicate balance, and we’re not guessing on this one. If your cake feels dry, it’s often because you’ve either overbaked it or your liquid-to-dry ratio was off from incorrect measuring. That’s not how this works; precision is key.
A high-quality cocoa powder is essential. I prefer natural unsweetened cocoa powder for this chocolate orange cake, as it reacts perfectly with the baking soda. Dutch-processed cocoa is fine for some recipes, but it won’t give you the same lift or flavor profile here. For a truly rich flavor, consider a good dark chocolate for your ganache. You’ll taste the difference.
Mastering Your Chocolate Orange Layers
Once your batter is mixed, the baking process needs attention. Using the right pans is vital. I always recommend light metal cake pans instead of dark ones, especially if you have an electric oven. Dark pans absorb more heat and can cause the edges of your cake to burn before the center is cooked through. We’re not aiming for burnt edges here. Spray your cake pans well with non-stick cooking spray, or use the butter and flour technique for complete peace of mind. Parchment paper is also critical to make sure your cake doesn’t stick. Trust me on this; scraping a stuck cake from a pan is a frustration you don’t need.
When it’s time to bake, preheat your oven properly. I once ruined an entire week’s worth of recipe testing because I didn’t account for my home oven running twenty degrees hot. Twelve batches of cookies, all overbaked. Now I check oven temperature with two thermometers before every single test. For two 8-inch cake pans, you’re looking at approximately 32-36 minutes at 350°F (175°C), or until a wooden skewer or toothpick inserted into the center comes out clean. Visually, the cake should spring back when lightly touched, and the edges will start to pull away from the sides of the pan. That’s exactly the texture we want.
Crafting Perfect Chocolate Orange Ganache & Buttercream
Now, for the best part: the frosting. A truly rich orange cocoa cake needs a frosting that complements, not overpowers. This recipe uses a luscious dark chocolate ganache and a bright orange curd, layered with whipped cream. For the ganache, using a quality dark chocolate is non-negotiable. The melting wafers are fine, but a good bar chocolate will give you a superior flavor and texture. Temperature matters here; let your ganache cool slightly before pouring, or it’ll be too runny.
Once your cake layers are baked and cooled, refrigerate or even freeze them for easier cutting and frosting. This is a high-value tip; cold cake layers are much less prone to tearing and crumbling. Level and tort your cake layers, meaning you cut off any domed tops to create flat surfaces. This makes stacking and frosting so much easier and gives you a professional-looking layered citrus chocolate cake. A cake turntable is a great investment for easier frosting and beautiful presentation; it’s worth it if you plan on baking often. If you’re short on time, you can use a high-quality store-bought dark chocolate frosting and add a bit of orange extract to it for that citrus chocolate dessert cake flavor.
Elegant Decoration & Candied Orange Slices
The aroma of this cake baking, that warm, rich chocolate mingling with bright orange zest, it’s truly intoxicating. As it cools, the anticipation builds. Pulling a perfectly baked cake from the oven, seeing that beautiful rise, it’s one of the most satisfying moments in baking. Now, for the final flourish: decoration.
Making candied orange slices is simpler than it sounds and adds an elegant touch to your sweet orange chocolate slice. You’ll need one orange, thinly sliced. Simmer the slices in water for about 10 minutes to remove some bitterness, then drain. Next, combine equal parts sugar and water (say, 1 cup of each) in a saucepan, bring to a simmer, and add your orange slices. Let them simmer gently for about 45-60 minutes, until the peel is translucent and tender. Carefully remove them and let them cool on a wire rack. For an extra shimmer, you can dip them in sugar. These beautiful, sticky-sweet slices are the perfect garnish, making your layered citrus chocolate cake truly photo-worthy. Arrange them artfully on top of your dark chocolate orange sponge for a stunning finish, perhaps with a sprinkle of dark chocolate curls.

Common Mistakes & Expert Fixes for Your Chocolate Orange Cake
Common Mistakes & Fixes
Mistake: Your chocolate orange cake is dry.
Solution: This often comes from over-baking. Check for doneness earlier than the recipe states, especially if your oven runs hot. Also, make sure you’re measuring your flour correctly; too much dry flour will absorb all your moisture.
Mistake: The cake sticks to the pan.
Solution: You likely skipped parchment paper or didn’t grease and flour the pans sufficiently. That’s not how this works; proper pan prep is non-negotiable. Use parchment paper on the bottom and generously spray the sides.
Mistake: The cake layers are difficult to frost or crumble.
Solution: You need to refrigerate or freeze your cake layers before frosting. Cold cake is firm cake. This makes a huge difference for a smooth, even frosting application. Freezing cake overnight allows it to harden, making assembly and frosting easier.
Mistake: Your ganache is too thin or too thick.
Solution: If it’s too thin, let it cool longer; it will thicken as it sets. If it’s too thick, gently warm it over a double boiler or in short bursts in the microwave until it reaches the right consistency. Temperature matters here.
Mistake: Powdery tasting frosting (if using buttercream).
Solution: This means your powdered sugar or cocoa powder hasn’t fully dissolved. Mix your buttercream longer at a low speed. Sometimes a tiny bit more liquid (like orange juice) can help, but add it slowly.
Chocolate Orange Cake Variations & Substitutions
This rich orange cocoa cake recipe is quite adaptable, which is a good thing for home baking. If you’re looking to change things up, you’ve got options. To convert this into cupcakes, preheat your oven to 350°F (175°C). Line 24 cupcake tins, fill them about three-quarters full, and bake for 15-20 minutes, or until a toothpick comes out clean. For a 9×14 sheet cake, you won’t need to change the batter amount. Bake it at 325°F (160°C) for 35-40 minutes. You’ll probably reduce the amount of ganache or whipped cream needed, though, for just the top and a simple border.
Need to feed a crowd? To convert this recipe for a three-layer 10-inch cake, which serves about 32 people, you’ll need to double the entire recipe. Just multiply each ingredient by two. I’m not entirely convinced this works at scale without a larger mixer, but it’s doable if you’re careful.
Ingredient Swaps for Your Chocolate Orange Cake
- Cocoa Powder: Stick with natural unsweetened cocoa powder. Dutch-processed has a different pH and will affect how your baking soda reacts, changing the rise and texture of this dark chocolate orange sponge.
- Vegetable Oil: Canola oil, avocado oil, or even a light olive oil work well. The flavor of a neutral oil like vegetable or canola is preferred for this moist cake recipe, as it won’t interfere with the delicate balance of chocolate and orange.
- Orange Extract: If you don’t have fresh oranges, a good quality orange extract can provide citrus notes. Start with a smaller amount and taste, as strengths vary. Orange flavor oil is also an option, but adjust the amount carefully.
- Hot Water: If your recipe calls for hot coffee to bloom the cocoa and you don’t have it, hot water is a perfectly acceptable substitute. It still helps the cocoa powder dissolve and intensifies its flavor.
Dietary Adaptations
For those with dietary needs, making a gluten-free chocolate orange cake is quite doable. Just swap the all-purpose flour for a good quality gluten-free all-purpose flour blend. I haven’t worked with that flour enough to say if it’ll be a 1:1 swap perfectly, but it generally works well. For a vegan option, you’d likely need to start with a completely different vegan chocolate cake recipe and then incorporate the orange zest and juice from this one. Dairy-free milk alternatives aren’t recommended for the cake itself, as they often lack the protein needed for a tender crumb in traditional recipes.
Make-Ahead & Storage for Your Chocolate Orange Cake
Baking a special occasion cake often means planning ahead, and this chocolate orange cake is surprisingly cooperative. You can bake the cake layers up to two days in advance. Once they’re completely cool, wrap them tightly in plastic wrap and store them at room temperature. For longer storage, you can freeze them for up to two months. Just make sure they’re wrapped well to prevent freezer burn. The dark chocolate ganache and orange curd can also be made ahead; store them in airtight containers in the refrigerator for up to two weeks. Bring them to room temperature and re-mix before use.
For a frosted chocolate orange cake, if your frosting contains butter (like a buttercream, though this recipe uses ganache and whipped cream), it will need refrigeration for overnight storage. If it’s a cool room, it can sit out for up to 3 hours. When refrigerating, I put toothpicks all over the top of the cake, then cover it loosely with plastic wrap. This prevents the plastic from sticking to the frosting. To freeze a frosted cake for long-term storage, slice it into serving-size pieces, lay them flat on wax or parchment paper, freeze until firm, then stack them in a freezer bag or airtight container for up to three months. Allow frozen cake to come to room temperature before serving, usually about 30 minutes for individual slices.
Frequently Asked Questions
Your Perfect Chocolate Orange Cake Awaits
There’s nothing quite like the satisfaction of creating a show-stopping dessert from scratch, especially one as elegant and flavorful as this chocolate orange cake. You’ve got the tools, the tips, and the confidence to make this happen. When you pull that perfectly baked cake from the oven, filling your kitchen with that incredible buttery smell, you’ll know it was all worth it. The pride you’ll feel when serving this beautiful creation is immense, and the compliments from family and friends? Well, that’s just the icing on the cake, isn’t it?
So, grab some fresh oranges on your next Trader Joe’s run, pick up a good quality dark chocolate, and get ready to bake. This sweet orange chocolate slice is more than just a recipe; it’s a delicious journey into home baking that delivers on every promise. I can’t wait to see your creations! For more inspiration, check out my Pinterest boards.
Source: Nutritional Information
Can I make Chocolate Orange Cake ahead of time?
Absolutely. You can bake the cake layers up to two days in advance and keep them tightly wrapped at room temperature. The ganache and orange curd can also be made a week or two ahead and stored in the fridge. This makes assembly on the day of serving a breeze.
How do I store leftover Chocolate Orange Cake?
Wrap individual cake pieces tightly in plastic wrap and refrigerate them for 2-3 days. For longer storage, you can freeze individual slices for up to 2 months. Just be sure to let them come to room temperature for about 30 minutes before enjoying.
Why is my chocolate orange cake dry?
A dry cake is usually a sign of over-baking or incorrect flour measurement. Always use the spoon-and-level method for flour to avoid adding too much. Check for doneness a few minutes before the recipe suggests, as oven temperatures can vary significantly.
How to add orange to chocolate cake mix?
If you’re using a mix, you can easily boost the orange flavor. Add 1-2 tablespoons of fresh orange zest to the dry mix and substitute a portion of the liquid with fresh orange juice. A touch of orange extract can also intensify the citrus notes.
Is orange cake better with oil or butter?
For a moist cake that stays tender, especially when refrigerated, oil is often preferred. It remains liquid at cooler temperatures, unlike butter which solidifies and can make a cake feel dense. This specific chocolate orange cake benefits greatly from vegetable oil.
What type of “vegetable oil” do you suggest?
For this chocolate orange cake, a neutral-flavored vegetable oil like canola oil or avocado oil is best. They won’t impart any unwanted flavors, allowing the rich chocolate and bright orange to truly shine. Olive oil can also work, but make sure it’s a very light, mild variety.
How do you decide which cakes to add sour cream to?
Sour cream adds moisture and a slight tang, often used in recipes needing extra richness and a tender crumb. For this chocolate orange cake, the orange juice provides the necessary acid for leavening and moisture, so additional sour cream isn’t typically needed.
How much hot water should be added for ‘1 Cup (240ml) hot water’?
When a recipe specifies “1 cup (240ml) hot water,” it means exactly that: one cup, which is 240 milliliters. The “hot” part is important for blooming the cocoa powder, intensifying the chocolate flavor in your dark chocolate orange sponge.
Is the temperature fan forced?
Unless specified, assume conventional oven temperatures. If you have a fan-forced (convection) oven, you’ll generally reduce the temperature by 25°F (15°C) and check for doneness a bit earlier. Always know your oven; temperature matters here.
How do you make the candied orange slices?
Thinly slice an orange. Simmer slices in water for 10 minutes, then drain. Make a simple syrup with equal parts sugar and water, bring to a simmer, add orange slices, and gently simmer for 45-60 minutes until translucent. Cool on a rack.
Do you have an eggless recipe for this cake?
This specific chocolate orange cake recipe relies on eggs for structure and moisture. While you could explore using egg substitutes, for a truly reliable eggless version, I’d recommend starting with a proven vegan chocolate cake base and then incorporating the orange zest and juice.
Can I substitute butter for oil?
You can substitute melted butter for oil, but be aware it will change the texture of your chocolate orange cake. Butter will produce a slightly denser cake that can dry out faster, especially after refrigeration, compared to the consistently moist crumb achieved with oil.
Do chocolate and orange go together?
Absolutely, it’s a classic pairing for a reason! The rich, slightly bitter notes of dark chocolate are beautifully complemented by the bright, sweet, and zesty freshness of orange. It creates a sophisticated and balanced flavor profile that’s truly irresistible in a dessert recipe.
Can this cake be made with gluten-free flour?
Yes, you can make this chocolate orange cake with gluten-free all-purpose flour. Just swap it in a 1:1 ratio for the regular all-purpose flour. Make sure your chosen GF blend contains xanthan gum, or add a quarter teaspoon per cup of flour for best results.