Soft Yeasted Donuts Recipe from Scratch
Ingredients
Method
- Preheat the oven to 350°F (180°C).
- Combine 2 cups of all-purpose flour, 1/2 cup of granulated sugar, and 1/2 teaspoon of salt in a large mixing bowl.
- Add 1/4 teaspoon of active dry yeast and 1/2 cup of whole milk, then mix until a smooth batter forms.
- Knead the dough for 5 to 7 minutes until it is elastic and shiny.
- Allow the dough to rise in a warm spot for 1 hour or until it has doubled in size.
- Deflate the dough and roll it out to a thickness of 1/2 inch.
- Cut out donut shapes using a donut cutter or the rim of a glass.
- Fry the donuts in 350°F (180°C) oil for 1 to 2 minutes per side until golden brown.
- Transfer the donuts to paper towels to drain any excess oil.
- Glaze the donuts with a mixture of 1 cup of powdered sugar and 2 tablespoons of milk, and adjust the consistency as needed.
Nutrition
Notes
The Ultimate Bakery-Style Homemade Donuts Recipe
I remember standing on a step stool in my grandmother’s kitchen in Casablanca, watching her heat honey for pastries. She would test the temperature by dropping a bit into cold water, showing me exactly how it should form a soft ball. I burned myself twice trying to test it myself before I learned patience. That is still how I think about sugar stages and frying temperatures today. It is all about patience and feeling the process through your hands.
With Easter brunch coming up, I know so many of us are looking for that ultimate centerpiece for the table. You want to recreate that early morning bakery run smell in your own kitchen. I completely understand the hesitation. My very first batch of yeasted dough was basically a brick. I over-floured it, shocked the yeast, and fried it in oil that was entirely too hot. But let me walk you through this homemade donuts recipe. I promise you it is foolproof once you understand the basic science behind the dough.
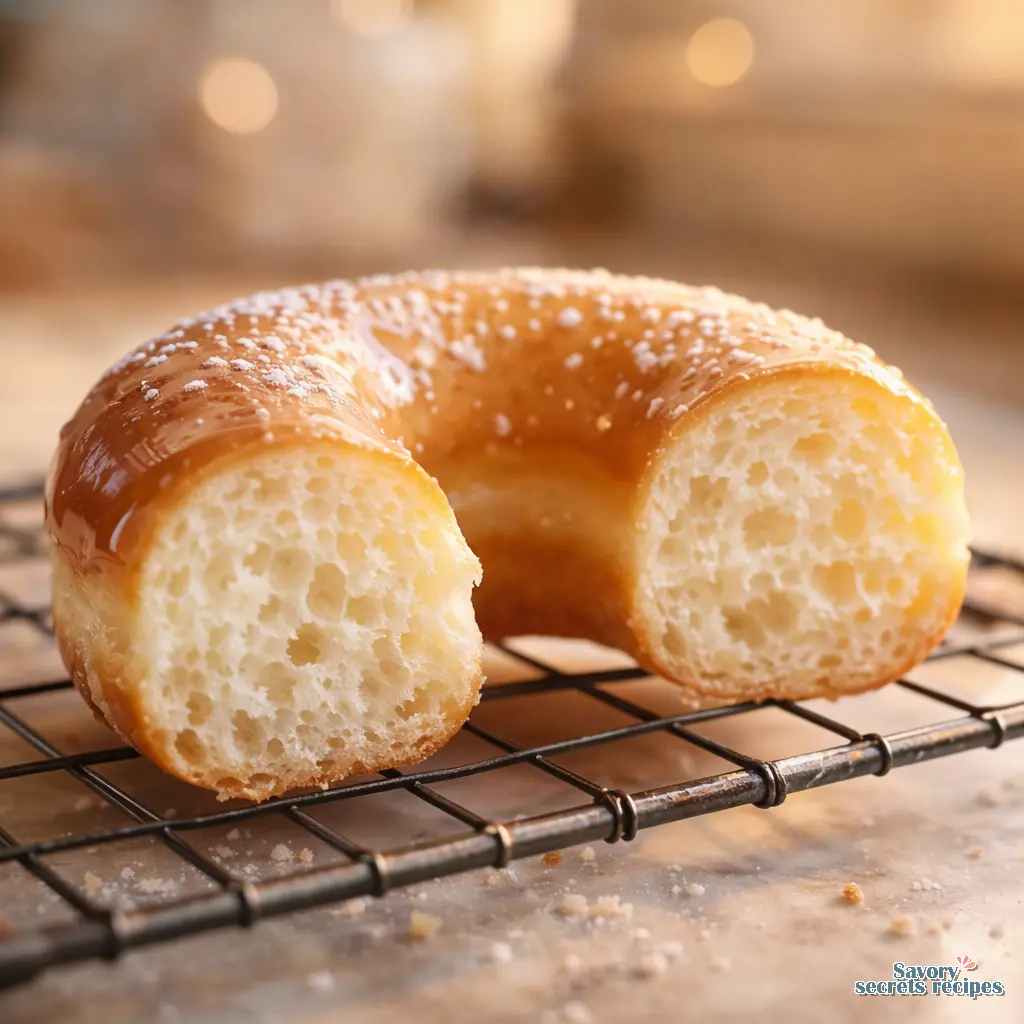
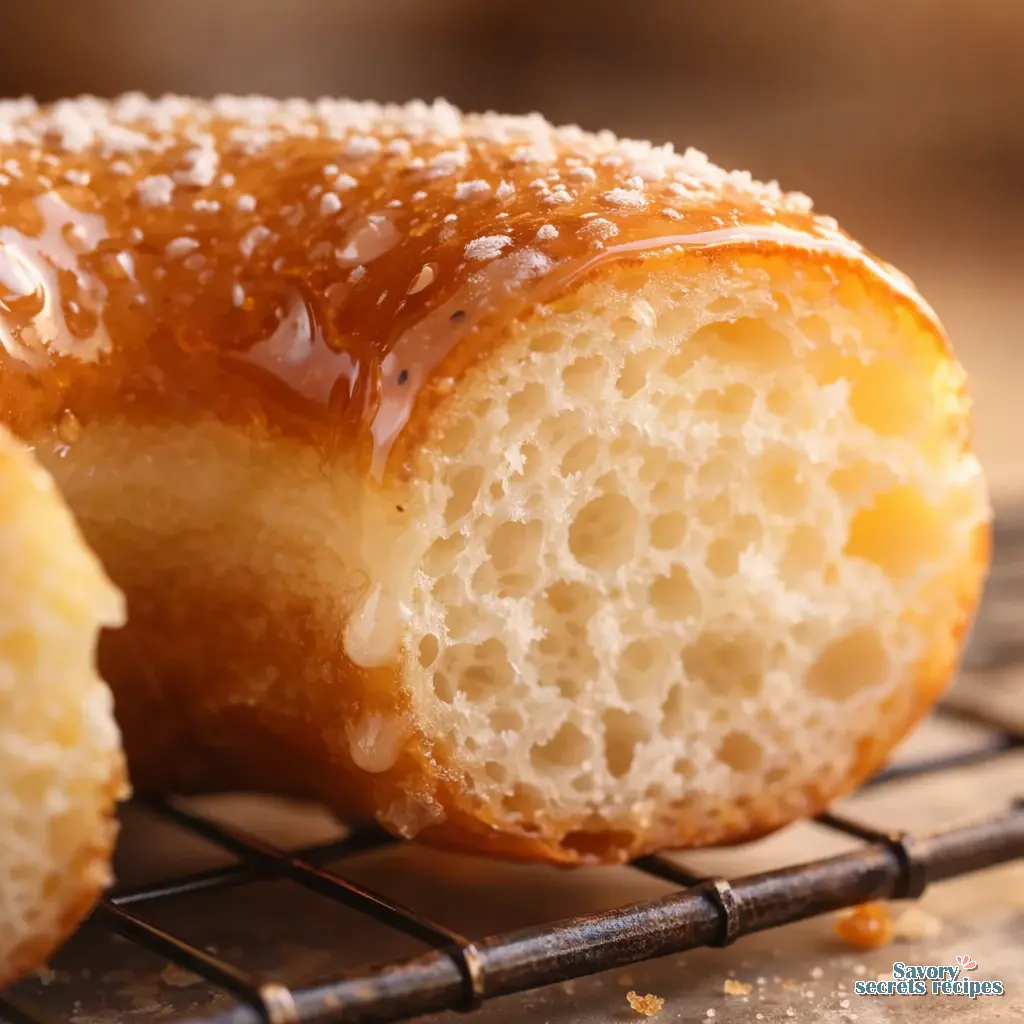
We are going for that perfect white ring around the middle and a pillowy soft crumb. You do not need to be a pastry chef to get there. You just need a little guidance, a reliable candy thermometer, and the willingness to let the dough tell you when it is ready. Let’s troubleshoot together and make you the designated donut master in your family.
Activating Your Yeast and Building the Dough
The foundation of any perfected donut dough is the yeast. For an enriched dough like this one, which is heavy with butter and sugar, I always use two packets of active dry yeast to ensure a strong rise. The extra fat weighs the dough down, so the yeast needs a little extra muscle. You will want to bloom it in warm whole milk. Think of the temperature like a baby’s bath. If it is too hot, you will kill the yeast. If it is too cold, it will not wake up. Right around 105°F to 110°F is the sweet spot.
Give it a minute to settle. You are looking for a foamy, bubbly surface that smells distinctly yeasty and alive. If nothing happens after ten minutes, throw it out and start over. I know it is frustrating to waste ingredients, but dead yeast will guarantee flat, heavy pastries.
When you start mixing, remember that room temperature eggs incorporate better and do not shock the yeast. I prefer using whole milk or even buttermilk for the most tender crumb. The acidity in buttermilk brings a wonderful tang that balances the sweetness. As you add your flour, please measure by fluffing, spooning, and leveling rather than scooping directly from the bag. Scooping packs the flour down, and adding too much flour is the number one reason why homemade donuts are tough instead of light and airy.
The Secret Ingredient and the Perfect Knead
Here is what I wish someone had told me years ago. The secret to that authentic donut shop flavor is nutmeg. Freshly grate whole nutmeg for a more potent aroma. It is a small detail, but it makes a massive difference in the final flavor profile. It is so satisfying when it comes together and you recognize that exact bakery smell in your own kitchen.
Whether you are using a stand mixer with a dough hook or kneading by hand, this needs time to hydrate properly. You want the dough to remain soft and slightly sticky. I tend to find, but test it yourself, that people panic when dough sticks to their hands and they add more flour. Resist the urge. That stickiness translates directly to a pillowy soft texture later. The dough should pull away from the sides of the bowl but still tack slightly to the bottom.
You can test the elasticity by gently stretching a small piece. If it tears immediately, keep kneading. Once it is smooth and elastic, let it rise in a warm, draft-free spot. You are waiting for the moment the dough actually doubles in size. A great way to check is the finger poke test. Press your finger about half an inch into the dough. If the indentation stays and slowly fills back in just a tiny bit, you are ready to roll.
Make-Ahead Magic: The Cold Proof
I know mornings can be chaotic, especially if you are prepping for a holiday brunch or a busy weekend. Can you make this homemade donuts recipe ahead of time? Absolutely. Cold proofing is actually my preferred method. After kneading the dough, cover it tightly and place it in the refrigerator overnight.
The cold environment slows down the yeast activity, allowing the dough to develop a much deeper, more complex flavor. Plus, cold dough is significantly easier to roll out and cut with a donut cutter or biscuit cutter. Your mileage may vary depending on your fridge temperature, but 8 to 12 hours is usually perfect. Just punch it down in the morning, roll it out, cut your shapes, and let them do their second rise at room temperature until they are puffy.
Mastering the Fry: Temperature and Technique
This is the part I love, but it is also where most people get nervous. Temperature is doing the heavy lifting here. You need a heavy-bottomed pot and a reliable candy thermometer. What is the best oil temperature for frying donuts from scratch? I recommend maintaining your neutral oil right in that window of 330°F to 340°F. This lower temperature allows for a slower rise in the oil, ensuring the center cooks completely before the outside gets too dark.
If you fry at 375°F, they will cook faster, but you risk a raw doughy center and a thick, crunchy crust. We want them pale golden and tender. If you do not have a thermometer, test the oil with a small scrap of dough. It should gently sizzle and float to the top within a few seconds. If it sinks and stays there, the oil is too cold and your pastries will absorb the grease. If it turns brown instantly, turn the heat down.
When you gently lower the dough into the oil using a slotted spoon or spider, do not overcrowd the pot. Adding too many at once drops the oil temperature drastically. I usually fry two or three at a time. You will see them puff up beautifully. That first golden flip in the oil is pure magic. The famous white ring around the middle happens because the dough is so airy it floats high in the oil, leaving the center equator untouched by the hot fat. Fry them until just pale golden, then transfer them to a cooling rack set over paper towels. Proper ventilation underneath keeps them from getting soggy.
Common Mistakes & Fixes
❌ Mistake: The dough is dense and heavy.
✅ Solution: You likely added too much flour during kneading. The dough should remain slightly sticky. Always measure flour using the spoon and level method.
❌ Mistake: The outside is dark brown but the inside is raw dough.
✅ Solution: Your oil temperature is too high. Keep an eye on it and adjust your burner to maintain a steady 330°F to 340°F.
❌ Mistake: They taste incredibly greasy.
✅ Solution: The oil was too cool. When the oil temperature drops below 325°F, the dough acts like a sponge and absorbs the fat instead of frying in it. Fry in smaller batches.
❌ Mistake: The glaze melts off completely and pools at the bottom.
✅ Solution: You glazed them while they were still lava-hot. Let them cool on a rack for about 5 to 10 minutes before dipping.
The Smoke Point and Oil Disposal
I want to touch briefly on the science of frying oil. Always use a neutral oil with a high smoke point, like canola, vegetable, or peanut oil. The smoke point is the temperature at which the oil begins to break down and burn, imparting a bitter, burnt flavor to your food. Since we are frying at 340°F, any of these neutral oils will work beautifully and keep the focus on that sweet, yeasty dough flavor.
Once you are finished frying, please do not pour hot oil down your sink. Let it cool completely in the pot. If you plan to reuse it, strain it through a fine-mesh sieve lined with a coffee filter to remove any flour bits, then store it in a dark, cool place. If you are disposing of it, pour the cooled oil into a sealable container and toss it in the trash.
Glazing and Finishing
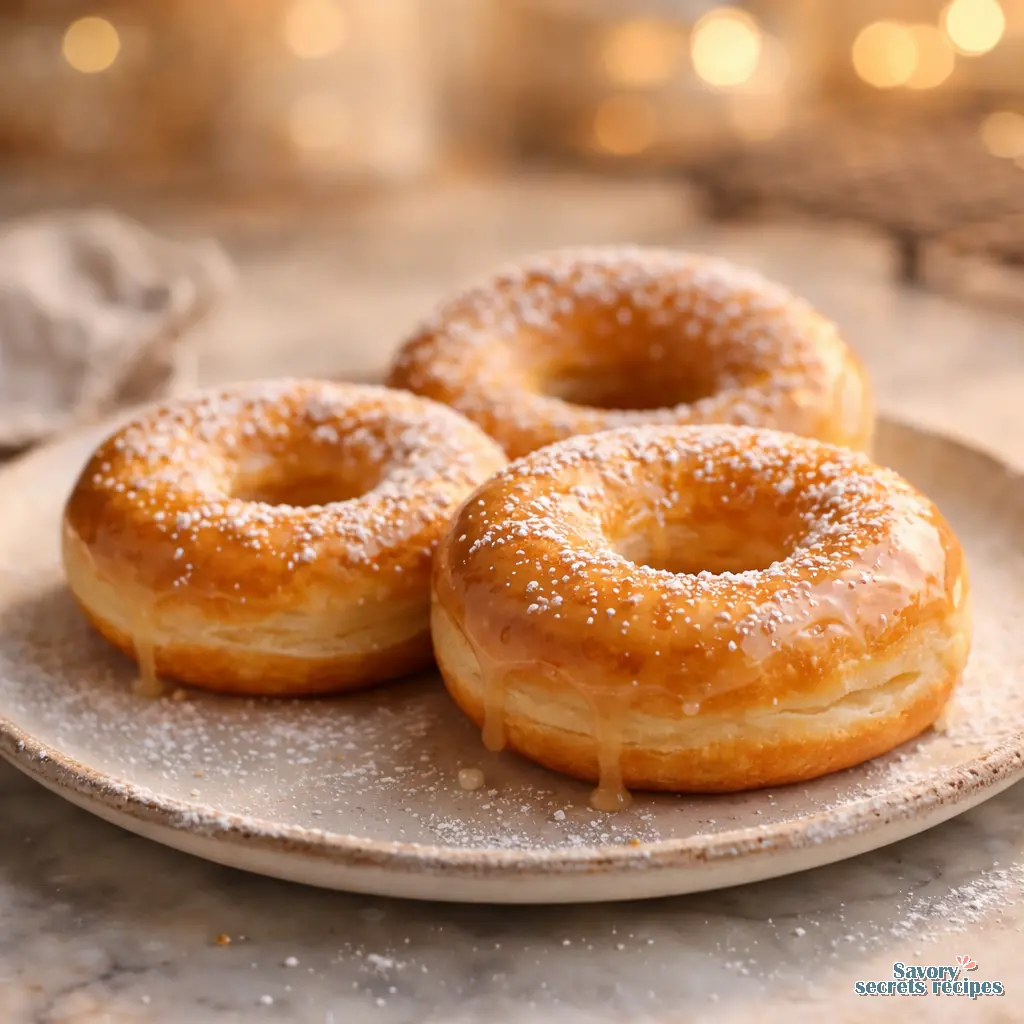
The texture should read smooth when you drag a spoon through your vanilla glaze. It is just a simple mix of confectioners sugar, whole milk, and a splash of good vanilla extract. You are looking for that ribbon stage where it flows off the whisk smoothly but is thick enough to coat the back of a spoon.
Wait until the fried dough is warm but not screaming hot. If you dip them straight out of the oil, the glaze will just melt and slide right off. Give them about five to ten minutes on the cooling rack. Dip the top half into the glaze, lift it straight up, let the excess drip off for a second, and place it back on the rack. The way the glaze sets into a crackly, translucent shell is a thing of beauty. The steam rising from a torn-open, freshly glazed pastry is honestly one of the greatest rewards in baking.
Frequently Asked Questions
Storage and Serving Your Homemade Donuts Recipe
Let’s talk about keeping these beauties fresh. I know it is tempting to make a massive batch, but fried dough has a notoriously short shelf life. They are truly at their absolute peak within the first few hours of frying. If you have leftovers, keep them at room temperature in an airtight container for 1 to 2 days. Do not put them in the refrigerator, as the cold air will dry out the crumb and make them stale faster.
If you are meal prepping or just want to save some for next weekend, freezing is your best option. Freeze them unglazed. Wrap them individually in plastic wrap, toss them in a freezer bag, and they will stay perfect for up to two months. When you are ready for a treat, thaw them at room temperature, give them 10 to 15 seconds in the microwave to wake up the crumb, and dunk them in fresh glaze. Serve them warm with a strong cup of coffee. It takes me right back to those Sunday mornings in New York when my mother would make sweets for us.
You Are Ready to Fry
I know tackling a yeasted dough and hot oil can feel intimidating, but you have got this. Once you pull that first golden, puffy ring out of the oil and see that perfect white line around the center, you will understand why making this homemade donuts recipe is so incredibly rewarding. It is a labor of love that your family will remember for years.
Take a photo before they all disappear, because they will go fast. I love when readers share their successes with me, so please let me know how your batch turns out. If you want to explore more variations, from chocolate glazes to different shaping techniques, browse my Pinterest boards for endless inspiration. Happy frying, and enjoy every single bite.
Reference: Original Source
How to make donuts at home for beginners using this yeasted donuts recipe?
Beginners should focus on temperature and patience. Use a thermometer for the milk to activate the yeast properly, and definitely use a candy thermometer for the oil. Do not rush the proofing time. Let the dough double in size naturally for the fluffiest homemade donuts recipe results.
Why are my homemade donuts tough instead of light and airy?
Toughness usually comes from overworking the dough or adding too much flour. You want the dough to remain slightly tacky and soft. Also, using all-purpose flour instead of bread flour yields a more tender bite, which I highly recommend for this homemade donuts recipe.
What is the best oil temperature for frying donuts from scratch?
The ideal frying temperature is between 330°F and 340°F. This specific range allows the dough to rise slowly in the oil, ensuring the center cooks completely before the outside becomes too dark. Keep an eye on it, as temperatures fluctuate when you add the dough.
Can I make the perfected donut dough ahead of time and let it rise in the fridge?
Yes, absolutely. A cold proof is fantastic for flavor development. After kneading, cover the bowl tightly and refrigerate overnight. In the morning, roll it out, cut your shapes, and let them rise at room temperature until puffy before frying.
What is the best way to store homemade donuts to keep them soft for the next day?
Store them at room temperature in an airtight container lined with a paper towel to absorb excess moisture. They are best eaten fresh, but they will keep for 1 to 2 days. A quick 10-second zap in the microwave revives their softness beautifully.
Can I use this dough to make filled doughnuts?
You certainly can. Instead of using a donut cutter with a center hole, use a solid round biscuit cutter. Fry them the exact same way, let them cool slightly, poke a hole in the side, and use a piping tip to fill them with jam or pastry cream.
Can I make these doughnuts in an air fryer?
You can, but I will be honest with you: they will taste more like sweet bread than traditional fried pastries. If you must air fry, brush them generously with melted butter and cook at 350°F for about 5 to 7 minutes until golden.
Should I glaze the donuts hot or cold?
Neither. You want them warm. If you glaze them right out of the hot oil, the sugar will melt off completely. If they are completely cold, the glaze goes on too thick. Wait about 5 to 10 minutes after frying for the perfect coating.
Can you freeze donuts?
Yes, but I strongly recommend freezing them unglazed. Wrap completely cooled, unglazed pastries tightly in plastic wrap and then in aluminum foil. They will keep in the freezer for up to two months without losing their wonderful texture.
How to glaze frozen donuts?
First, let them thaw completely at room temperature for about 1 to 2 hours. Once thawed, you can warm them in the microwave for just 10 seconds to soften the crumb, then dip them fresh into your prepared vanilla glaze.
How many teaspoons are in an envelope of yeast?
A standard envelope of active dry yeast or instant yeast contains exactly 2 and 1/4 teaspoons. For enriched doughs heavy with butter and sugar, I often use two full envelopes to guarantee a strong, beautiful rise.
Can you replace shortening with butter?
Yes, you can substitute butter for shortening in a homemade donuts recipe. Butter provides a much richer, superior flavor. Shortening can sometimes yield a slightly lighter color and higher rise, but the taste of real unsalted butter is always worth it in my kitchen.