Easy Moist Coconut Cake Recipe with Coconut Milk
Ingredients
Method
- Preheat the oven to 340°F (170°C) and line two 8-inch (20 cm) baking pans with parchment paper.
- Blend the shredded coconut until it reaches a flour-like consistency.
- Sift the blended coconut, all-purpose flour, baking powder, baking soda, and salt together and set aside.
- Combine the butter and granulated sugar in a large bowl or stand mixer and beat on medium-high speed for 3 minutes.
- Add the eggs two at a time, mixing until fully incorporated after each addition.
- Add half of the dry ingredients and mix on low speed until just combined.
- Mix in the sour cream, coconut milk, vegetable oil, vanilla extract, and coconut extract until just combined, then add the remaining dry ingredients and mix until incorporated.
- Gently fold the batter with a rubber spatula to ensure all ingredients are thoroughly combined.
- Divide the batter between the prepared pans and bake for 20 to 23 minutes, or until a cake tester comes out clean.
- Cool the cakes on a wire rack for 10 minutes, then remove them from the pans and allow them to cool completely.
- Remove the butter and cream cheese from the refrigerator 10 minutes before use, then cube the butter and sift the powdered sugar.
- Cream the butter in a stand mixer fitted with the paddle attachment on high speed for 5 minutes, scrape the bowl, and mix for another 2 minutes.
- Add the cream cheese, vanilla bean paste, coconut milk, and coconut extract, then cream with the butter for 1 minute.
- Scrape the bowl and mix in the sifted powdered sugar in two batches on low speed, ensuring each is incorporated before adding the next, then scrape again and mix for a final 2 minutes.
- Place the first cake layer onto a serving dish or cake board, using a turntable if available.
- Spread two large scoops of frosting evenly over the layer with an offset spatula, top with the second cake layer, apply a thin crumb coat to the entire cake, and refrigerate for 20 minutes.
- Apply the remaining frosting evenly over the cake and garnish with coconut flakes if desired.
Notes
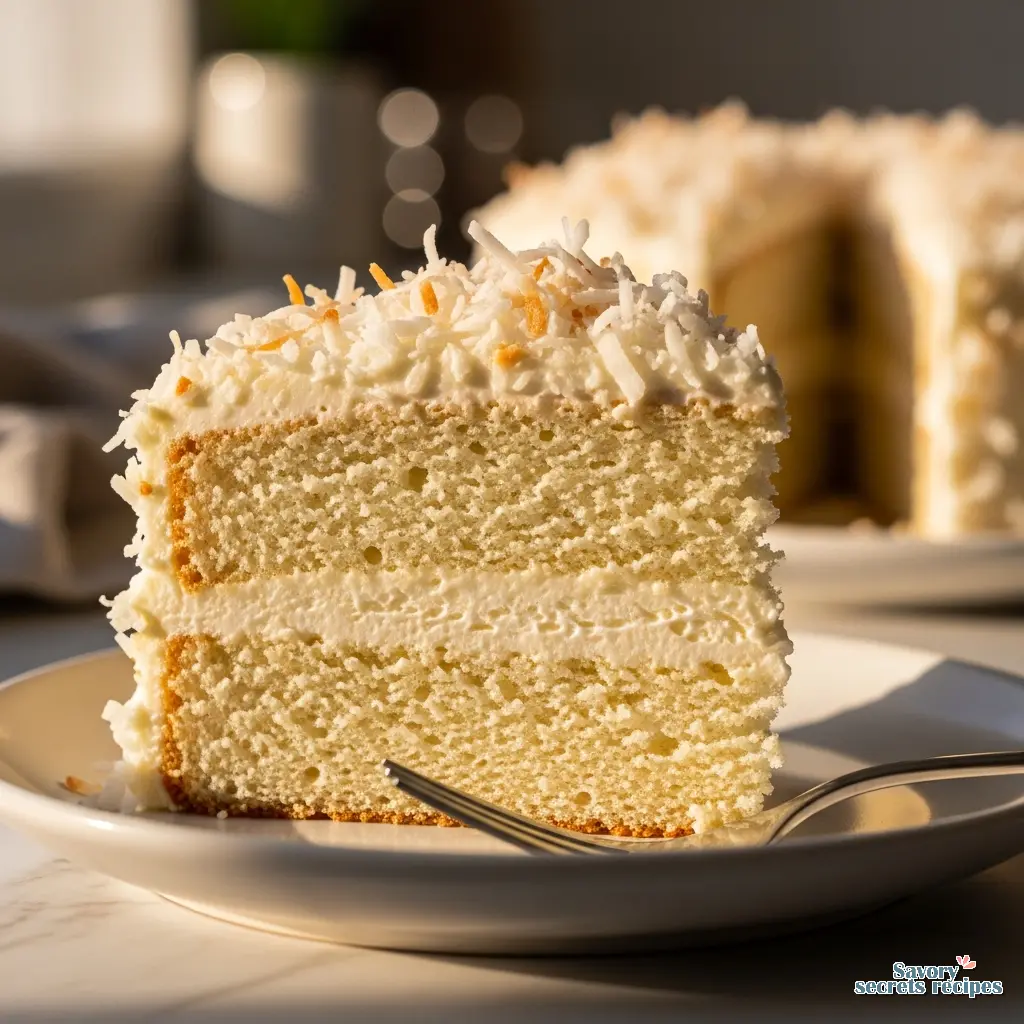
The Secret to a Truly Moist Coconut Cake
I remember standing on a wooden stool in my teta’s kitchen in Heliopolis, watching her pour cool syrup over hot basbousa. She’d count the folds of dough for other pastries, but for that semolina cake, it was all about the soak. That specific memory of liquid absorbing into a warm crumb is exactly why this moist coconut cake works perfectly. Wednesday evening, 35 minutes before a dinner party, you don’t have time for complicated layers. You need a guaranteed tropical flavor that looks impressive but is actually quite simple. With Cinco de Mayo right around the corner, this makes a brilliant tropical alternative to a traditional Tres Leches. If you are looking for a more traditional bake, consider trying my classic coconut cake recipe instead.
I know the idea of a dry cake is disappointing. We’ve all been there. You spend hours baking, only to cut into something that crumbles like sand. I once made kunafa for a potluck and didn’t drain the cheese enough, and the whole thing was soggy. I rewrote that recipe four times. But we are using the “poke cake” method here, and it’s practically impossible to mess up. You literally poke holes in the warm cake and pour a rich coconut mixture right over the top. It’s like a spa day for your dessert. The liquid seeps into every single crumb, creating a moist coconut cake that stays incredibly soft for days. Let me think through this. Yes, this is exactly the texture we’re after. Even my daughter, who is my toughest critic, asks for this specific refrigerator cake every single spring.
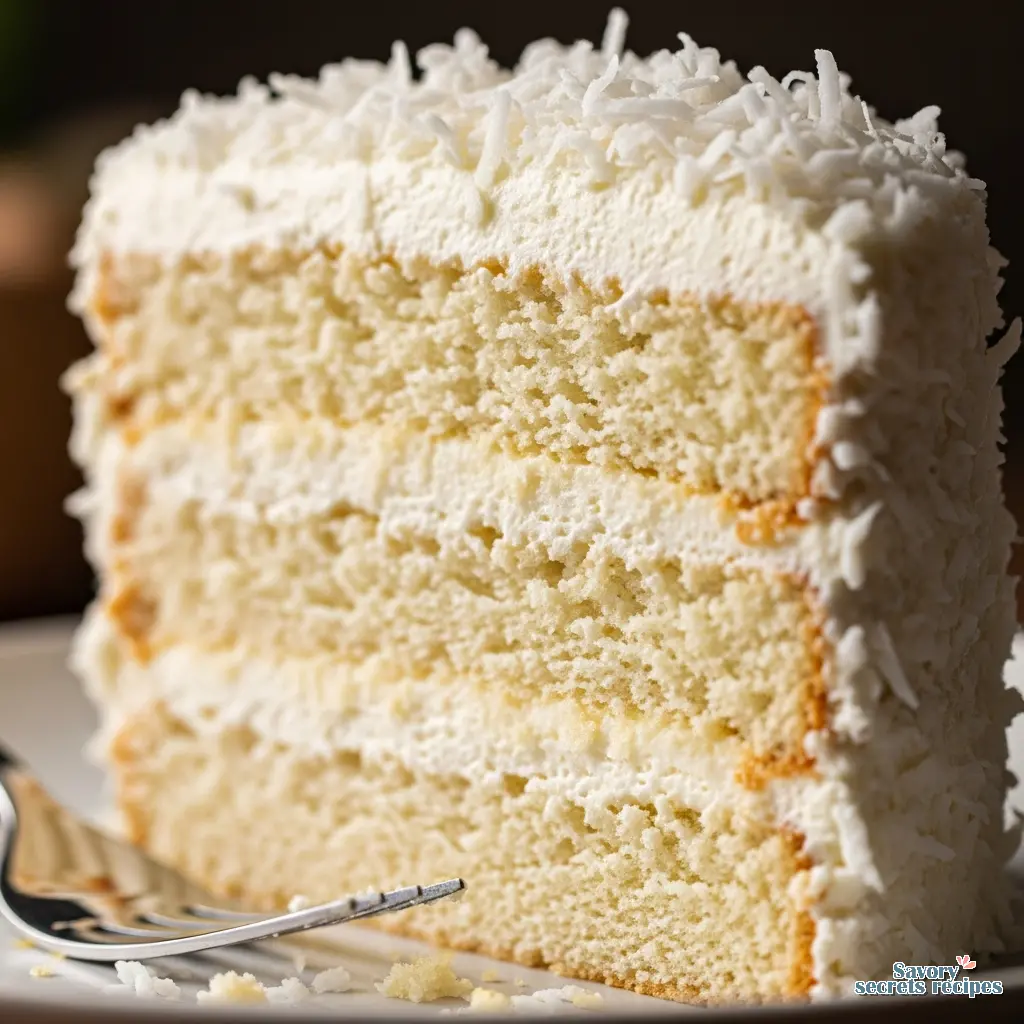
The 5 Power Ingredients for a Fluffy Crumb
Look, I’ll be honest. The grocery store baking aisle is overwhelming. But you only need a few specific items to make this easy baking project a reality. I prefer working with weight measurements exclusively, so grab your digital scale. Volume is too variable for the precision these doughs need. First, you’ll need all-purpose flour. I’ve seen people use cake flour, but if you measure your all-purpose flour by weight (in grams), you get the perfect structure without it being too dense. Add a little baking soda to give it that necessary lift. These steps are fundamental when preparing a homemade coconut layer cake that needs to hold its shape.
Then we have the liquids. You’ll want full-fat sour cream. I mean, you could skip this and use yogurt, but the fat content in sour cream gives the crumb a velvet texture that is hard to replicate. Next is the canned full-fat coconut milk. Please do not buy the carton of coconut beverage from the cereal aisle. You need the canned version for its fat content. Finally, we use cream of coconut. It’s a thick, sweet syrup usually found near the mixers at the store. It’s entirely alcohol-free and provides that intense, sweet tropical flavor. If you can’t find it, sweetened condensed milk mixed with a little coconut extract works in a pinch, but cream of coconut is the real star here.
Room Temperature: Why it’s Non-Negotiable
Here’s what I’m noticing. A lot of home bakers pull their eggs and butter straight from the fridge, mix them up, and wonder why their batter looks curdled. Temperature matters more than time here. You must use room temperature ingredients. Your eggs, sour cream, and butter need to be sitting on the counter for at least an hour before you start. I know it sounds fussy.
But this isn’t being fussy, it’s the difference between a dense brick and a fluffy masterpiece. When your ingredients are all at the same temperature, they emulsify properly. This traps air in the batter. That air expands in the oven, giving you a gorgeously light texture. If you add cold sour cream to room temperature butter, the butter seizes up into tiny hard lumps. The dough will tell you when it’s ready, but you have to set it up for success first.
The Science of Egg Whites: Why We Skip the Yolks
I need to test that assumption. That’s what I told myself when I first started developing this recipe. Traditional cakes use whole eggs, right? But I kept getting a yellow cake that tasted vaguely like coconut. I wanted a pristine white color and a fluffy texture that felt like eating a cloud. So, we use only egg whites. No yolks.
The fat in the yolks weighs down the crumb and turns the batter yellow. By using just the whites, we keep the cake incredibly light. Here’s a trick I learned the hard way. Separate your eggs while they are cold straight from the fridge, because the yolks are firmer and less likely to break. But then, let those separated whites sit until they reach room temperature before you whip them into the batter. Trust me on this. It changes everything. This careful handling of ingredients is what makes a fluffy coconut sponge cake stand out from denser varieties.
Visual Troubleshooting: A Photo Guide to “Is It Done?”
I’ve seen this go both ways. You set the timer for 35 minutes, the buzzer goes off, and you pull the pan out. Half the time it’s raw in the middle, and the other half it’s dry as a bone. Your hands know before your eyes do, but let’s talk about visual cues. A toothpick test is fine, but it doesn’t tell the whole story. You want to look for edges that are just starting to pull away from the sides of the pan. The top should spring back slightly when you gently press it with your finger.
If you struggle with sinking centers or domed cakes, I highly recommend using cake strips. These are little fabric strips you soak in water and wrap around your cake pans. They cool the edges of the pan so the outside doesn’t bake faster than the inside, ensuring perfectly flat, even layers. Oh, and always rotate your pans halfway through baking for even heat distribution. Most LA apartment ovens have terrible hot spots. I bought an oven thermometer and retested everything. Now it’s the first thing I mention in any baking troubleshooting. Consistency in heat is vital for a successful homemade coconut layer cake that rises uniformly.
Canned Coconut Milk Brand Comparison
Not all canned coconut milk is created equal. I’m working through the variables constantly in my kitchen. When you buy a can of full-fat coconut milk, you’ll notice that some brands separate into a hard block of white fat at the top and clear coconut water at the bottom. Brands like Aroy-D or Thai Kitchen are excellent choices because they have a high fat content.
Before you even open the can, you need to shake it vigorously. I mean really shake it. You want to incorporate those solid fats back into the liquid so you get a smooth, creamy pour. If you open it and it’s still separated, just pour it into a bowl and whisk it until it’s smooth before measuring it for your moist coconut cake batter. I’ve found that cheaper brands tend to be mostly water, which will leave your cake lacking that rich flavor.
Toasted vs Raw Coconut: Flavor Profile Comparison
This might vary depending on your oven, but I love playing with the texture of the coconut flakes. Raw, sweetened shredded coconut gives you that classic, chewy, birthday-party texture. It’s nostalgic. It reminds me of the treats my mother would buy for Eid when she didn’t have time to bake.
But if you want to elevate the flavor profile, try toasting half of your coconut flakes. Spread them on a baking sheet and bake at 325°F for about 5 to 10 minutes until they are the color of peanut butter. The smell shifts right before it’s done, so watch them closely. They burn fast. For the batter itself, I like to pulse long shreds of coconut in a food processor a few times. It gives you a much better mouthfeel in the cake without having huge, stringy pieces interrupting the tender crumb.
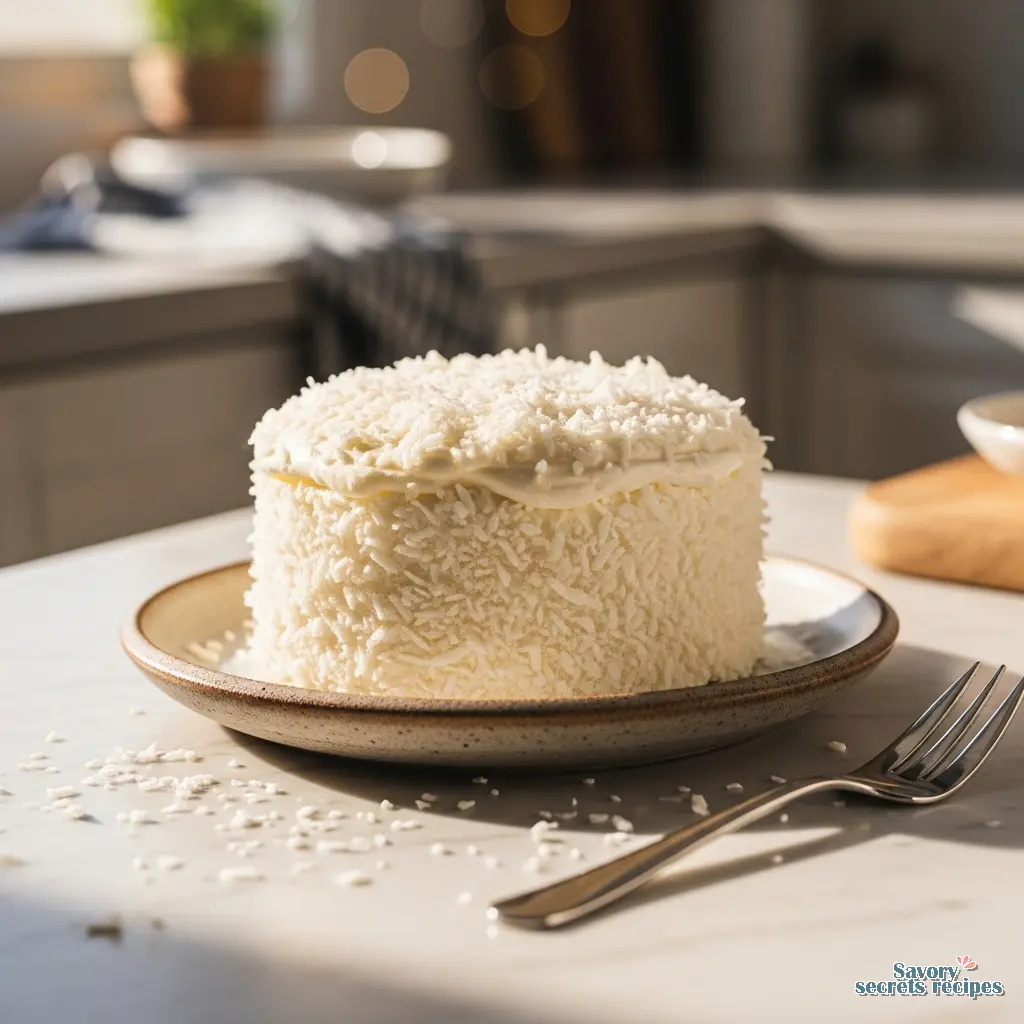
Step-by-Step Decorating: How to Apply Shredded Coconut
Decorating a cake can be intimidating. I completely understand that. But this is the beauty of a moist coconut cake. The coconut flakes hide absolutely every frosting mistake. You don’t need to be a pastry chef with a piping bag. Once your cake is completely cool, spread your thick, fluffy whipped cream or cream cheese frosting all over the top and sides.
Here’s the trick. You need to press the shredded coconut onto the frosting by hand while the frosting is still slightly soft. Just grab a handful of flakes and gently press them into the sides, letting the excess fall onto the plate or a baking sheet underneath. It’s a messy process. My daughter insists on helping with this part now, and I let her even though it adds twenty minutes to everything. It’s fun, it’s tactile, and the result is a stunning, snowy-white dessert that looks incredibly professional.
Storage & Freezing Guide
This is where most recipes skip the detail, and it drives me crazy. Proper storage is the key to maintaining that moist texture we worked so hard to achieve. Because this cake uses a dairy-rich frosting and a liquid soak, it cannot sit on your counter for days. It’s fine at room temperature for about half a day, especially if you’re serving it at a party. But after that, it needs to be chilled.
Store your leftover moist coconut cake in an airtight container in the refrigerator for 4 to 5 days. Honestly, I think it tastes even better on day two when served cold straight from the fridge. If you want to freeze it, wrap the unfrosted cake tightly in plastic wrap and then foil. It will keep in the freezer for up to 3 months. Let it thaw naturally in the fridge overnight before you frost and serve it. Please, whatever you do, do not microwave a slice if it has cream cheese frosting on it. The frosting will melt into a sad puddle.
Frequently Asked Questions
Common Mistakes & Fixes
Mistake: Using refrigerated coconut milk from a carton instead of a can.
Solution: The carton version is mostly water. Always buy canned full-fat coconut milk from the international aisle for the proper fat content required for baking.
Mistake: Overmixing the batter.
Solution: Once you add your dry ingredients, mix only until you no longer see streaks of flour. Overmixing develops the gluten, resulting in a tough, dense cake rather than a fluffy one.
Mistake: The cake sinks in the middle.
Solution: This usually happens if the oven door is opened too early or the cake is underbaked. Wait until the last 5 minutes of baking to check on it, and ensure a toothpick comes out mostly clean.
Bringing It All Together
There’s nothing better than watching a cake come together perfectly. When you cut into it and see those distinct, fluffy layers soaking up that rich coconut cream, it’s incredibly satisfying. I never get tired of that moment. Serve this moist coconut cake chilled, maybe with some fresh strawberries or a side of diced California Meyer lemons and pineapple if you want to lean heavily into the tropical vibe. It’s a dessert that feels like a celebration, even if you just threw it together on a busy weeknight.
If you try this recipe, please let me know how it turns out. I love hearing about your baking successes. For more inspiration, check out my Pinterest boards where I save all my favorite weeknight baking projects. Happy baking, and remember, the dough will tell you when it’s ready.
Reference: Original Source
Why is everything at room temperature?
Using room temperature ingredients like butter, eggs, and sour cream is critical for proper batter emulsification. Cold ingredients won’t mix smoothly, leading to a dense, heavy crumb. Give them at least an hour on the counter before baking your moist coconut cake.
Can I turn this cake into a coconut sheet cake?
Absolutely. You can easily bake this in a 9×13-inch pan to make a simple sheet cake. Just adjust your baking time to 35 to 40 minutes. It’s the perfect potluck dessert because it travels beautifully in the pan without sliding around.
Should I use sweetened or unsweetened coconut for this recipe?
I prefer using unsweetened shredded coconut in the batter so it doesn’t become overly sugary. However, you can use sweetened coconut for the outside decoration. If you only have unsweetened, just know the final result will be slightly less sweet, which many people actually prefer.
Can I use desiccated coconut or coconut flakes?
Desiccated coconut is much drier and finer, which will absorb more moisture and change the cake’s texture. Large coconut flakes are too heavy for the batter but look beautiful as a garnish. Stick to standard shredded coconut for the actual cake layers.
How do you press coconut on a cake?
The easiest method is to use your hands. While the frosting is still freshly applied and slightly sticky, grab a handful of shredded coconut and gently press it directly against the sides and top. Let the excess fall onto a tray underneath for easy cleanup.
Why is my coconut cake dry?
A dry cake is usually the result of overbaking or measuring flour by volume instead of weight. Always weigh your all-purpose flour in grams. Also, ensure you aren’t skipping the poke cake soaking step, as that liquid is what guarantees a truly moist coconut cake.
Can I make the frosting in advance?
Yes, you can prepare the cream cheese frosting up to two days in advance. Store it in an airtight container in the refrigerator. Before using, let it sit on the counter for about 15 minutes to soften slightly, then give it a quick whip to smooth it out.
Can I use light coconut milk?
I strongly advise against it. Light coconut milk has a much higher water content and lacks the essential fats needed to create a rich, tender crumb. Using it will likely result in a dry, flavorless cake. Always reach for the full-fat canned version.