


Bake the best rich chocolate cake for birthdays
Ingredients
Method
- Preheat the oven to 350°F. Grease two 8-inch or 9-inch round cake pans, line the bottoms with parchment circles, and set them aside.
- Combine the flour, cocoa powder, baking soda, baking powder, and salt in a bowl, then sift or whisk to remove clumps and set the mixture aside.
- Whisk the granulated sugar, eggs, buttermilk, warm water, vegetable oil, and vanilla extract in a large bowl until evenly incorporated.
- Stir half of the dry ingredients into the wet mixture until just combined, then add the remaining dry ingredients and stir until incorporated without overmixing; ensure the batter is thin and slightly bubbly.
- Divide the batter evenly between the prepared cake pans and gently tap them on the counter to release air bubbles.
- Bake the cakes for 26-30 minutes for 9-inch pans or 28-34 minutes for 8-inch pans. Test for doneness by ensuring the center does not jiggle, the surface springs back when pressed, or a toothpick inserted into the center comes out clean.
- Remove the cakes from the oven and allow them to cool completely in the pans on a wire rack.
- Beat the room-temperature butter in a large bowl until creamy, about one minute. Gradually add the confectioner's sugar and cocoa powder, mixing slowly until combined, then whip on high speed for 2-3 minutes until light and fluffy.
- Add the heavy cream, vanilla extract, and salt, then whip for 2-3 minutes until fluffy, adding more cream as needed to reach the desired consistency.
- Carefully remove the cakes from the pans and trim the rounded tops with a serrated knife to create flat layers.
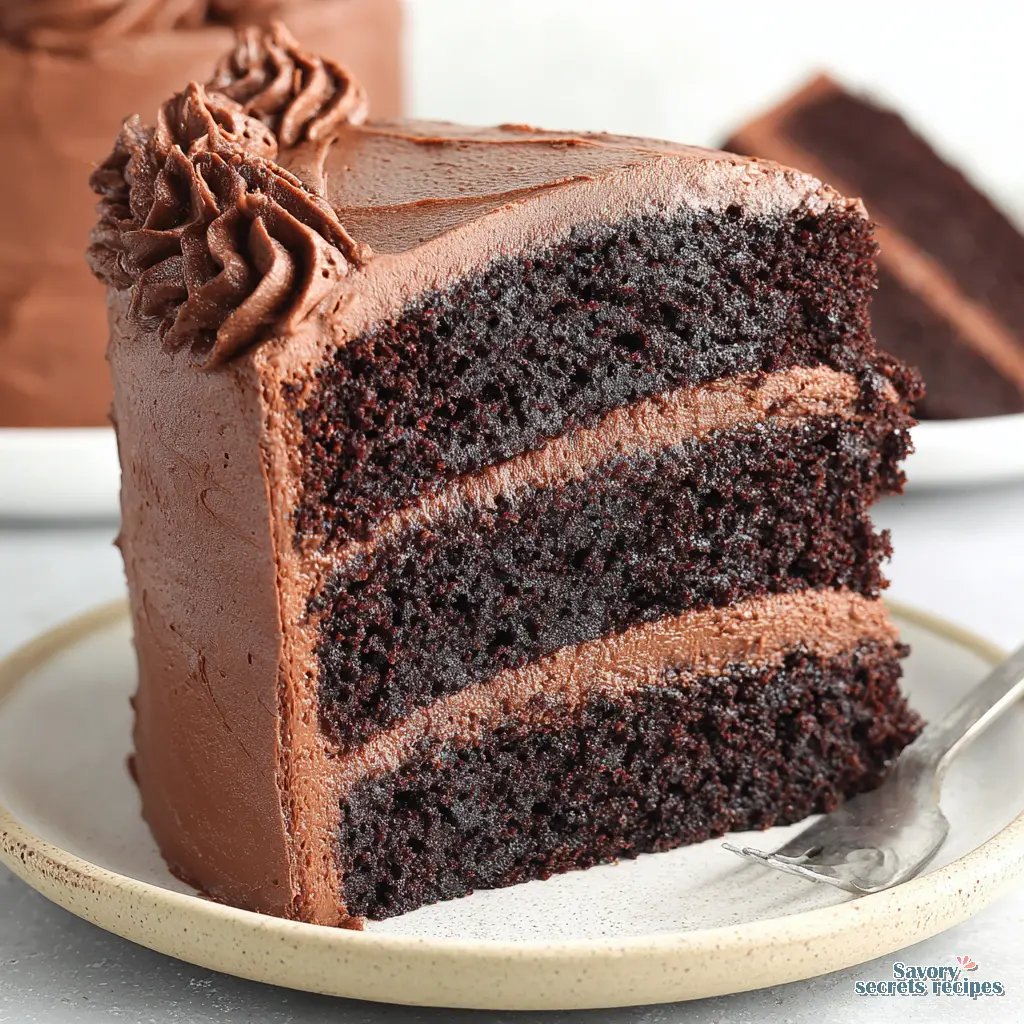
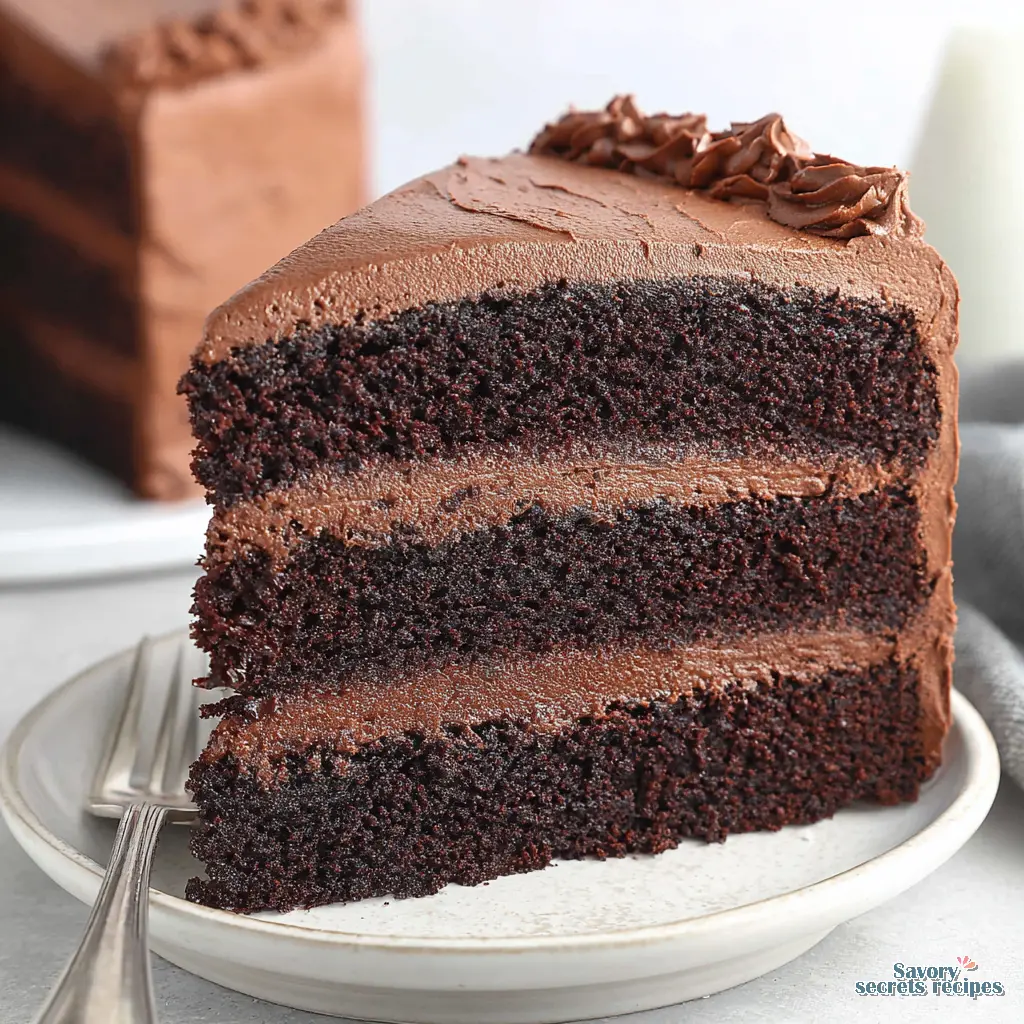
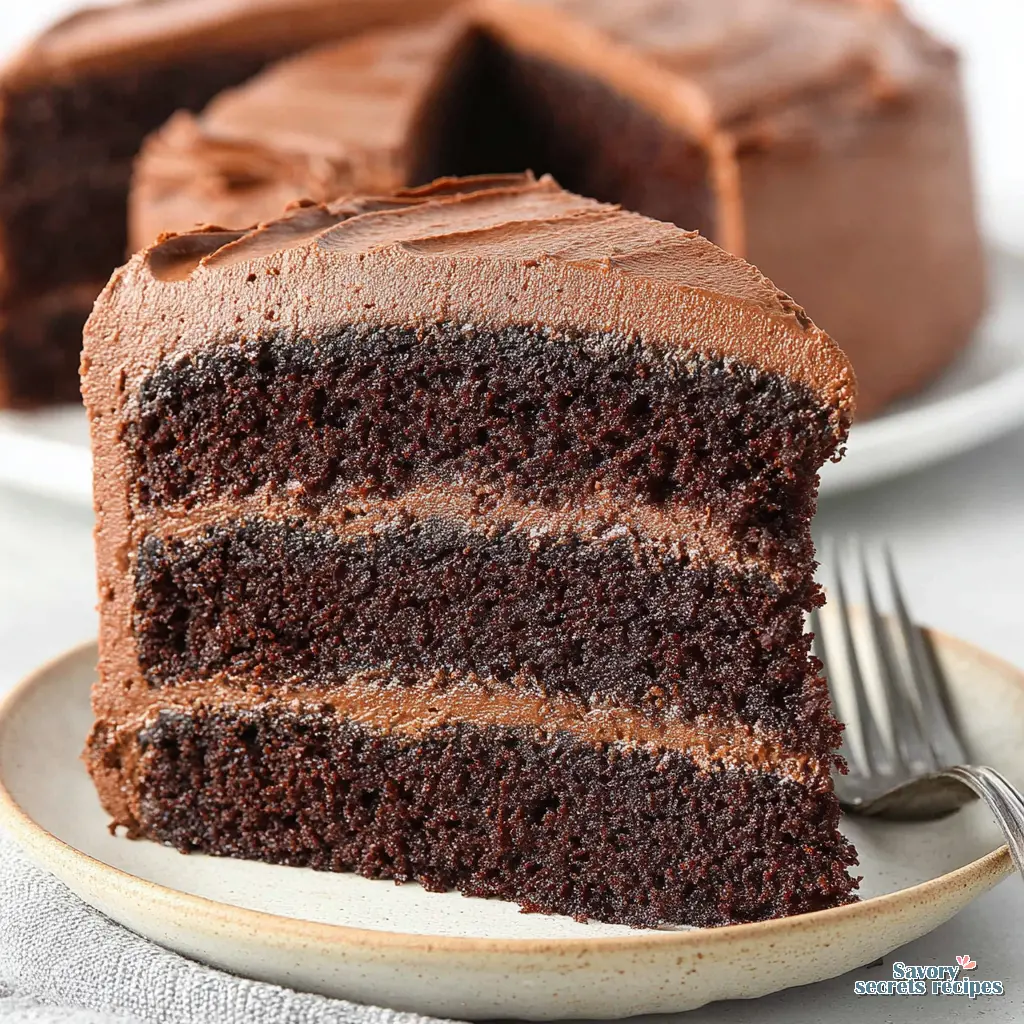
- Place the first cake layer top-side down on a serving plate, spread an even layer of frosting over it, add the second layer top-side down, and frost the top and sides.
Nutrition
Notes
- Serves: Layer cake can be sliced to serve up to 30-40 guests when serving small slices (like wedding cake slices). If slicing into wedges, cake will yield 12-16 slices.
- Baking is an exact science: I do not recommend substituting any ingredients. The oil, buttermilk, eggs, and sugar keep your cake moist - substituting any of these ingredients can change the texture and make your cake dry.
- Storage: Unfrosted or frosted cake will keep in a sealed container at room temperature for 2-3 days, in the refrigerator for 3-4 days, or frozen for up to 2 months. If refrigerating or freezing unfrosted cake layers, wrap tightly in plastic and place in a tightly sealed container. Thaw overnight in the refrigerator, then bring to room temperature for an hour before serving.
- Top tips: Be sure to check out my 10 tips for baking cake, based on reader comments and questions!
The Ultimate Rich Chocolate Layer Cake for Your Next Celebration
I remember standing on a wooden stool in my teta’s kitchen in Heliopolis, watching her fold butter into dough. I was seven, and I thought I was just learning how to count in Arabic. Really, I was learning the exact ratios of baking. She taught me that your hands know before your eyes do, and that the smell of a kitchen shifts right before a bake is done. I apply that exact philosophy to this rich chocolate layer cake. It’s the masterpiece you’ve been looking for.
With Mother’s Day just around the corner, I know the pressure to perform is real. You want a bakery-quality centerpiece that makes everyone pause when you carry it to the table. I’ve tested this recipe until my Los Angeles kitchen was covered in cocoa powder, just to make sure it’s absolutely foolproof for you. Look, I’ll be honest. Making a celebration cake feels intimidating. But once you understand the basic structure, it’s actually quite forgiving. You’ll get that perfectly moist crumb, those sharp edges, and a decadent chocolate flavor that tastes like it took three days to build.
Why This Recipe Works (And Why We Skip the Butter)
Let me think through this. People always ask why my best rich chocolate cake for birthdays uses vegetable oil instead of butter. I mean, who wants a cake without butter? Well, actually, you do. Butter tastes incredible, but oil coats the flour proteins completely. It prevents strong gluten formation, which guarantees a tender, velvety crumb that stays moist for days. You’ll get plenty of buttery flavor from the rich buttercream frosting later. If you find the science of oil-based cakes complex, you can start with a more classic chocolate cake that uses traditional methods.
I prefer working with weight measurements exclusively. Volume is simply too variable for the precision a rich chocolate layer cake needs. Grab your digital scale. Trust me on this. Weighing your flour and cocoa powder is the difference between a dense, dry brick and a light, fluffy sponge.
You also need room temperature ingredients. Cold eggs or cold buttermilk will shock the batter, causing uneven mixing. If you forgot to take your eggs out of the fridge, don’t panic. Just warm those refrigerated eggs in a cup of warm water for 10 minutes to speed up the process. It’s a tiny step that changes everything.
The Magic of Blooming: Hot Coffee and Cocoa
Here’s what I’m noticing in most failed cake recipes. They just mix dry cocoa into cold batter. We don’t do that here. You must use boiling hot liquid to bloom the cocoa powder and activate the leaveners. I highly recommend hot coffee. You won’t taste the coffee at all. It simply deepens the chocolate profile, making it taste darker and more complex.
If you prefer, you can use hot water or hot chai tea instead of coffee. You can even use decaf coffee or instant espresso powder mixed with boiling water. The lava-hot water hits the cocoa, and the smell shifts immediately. It emulsifies the fats and cocoa butter, creating a glossy, dark batter. You’ll notice the batter is very thin. Don’t worry, a thin batter is completely normal here and results in that signature moist crumb.
Before you mix, always sift your cocoa powder to avoid those bitter cocoa chunks in the final crumb. It takes two extra minutes and saves you from biting into a pocket of dry powder.
Natural vs. Dutch-Process Cocoa Powder
I’ve seen this go both ways, but the traditional method says one thing, and the chemistry backs it up. You need natural cocoa powder for this rich chocolate layer cake. Dutch process cocoa has its acidity neutralized during manufacturing. Because our recipe relies heavily on baking soda for lift, we absolutely need the natural acid in standard cocoa powder to react with it.
If you substitute Dutch-process cocoa in a recipe relying on baking soda, your cake won’t rise properly. It’ll sink in the middle and become incredibly dense. Save the Dutch-process cocoa for your brownies or puddings where structure isn’t as dependent on that chemical reaction.
Interactive Make-Ahead Schedule for Stacking
I need to test the assumption that you have to bake and decorate a cake on the same day. You shouldn’t. Breaking this down into two days is how the professionals do it, and it saves your sanity.
Day 1: Bake and Chill
First, prep your pans. Use nonstick spray PLUS parchment paper liners for a guaranteed release. Weigh your batter into the pans for perfectly even layers. If you want completely flat, non-domed tops, use baking strips or wet cloths wrapped around the outside of your pans. Bake until a tester comes out with just a few moist crumbs attached. Cool the layers completely before frosting to prevent melting your beautiful buttercream. Wrap them tightly in plastic wrap and chill them overnight.
Day 2: The Build
How to stack a 3 layer chocolate cake without it leaning or collapsing? You need cold cake layers. Grab a turntable, a bench scraper, and an offset spatula. If your cakes did dome slightly, level the domed cakes with a serrated knife or a cake leveler for flat stacking. Place your first layer, pipe a border of frosting, fill the center, and repeat. That moment the third layer is perfectly centered is purely magical.
Always apply a crumb coat first. It’s just a thin layer of frosting that traps the loose crumbs. Chill the cake for 20 minutes, then apply your final, thick layer of frosting. The satisfaction of a smooth-as-glass frosting finish is totally worth the extra chill time.
Common Mistakes & Fixes
Mistake: Using cold eggs or buttermilk.
Solution: This causes uneven mixing and a dense crumb. Always bring dairy to room temperature. If you’re in a rush, place eggs in warm water and microwave buttermilk for 10 seconds.
Mistake: Frosting the cake while it’s still slightly warm.
Solution: I learned this the hard way. Warm cake melts buttercream instantly, causing layers to slide. Chill your cake layers completely, preferably overnight.
Mistake: Your cake sinks in the middle.
Solution: You likely opened the oven door too early, or your oven temperature is off. I discovered that most American ovens run twenty degrees hotter or colder than they claim. Get an oven thermometer.
Mistake: Overmixing the batter.
Solution: Once the flour goes in, mix just until you can’t see dry streaks anymore. Overmixing develops gluten and leads to a tough, dry crumb.
High-Altitude Adjustments
If you’re baking above 3,000 feet, the lower air pressure means your leaveners work too quickly, causing the cake to rise fast and then collapse. I’m working through the variables for you. Here’s what you need to change:
- Increase your all-purpose flour by 2 tablespoons per cup.
- Decrease the baking soda by 1/8 teaspoon.
- Decrease the granulated sugar by 1 tablespoon per cup.
- Add an extra tablespoon of buttermilk to keep the moisture high.
Storage & Freezing Guide
How do I store this homemade chocolate dessert to keep it moist? It’s a question I get constantly. The worst thing you can do is leave cut cake exposed to the air. Always wrap leftover slices in plastic wrap or wax paper pressed directly against the cut edge to prevent stalling and drying out.
You can keep the frosted cake at room temperature under a glass cake dome for up to 3 days. If your kitchen is very warm, move it to the refrigerator where it’ll stay fresh for up to 5 days. Just remember to bring it back to room temperature before serving for the best texture. Cold buttercream is hard and waxy; room temperature buttercream is silky and melts in your mouth.
If you want to freeze the cake layers in advance, let them cool completely. Wrap each layer tightly in a double layer of plastic wrap, then a layer of aluminum foil. They’ll freeze beautifully for 2-3 months. Thaw frozen layers overnight in the refrigerator with the wrapping intact to prevent condensation from making the cake soggy.
Frequently Asked Questions
You’re going to nail this. I know baking a tiered centerpiece feels like a lot of pressure, but just trust the process. Weigh your ingredients, bloom that cocoa, and take your time with the frosting. Cut that first slice, look at those distinct, beautiful layers, and enjoy the applause from your guests. You’ve earned it.
For more inspiration, check out my Pinterest boards where I share tons of variations and seasonal baking ideas.
Reference: Original Source
Can I make this rich chocolate layer cake as a 1-layer cake?
You absolutely can. Just halve the recipe and bake it in a single 8-inch or 9-inch pan. You’ll need to adjust the baking time slightly, checking it around the 30-minute mark. It makes a perfect, simple snacking cake for weeknights.
Can I make cupcakes from this rich chocolate layer cake recipe?
Yes, this batter scales beautifully for cupcakes. It’ll make about 24 standard cupcakes. Fill the liners only halfway, as this batter rises quite a bit. Bake at 350°F for 18-22 minutes. They turn out incredibly moist with perfect domes.
Will this cake hold up under heavy fondant?
I wouldn’t recommend it. This crumb is incredibly tender and moist, which is exactly why it tastes so good. However, that tenderness means it lacks the rigid structure needed to support the heavy weight of thick fondant decorations. Stick to buttercream or ganache.
Is buttermilk necessary or can I use regular milk?
Do not make substitutions for key structural ingredients here. The acidity in buttermilk reacts with the baking soda to give the cake its lift. If you’re out, make DIY buttermilk by adding one tablespoon of white vinegar or lemon juice to regular milk and letting it sit for five minutes.
Why is the batter for my rich chocolate layer cake so thin?
I know it looks alarming, but a very thin batter is exactly what you want. The boiling hot coffee melts the sugars and cocoa butter, creating a liquid consistency. That high hydration ratio is the secret behind the incredibly moist, fudgy texture after baking.
Can I use Dutch-process cocoa powder instead?
I strongly advise against it. Dutch-process cocoa is neutralized, meaning it lacks the acid needed to react with the baking soda in this recipe. If you use it, your rich chocolate layer cake won’t rise properly and will likely sink in the center.
How do I store leftovers of this homemade chocolate dessert?
Press plastic wrap directly against the cut edges of the cake to lock in moisture. You can keep it at room temperature under a dome for 3 days, or refrigerate it for up to 5 days. Always bring slices back to room temperature before eating.
Can I freeze the cake layers for later?
Absolutely. Let the layers cool completely, wrap them twice in plastic wrap, and then once in foil. They’ll keep in the freezer for up to 3 months. Thaw them overnight in the fridge while still wrapped so the condensation forms on the plastic, not your cake.


