Easy Thin Crispy Chicken Parmesan Main Course
Ingredients
Method
- In a shallow bowl, combine the panko breadcrumbs, garlic, parsley, and ¼ cup Pecorino Romano. Season with salt and pepper, then mix well, rubbing the garlic evenly into the breadcrumbs.
- In a second shallow bowl, whisk the eggs with ½ cup Pecorino Romano, a pinch of salt and pepper, and 1 tablespoon water until smooth.
- Place the flour in a third shallow bowl and season lightly with salt and pepper.
- Pound each chicken cutlet between plastic wrap until evenly thick. Season both sides with salt and pepper.
- Dredge each cutlet in flour, shaking off excess. Dip into the egg mixture, then coat well in the breadcrumb mixture, pressing gently to adhere. Place on a plate and repeat. Let rest for 15 minutes to set the breading.
- Preheat the oven to 450°F (230°C). Heat a generous layer of olive oil in a large heavy skillet over medium heat.
- Fry the chicken in batches until golden brown and crispy on both sides. Transfer to a rack or paper towels to drain.
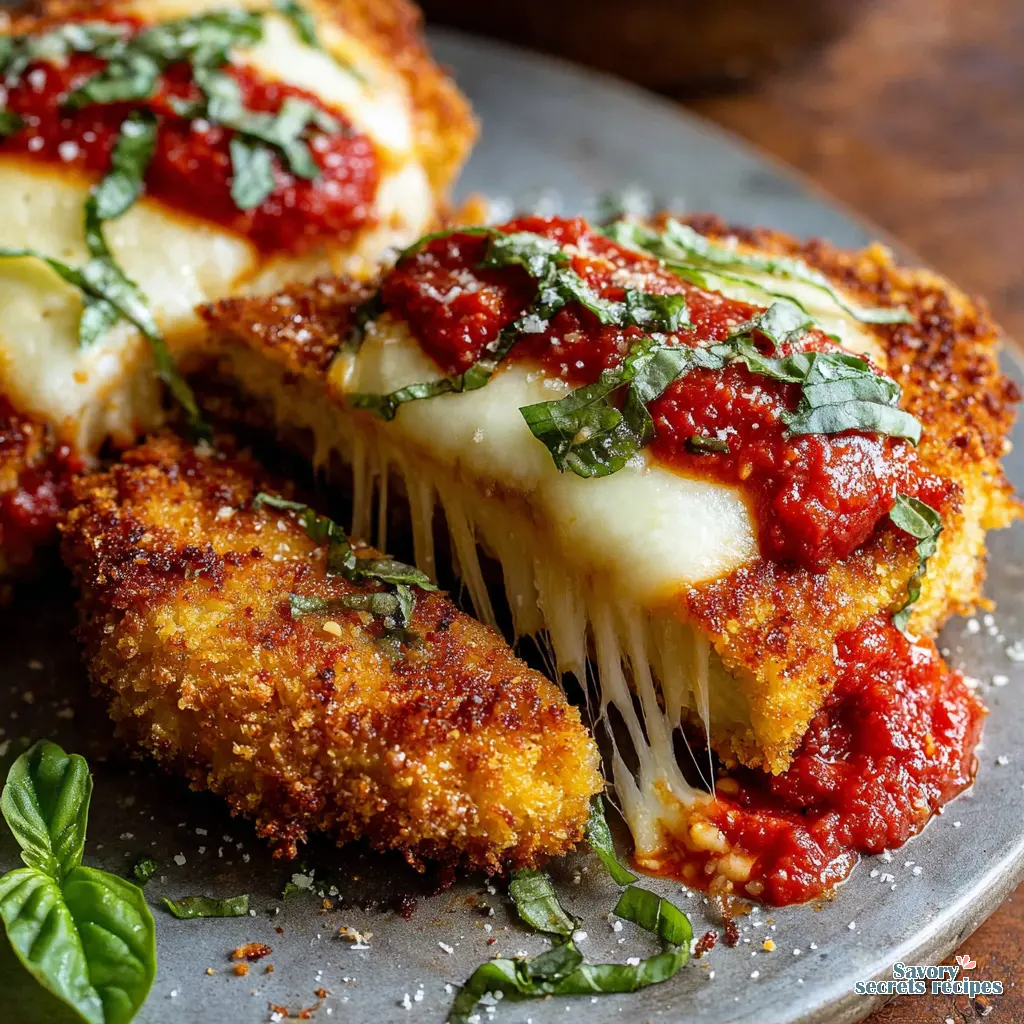
- Arrange the chicken on a baking sheet. Top each piece with 2–3 slices of mozzarella, leaving some crispy edges exposed.
- Bake for about 10 minutes, until the cheese is fully melted. Broil briefly if desired to lightly brown the cheese.
- Meanwhile, heat the marinara sauce until hot. Spoon sauce onto plates, place the chicken on top, and finish with extra grated cheese and fresh basil. Serve immediately.
Nutrition
Notes
Why You’ll Love This Thin Crispy Chicken Parmesan
I know the feeling. It’s Wednesday evening in Los Angeles, you’ve just battled the holiday traffic, and you’re staring down dinner with maybe 35 minutes to spare. You want something comforting, maybe even a little impressive, but the thought of another soggy chicken parmesan disaster just makes you want to order takeout. Let’s be clear about this: restaurant-quality chicken parm at home doesn’t have to mean a limp, sad piece of chicken swimming in sauce. That’s not how this works.
I’ve been there, trust me. I once ruined an entire week’s worth of recipe testing because I didn’t account for my home oven running twenty degrees hot. I was so focused on the timing and ratios that I forgot to verify the most basic variable. It’s frustrating when the basics go wrong, especially with a classic like this. But what if I told you that achieving truly thin crispy chicken parmesan, the kind that crackles with every bite, is completely within your reach, even on a busy weeknight?
This recipe isn’t just about cooking chicken; it’s about mastering a technique that ensures a perfectly golden, undeniably crispy coating every single time, even during these cooler LA winter months when we actually use our ovens. You’ll get tender, juicy chicken, a delicious homemade-tasting marinara, and that bubbly, gooey mozzarella, all without the usual fuss. This is the comfort food you’ve been craving, done the correct way.
Ingredients for Thin Crispy Chicken Parmesan
Getting the best thin crispy chicken parmesan starts with the right ingredients, and honestly, quality matters here. You don’t need anything fancy, but a good foundation makes all the difference. We’re talking about boneless, skinless chicken breasts, of course. For the breading, panko breadcrumbs are non-negotiable for that superior crispy texture. Regular breadcrumbs just won’t cut it if you’re chasing that real crunch. We’re not guessing on this one.
Your cheese choice is important too. Fresh mozzarella is fantastic, but if you’re using it, be prepared to blot some moisture. Parmesan cheese, or even Pecorino Romano if you like a sharper bite, gets mixed right into the panko for an extra layer of flavor and crispiness. Then there’s the marinara sauce. A good quality, rich marinara, whether it’s your grandmother’s secret recipe or a solid store-bought brand from Ralphs or Trader Joe’s, will really make this dish sing. Fresh basil leaves are the final touch, adding a bright, herbaceous note that elevates everything.
Making Thin Crispy Chicken Parmesan (Steps)
Now, let’s get into the process. This isn’t just a list of steps; it’s about understanding the *why* behind each action to ensure you get that perfect result. We’re building something delicious here, and precision really counts, just like Zoya always taught me with her blini batter. We’re not just cooking; we’re crafting.
Preparing the Chicken Breast
The secret to thin crispy chicken parmesan starts right here: pounding the chicken. This is where many recipes fall short. You want those boneless, skinless chicken breasts pounded to an even 1/4 to 1/2-inch thickness. This isn’t just about making them cook faster, though that’s a nice bonus for a busy weeknight dinner. It’s about ensuring every part of the chicken cooks evenly, preventing dry spots and allowing that crispy coating to shine. Use a meat tenderizer or a heavy rolling pin. Cover the chicken with plastic wrap first; it makes cleanup a breeze and keeps things hygienic.
After pounding, generously season both sides of your chicken cutlets with kosher salt and freshly ground black pepper. Don’t be shy here; this is your first layer of flavor. That’s the correct instinct. Think of it as seasoning a good piece of meat before it even hits the pan. If you don’t season at this stage, you’ll find the final dish tastes a little flat, and we definitely don’t want that. Temperature matters here, too: let the seasoned chicken sit at room temperature for about 10 minutes while you set up your breading station; it helps with even cooking.
Breading for Ultimate Crispiness
This is where the magic happens for that incredible crispy texture. You’ll need three shallow dishes: one with all-purpose flour, one with a well-beaten egg wash (eggs whisked with a splash of water or milk), and the third with your panko breadcrumbs mixed with finely grated Parmesan cheese and fresh Italian flat-leaf parsley. For an easy weeknight meal, this setup is key. Designate one hand for wet ingredients and one for dry; it’s a small detail, but it prevents your fingers from becoming breaded clubs. This is the correct way to set up your station.
Dredge each thin chicken cutlet first in flour, shaking off any excess. Then dip it into the egg wash, letting any extra drip off. Finally, press it firmly into the panko-Parmesan mixture, ensuring it’s completely coated. Really press it on there. Once breaded, lay the cutlets on a wire rack set over a baking sheet. Here’s a pro tip: let the breaded chicken rest in the refrigerator for about 15 minutes before frying. This allows the coating to adhere properly, making it less likely to fall off in the hot oil. That’s exactly the texture we want.
Frying & Baking Instructions
For the frying, use a high-smoke-point oil like avocado oil, canola, or vegetable oil. Pour about 1/2 inch into a large, heavy-bottomed skillet and heat it over medium-high heat until it shimmers. You want that oil hot enough to create an instant sizzle when the chicken hits it, but not so hot that it burns the breading before the chicken cooks through. If it doesn’t look right, it isn’t right. Fry two cutlets at a time; do not overcrowd the pan. Overcrowding drops the oil temperature, leading to soggy chicken, and we’ve worked too hard for that.
Fry for about 3-4 minutes per side, until deeply golden brown and crispy. The color of toasted almonds, not pale beige. Transfer the fried chicken cutlets back to the wire rack. Now for the baking: preheat your oven to a blazing 450°F. Arrange the fried cutlets on a baking sheet, top each with a spoonful of marinara sauce, a slice of fresh mozzarella (blotted dry, please, we’re avoiding sogginess), and a sprinkle of Parmesan. Bake for 8-10 minutes, or until the cheese is melted and bubbly. For that extra golden, restaurant-style finish, broil for 1-2 minutes, but watch it like a hawk. Never use parchment paper under the broiler, that’s a fire hazard. Ensure chicken reaches an internal temperature of at least 165°F for food safety.
Expert Tips for the Crispiest Chicken Parm
Achieving that ultimate thin crispy chicken parmesan isn’t just about following steps; it’s about understanding the little nuances. One thing most people don’t know is the power of resting the breaded chicken. That 15-minute chill time really helps the coating set, preventing it from sliding off in the hot oil. It’s a small pause, but it makes a huge difference to the crispy texture.
Another critical point is managing moisture. If you want truly crispy chicken, you can’t drown it in sauce and cheese. I mean, you could, but then you’re making something else. A thin layer of good quality marinara and blotted mozzarella slices are key. Blotting fresh mozzarella with paper towels removes excess water that would otherwise steam the breading, turning your beautiful crispy coating into a soggy mess. Less is more, especially when it comes to keeping things crisp.
And let’s talk about the oven. A screaming hot oven, like 450°F, is essential for baking the chicken and melting the cheese quickly without overcooking the chicken or making the breading soft. That high heat ensures a quick finish and helps maintain that golden brown exterior. For a truly impressive touch, a brief stint under the broiler gives you those coveted bubbly, slightly browned cheese spots. Just remember to watch it constantly; broiler heat is intense, and exposed chicken can burn in seconds. We’re not guessing on this one.
Serving Suggestions for Thin Crispy Chicken Parmesan
Once you’ve got your beautiful, thin crispy chicken parmesan, what do you serve it with? For an easy weeknight meal, a simple side of cooked pasta tossed with garlic butter or a light marinara sauce is always a winner. If you’re feeling a bit more ambitious, a fresh arugula salad with a bright vinaigrette provides a nice contrast to the richness of the chicken and cheese. It’s avocado toast money well spent, I think, for the freshness. For a truly indulgent meal, pairing it with creamy four-cheese spaghetti can elevate the experience. Alternatively, a side of creamy parmesan rice or garlic parmesan rice offers a delicious and hearty accompaniment.
For a family dinner, consider serving it with some warm garlic bread or even a side of roasted asparagus for a seasonal touch, especially with spring produce popping up at the Santa Monica Farmers Market. If you’ve got little ones, slicing the chicken into thin strips before serving makes it much easier for them to manage. And remember, always offer extra marinara sauce on the side for dipping, so everyone can customize their sauciness without compromising the crispiness of the main dish. That’s the correct instinct.
Storage & Reheating Your Thin Crispy Chicken Parmesan
You’ll probably have leftovers, and that’s a good thing! To store your thin crispy chicken parmesan, let it cool completely, then place it in an airtight container in the refrigerator. It’ll stay fresh for 2 to 3 days. I’m not entirely convinced that reheating a massive batch works at scale without some compromise, but for a few pieces, you’re golden.
Reheating is crucial if you want to maintain that crispy coating. The microwave is not your friend here; it’ll make everything soggy. The best methods are the oven or the air fryer. For the oven, preheat it to 350°F, place the chicken on a wire rack set over a baking sheet, and heat for 10-15 minutes, or until warmed through and crispy again. If it seems a little dry, add a tiny bit more marinara and cheese during the last few minutes. For the air fryer, heat at 350°F for about 5-7 minutes, checking halfway. You’ll get that satisfying crispy texture back, I promise you.
Common Questions About Thin Crispy Chicken Parmesan (FAQ)
Alcohol-Free Variation
This recipe can easily be made without alcohol. Here are the substitutions I recommend:
- Rum → pineapple juice + 1/2 tsp almond extract. For tropical sweetness
These swaps maintain the depth of flavor while keeping the dish completely alcohol-free. Perfect for family-friendly meals or personal preference.
Recipe Variations & Substitutions
One of the great things about thin crispy chicken parmesan is how adaptable it is. If you’re looking to change things up, you’ve got options. For a bit of heat, a pinch of red pepper flakes added to your marinara sauce or even the breading can give it a nice kick. If fresh basil isn’t available, you can substitute it with a teaspoon of dried Italian herbs or even a dollop of pesto, though I think fresh basil is always best.
Chicken thighs or even chicken tenders can be substituted for chicken breast, just make sure they’re thinly sliced or pounded evenly for consistent cooking. For dairy-free alternatives, there are some decent plant-based mozzarella and parmesan cheeses available at Whole Foods or your local Ralphs these days; the results won’t be identical, but they’ll still be tasty. And if you’re out of panko, normal breadcrumbs can work, but I’ll be honest, the crispiness won’t be the same. That’s not how this works for maximum crunch.
Troubleshooting Your Crispy Chicken Parm
Even with the best intentions, things can sometimes go sideways in the kitchen. I’ve learned this the hard way more times than I care to admit. But understanding common mistakes and how to fix them means you’re always prepared. We’re not guessing on this one.
Common Mistakes & Fixes for Thin Crispy Chicken Parmesan
Mistake: The chicken coating is soggy.
Solution: You likely overcrowded the frying pan, which dropped the oil temperature, or you didn’t blot excess moisture from fresh mozzarella. Fry in small batches, ensure oil is hot, and always blot your cheese. Also, don’t drown it in sauce.
Mistake: The breading falls off the thin crispy chicken parmesan.
Solution: This usually happens if the breaded chicken wasn’t allowed to rest for 15 minutes before frying, or the oil wasn’t hot enough. Let the coating adhere, and ensure that sizzle when it hits the pan.
Mistake: The chicken is dry.
Solution: The chicken was likely pounded too thin and overcooked, or the oven temperature was too high for too long. Stick to 1/4 to 1/2-inch thickness and use an instant-read thermometer to hit 165°F exactly.
Mistake: The cheese isn’t bubbly and golden.
Solution: Your oven might not be hot enough, or you skipped the broiler step. Ensure a preheated 450°F oven, and if needed, a quick 1-2 minute broil will get you that perfect finish.
Mistake: The sauce is too watery and makes the thin crispy chicken parmesan soggy.
Solution: You might be using too much sauce, or the sauce itself is too thin. Simmer your marinara a bit longer to thicken it, and apply only a thin layer on the chicken. Offer extra on the side.
Your Crispy Chicken Parmesan Triumph
When you make this thin crispy chicken parmesan, you’ll be amazed at how easily you’ve created a restaurant-quality meal right in your own kitchen. That first bite, the sound of the crispy coating giving way to tender, juicy chicken, the rich marinara, and the gooey cheese, it’s pure comfort. This isn’t just a recipe; it’s a technique you’ll carry with you, making weeknight dinners feel special and satisfying.
So, next time you’re at Costco or Vons, grab those chicken breasts and a good bottle of marinara. You’ve got this. I genuinely love the problem-solving aspect of recipe development, and this one solves the soggy chicken parm problem perfectly. Let me know how it turns out for you in the comments, and for more inspiration, check out my Pinterest boards. I share tons of variations there if you want ideas.
Source: Nutritional Information
Can I make thin crispy chicken parmesan ahead of time?
Yes, you can prep the chicken cutlets by pounding and breading them, then refrigerate them for up to 24 hours before frying. For a larger group, you could fry the chicken ahead, cool it, and then bake with sauce and cheese right before serving. It still comes out beautifully crispy.
How do I store leftover thin crispy chicken parmesan?
Store any leftover thin crispy chicken parmesan in an airtight container in the fridge for 2 to 3 days. To reheat, avoid the microwave. Use an oven preheated to 350°F for 10-15 minutes, or an air fryer at 350°F for 5-7 minutes, to bring back that delicious crispy coating.
Can you deep fry the chicken for this thin crispy chicken parmesan recipe?
While I typically pan-fry for control and less oil, you certainly could deep fry the chicken cutlets. Ensure your oil temperature is consistent around 350°F, and fry until golden brown and cooked through. It will give you an incredibly crispy result, probably even more so.
Do you have to bake this thin crispy chicken parmesan dish?
No, you don’t have to bake it. After pan-frying, you can add a thin layer of marinara and mozzarella to the hot chicken right in the skillet. Cover the pan with a lid for a few minutes to allow the cheese to melt and become gooey. It’s a faster, stove-top option.
What to have with crispy chicken fritters for dinner?
Crispy chicken fritters, or these thin crispy chicken parmesan cutlets, pair wonderfully with a simple pasta side tossed with garlic butter, a fresh green arugula salad, or even some roasted asparagus. Garlic bread is always a good idea too. It makes for an easy weeknight meal.