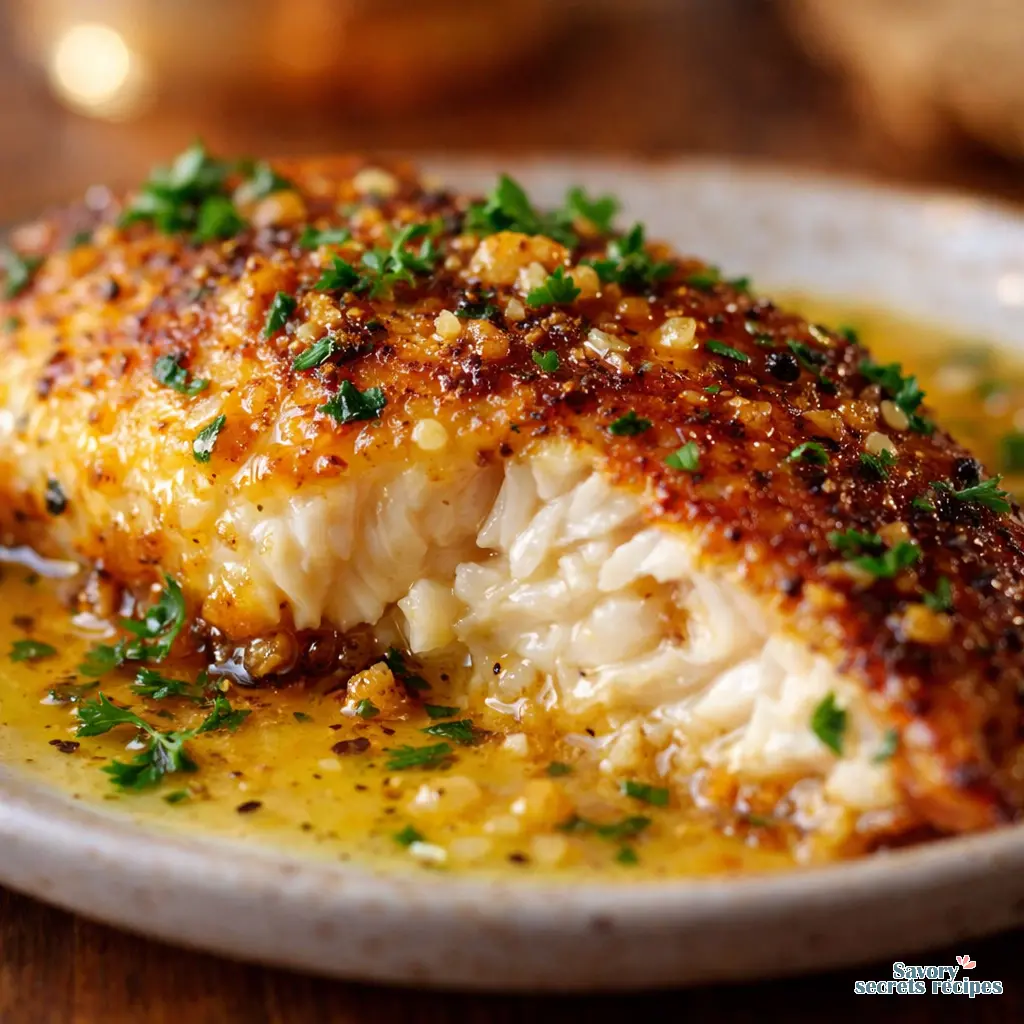
Crispy Pan Fried Honey Lemon Garlic Tilapia
Ingredients
Method
- Pat the fillets dry with paper towels to remove excess moisture.
- Season both sides of the fillets with salt, pepper, garlic powder, and paprika.
- Lightly dredge each fillet in flour and shake off any excess.
- Heat oil in a large skillet over medium-high heat until it is hot enough to sizzle.
- Carefully place the fillets in the pan without crowding them to allow for proper crisping.
- Cook for 3 to 4 minutes per side until golden brown and the fish flakes easily with a fork.
Nutrition
Notes
📝 Notes
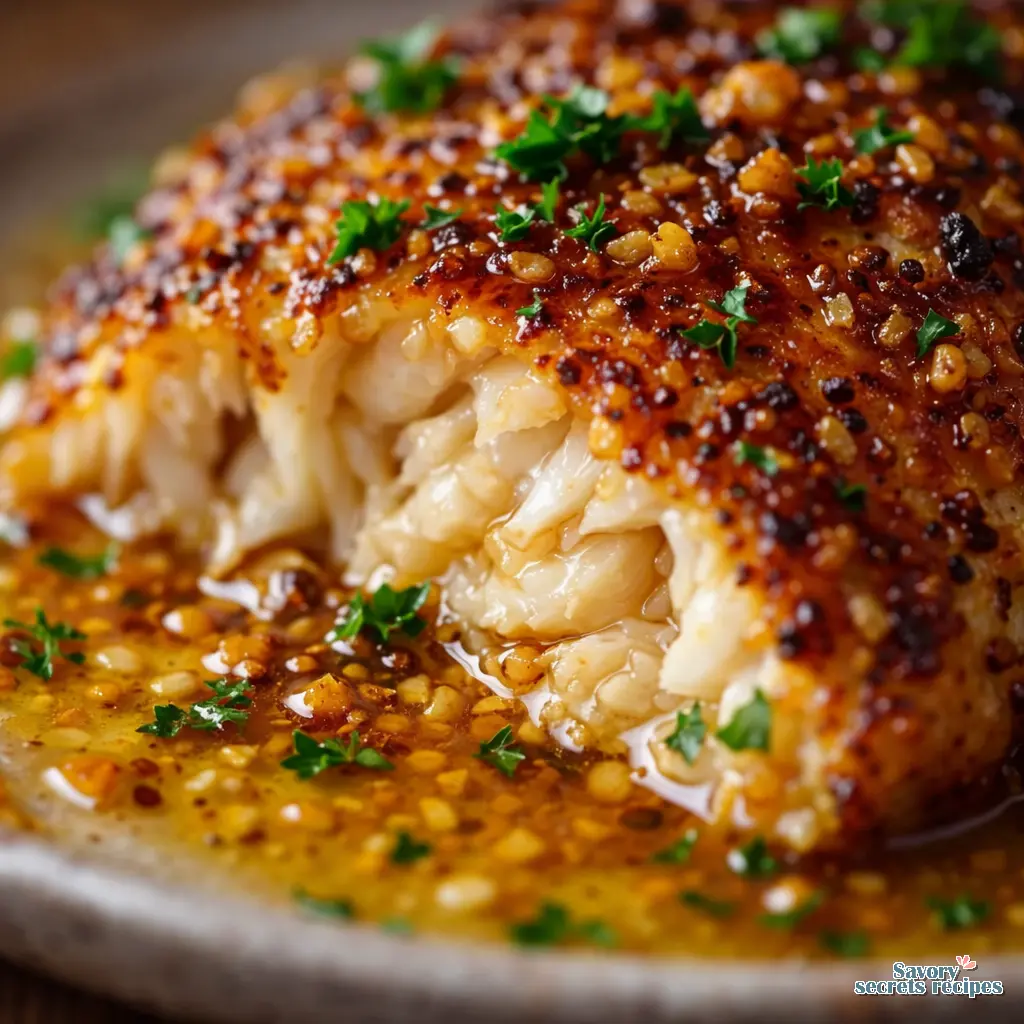
- Tilapia: Fresh or thawed fillets work best. Pat them completely dry before dredging to get a perfectly crispy crust.
- Cooking Tip: Don’t overcrowd the pan — cook in batches if needed so each piece gets golden and crisp.
- Garlic Lemon Butter Sauce: Use freshly squeezed lemon juice for bright flavor and real butter for richness. Add a little parsley for color and freshness.
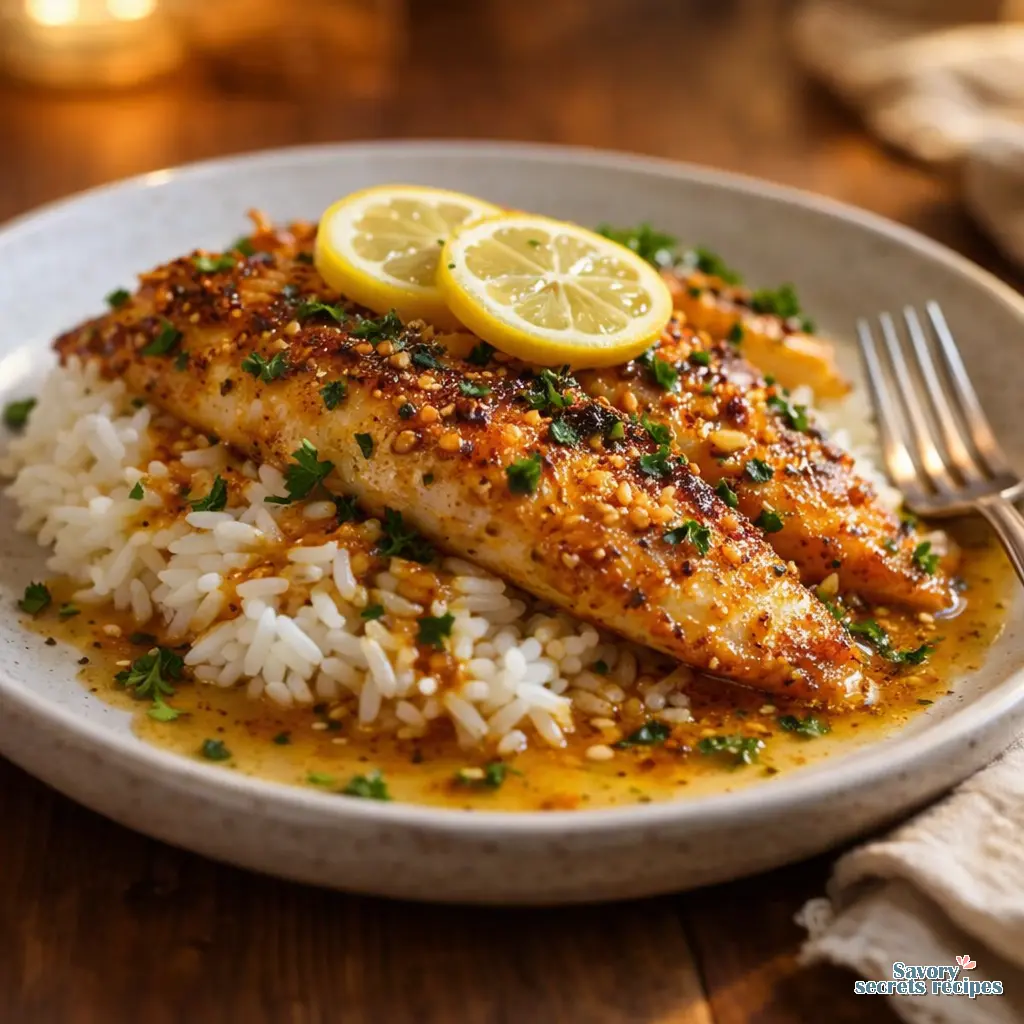
- Serving Ideas: Pair with steamed vegetables, rice, or mashed potatoes. A light salad or roasted asparagus also complements the buttery sauce well.
- Storage: Store leftovers in an airtight container for up to 2 days. Reheat gently in a skillet to maintain crispness — avoid the microwave if possible.
- Fish Alternatives: You can also make this recipe with cod, catfish, or haddock using the same method and sauce.
🍽️ Nutrition Facts (Per Serving)
Calories: 350 kcal | Carbohydrates: 5 g | Fiber: 0 g | Sugars: 0 g | Protein: 35 g | Fat: 20 g | Saturated Fat: 8 g | Cholesterol: 110 mg | Sodium: 480 mg | Potassium: 520 mg | Calcium: 40 mg | Iron: 1.1 mgThe Weeknight Dinner Struggle is Real
Wednesday evening, exactly 35 minutes before dinner time. The December holiday traffic in Los Angeles is brutal, and honestly, I am completely exhausted. You know the feeling. You stare at the fridge hoping a fully cooked meal will magically appear. It never does.
My daughter went through a phase a few years ago where she would only eat “white foods.” It is a nightmare for someone who works with ingredients all day. Getting her to eat anything from the sea felt impossible. Kids just naturally reject that “fishy” taste. But then I remembered my grandmother Fatoumata’s notebook. She always balanced strong flavors with something sweet and something sour. That is how this honey lemon garlic tilapia recipe became my secret weapon.
I started testing a simple sticky glaze. Liquid gold, really. I combined clover honey, fresh lemon juice, and a little butter. The result was a sweet and sour lemon garlic tilapia that completely won over my pickiest eater. The first time she took a bite and said “yum,” I almost cried into the pan. It is easier than you think to make healthy food taste like a treat.
Why This Honey Lemon Garlic Tilapia Works: Oven vs. Stovetop
In my experience, you have two main paths here. You can bake it, or you can pan-fry it. It depends on what you’re going for.
During these cooler LA winter months when we actually want to use our ovens, baking is fantastic. It is virtually no-mess. You just lay the fillets on a lined baking sheet and let the heat do the work. But if you want that beautiful, restaurant-quality caramelized exterior, the stovetop is your best friend. Pan-frying gives you a golden, crunchy texture that the oven just cannot replicate.
Here is what I’ve found works best for a pan-fried garlic lemon tilapia honey dish. Use a simple flour dredge. Just a light dusting of whole wheat or white all-purpose flour before the fish hits the pan. It creates a protective barrier. That barrier absorbs the honey garlic lemon tilapia glaze without turning the fish to mush. You’ll know it’s ready when the oil starts to shimmer in the pan. Trust your nose on this one. It smells incredible.
The Science of the Perfect Sticky Glaze
Let me think about that for a second. The biggest complaint I hear is about burnt sugar. How do you caramelize honey on fish without burning while making honey lemon garlic tilapia? It is a great question.
The trick is managing your heat and knowing your ingredients. Honey is mostly fructose and glucose, which caramelize at lower temperatures than regular table sugar. If your pan is screaming hot, the honey will scorch and turn bitter in seconds. I learned this the hard way during a very smoky recipe test.
Keep your heat at medium-low when you introduce the glaze. Look for the color change, that is your signal. It should look like the color of peanut butter, not dark coffee. Also, the type of honey matters. Clover honey is mild and sweet, perfect for a honey garlic tilapia recipe for kids. Wildflower honey has deeper, more floral notes if you want a more complex flavor profile. A tiny splash of soy sauce (optional, but highly recommended) adds just enough savory umami to balance the sweetness.
The 10-Minute Rule for Tilapia Fillets
Please, I am begging you, do not bake or cook your tilapia for 30 minutes. I see this advice floating around the internet, and it breaks my heart. Tilapia is a delicate, lean protein. If you cook it that long, you will end up with fish jerky.
I think probably around 8 to 10 minutes total is all you need for standard fillets. Choose fillets that aren’t too thick so the sauce can soak in properly. You want the internal temperature to reach exactly 145°F on a meat thermometer. That is the USDA safe zone.
If you don’t have a thermometer, use the fork test. Press a fork gently into the thickest part of the fillet and twist. If it flakes easily and the meat is opaque all the way through, pull it off the heat immediately. The residual heat will finish the job. Even when they’re not perfect, they’re still pretty great, but nailing that 10-minute window makes all the difference.
Air Fryer Instructions for Honey Garlic Lemon Tilapia
That tracks with what I’ve seen lately, everyone wants to use their air fryer. And fair enough! It is incredibly convenient for a quick dinner. Making honey lemon garlic tilapia in the air fryer gives you beautifully crispy edges without the mess of pan-frying.
Preheat your air fryer to 380°F. Give the basket a light spray of neutral oil. Place your seasoned, flour-dusted fillets in the basket in a single layer. Do not crowd them, or they will steam instead of crisping up. Cook for about 8 to 10 minutes.
Here is the real secret for the air fryer method. Do not put the honey glaze on raw fish in the air fryer. The circulating air will burn the sugars before the fish cooks. Instead, heat your honey, lemon zest, fresh garlic, and butter in a small saucepan on the stove. When the fish comes out crispy and hot, immediately brush that sticky glaze generously over the top.
Common Mistakes & Fixes
Mistake: The honey burns and turns bitter.
Solution: You let the pan get too hot. Lower the heat to medium-low before adding the honey, and follow the “watch the pan” rule. It caramelizes fast.
Mistake: Cross-contamination with the glaze.
Solution: Always reserve 1/4 cup of the clean marinade before it ever touches the raw fish. Use this reserved portion as your final clean finishing sauce.
Mistake: The fish is mushy instead of crispy.
Solution: You likely overcrowded the pan. Cook in batches. Also, wipe the pan with a paper towel between batches to remove burnt bits and excess moisture.
Meal Prep: How to Marinate Ahead
I know weeknights are chaotic. If you are doing meal prep on a Sunday, you can absolutely get a head start on this honey lemon garlic tilapia. But there is a catch.
Because lemon juice is highly acidic, it will actually start to “cook” the raw fish if you leave it too long. It is the same science behind ceviche. If you leave tilapia sitting in lemon juice overnight, the texture will become unpleasantly mushy.
Instead, mix your marinade ingredients together and store them in a glass jar in the fridge. Keep your tilapia fillets separate. About 20 minutes before you plan to cook, pour the marinade over the fish. That is just enough time for the flavors to penetrate without ruining the delicate texture.
If you are using frozen tilapia fillets, which are a fantastic budget-friendly staple, thaw them safely. The best way is overnight in the refrigerator. If you are in a rush, place them in a sealed plastic bag and submerge them in a bowl of cold water for about 30 minutes. Never use warm water, and try to avoid the microwave if possible to prevent a rubbery texture.
Side Dish Pairings for a One Pan Dinner
This dish practically begs for sides that can soak up that incredible sauce. My grandmother always served heavily sauced dishes with rice, and she would toast the grains in oil first so they wouldn’t clump. A simple rice side dish is perfect here.
Here is a parent-to-parent tip. Serve the honey lemon garlic tilapia right on top of a bed of jasmine rice or couscous. The rice catches every single drop of the extra glaze. My daughter will eat an entire bowl of rice just because it tastes like sweet and tangy lemon garlic butter.
For vegetables, steamed broccoli is a classic family favorite. The bright green color looks beautiful next to the golden fish. You could also do pan-roasted tomatoes or simple green beans. Finish the whole plate with freshly grated Parmesan cheese and a few extra lemon wedges on the side.
Storage & Reheating Guide
If you actually have leftovers, which is rare in my house, you need to store them properly. Refrigerate the cooked honey lemon garlic tilapia in an airtight container. It will keep safely for 2 to 4 days. You can also freeze the cooked fish for up to 3 months, though the texture of the glaze might change slightly when thawed.
Reheating fish is where things usually go wrong. That’s a good question, actually, how do you reheat it without ruining it? Skip the microwave. The microwave will turn your beautiful tender fillets into rubber erasers. Instead, place the fish in a baking dish, cover it loosely with foil to trap the moisture, and warm it in a 350°F oven until just heated through. Alternatively, a gentle stovetop pan reheating with a tiny splash of water works wonders to bring that sticky glaze back to life.
Frequently Asked Questions
Ready to Cook?
I am genuinely excited for you to try this. Once you understand the basics of balancing that sweet honey with acidic lemon, you’ll find yourself making this honey lemon garlic tilapia every week. It is fast, it is forgiving, and it makes your kitchen smell absolutely incredible. Serve it up with a big scoop of rice, and watch your family’s faces light up at the dinner table. You’ve got this.
If you try this recipe and it wins over your picky eaters, please let me know in the comments. I love hearing those success stories. I share tons of variations on my Pinterest boards if you want more easy weeknight ideas to add to your rotation.
Reference: Original Source
Can I use frozen tilapia for honey lemon garlic tilapia?
Absolutely. Frozen fillets are a fantastic pantry staple. Just make sure to thaw them completely before cooking, preferably overnight in the fridge. Pat them very dry with a paper towel before adding your flour dredge so you get a proper sear.
How do you caramelize honey on fish without burning while making honey lemon garlic tilapia?
The secret is temperature control. Honey burns quickly because of its high sugar content. Keep your pan at medium-low heat when you add the glaze, and watch it constantly. Once it turns the color of peanut butter and thickens slightly, pull it off the heat.
Is this honey garlic tilapia recipe for kids mild enough for picky eaters?
Yes, it is incredibly kid friendly! The sweet clover honey masks any strong fishy flavors, while the lemon adds a familiar tang. My daughter used to refuse all seafood, but this sweet and tangy glaze completely changed her mind. It is a guaranteed win.
Can I substitute the tilapia with salmon or cod for this sweet and sour lemon garlic tilapia dish?
You certainly can. The honey lemon garlic glaze works beautifully on almost any mild white fish like cod, catfish, or red snapper. It is also phenomenal on salmon, though you will need to adjust your cooking time slightly since salmon fillets are generally thicker.
How long can you safely store leftover honey garlic lemon tilapia in the refrigerator?
Store your leftovers in a tightly sealed airtight container in the fridge for 2 to 4 days. When you are ready to eat, reheat it gently in the oven or on the stovetop. Avoid the microwave to keep the fish tender and flaky.