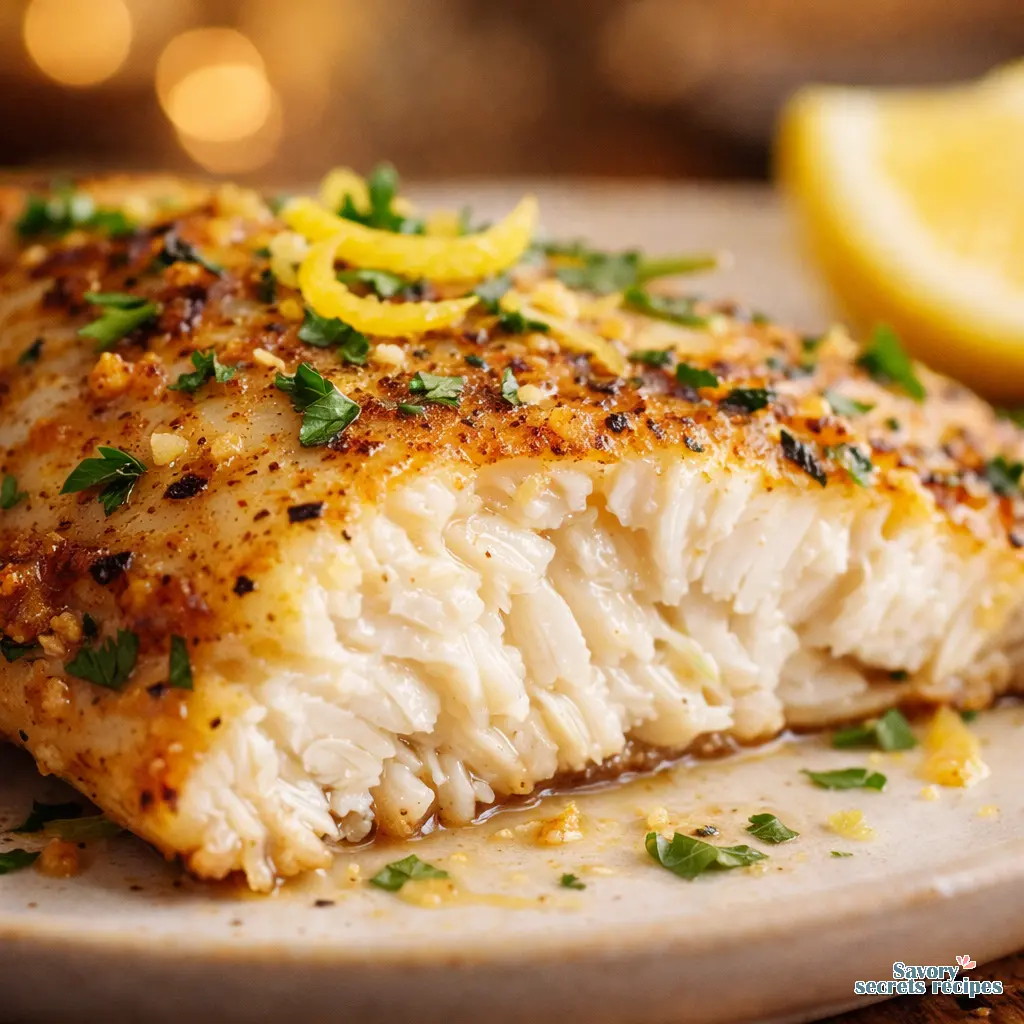
Pan Seared Lemon Garlic Tilapia with Lemon Butter Sauce
Ingredients
Method
- Combine all ingredients in a food processor. Spoon the mixture onto plastic wrap and shape into a cylinder. Wrap tightly and refrigerate until firm.
- Pat the tilapia dry using paper towels.
- Mix the garlic powder, salt, pepper, paprika, and lemon zest in a bowl.
- Coat the tilapia fillets with oil.
- Rub the seasoning mixture onto all sides of the fillets.
- Heat a large skillet over medium-high heat and coat with non-stick cooking spray.
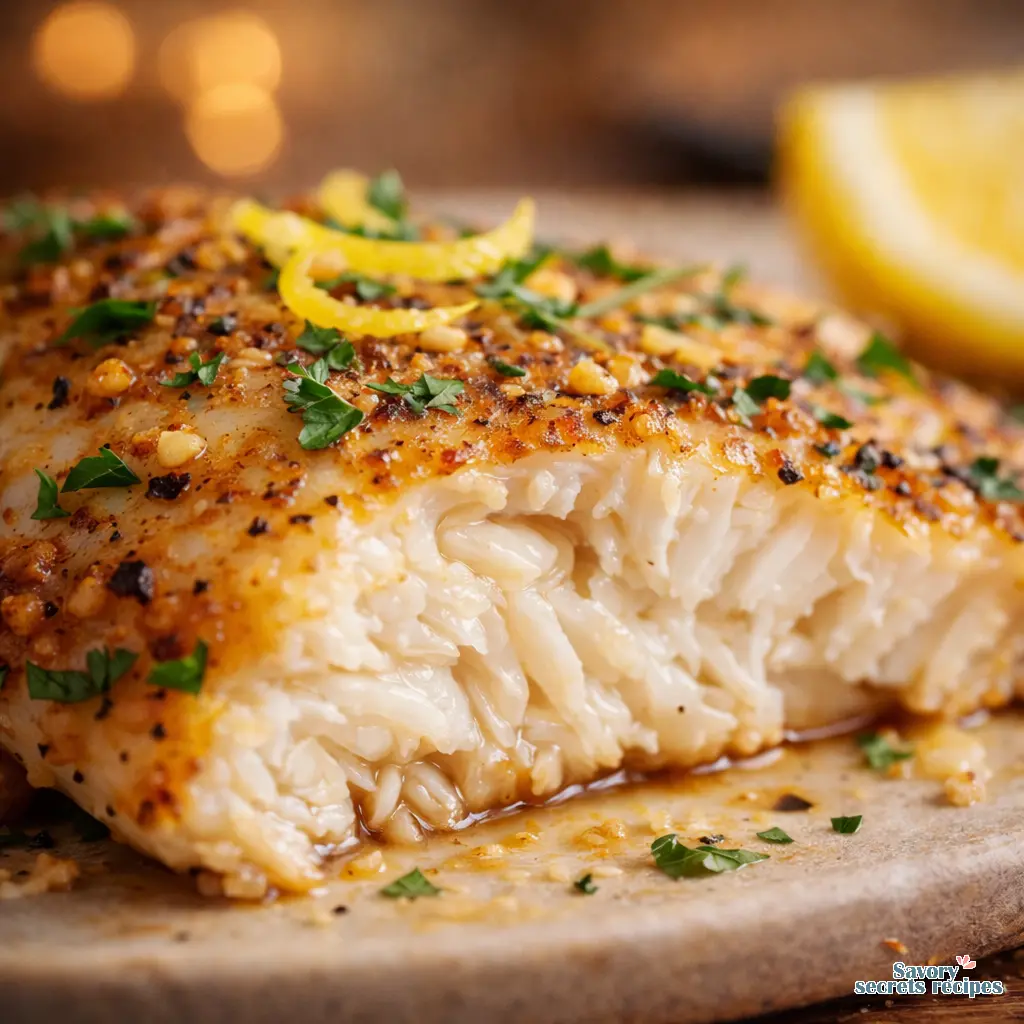
- Add the tilapia fillets to the skillet. Cook for 2 to 3 minutes until the edges become opaque. Flip the fillets and cook for another 2 to 3 minutes until the fish flakes easily and reaches an internal temperature of 140°F.
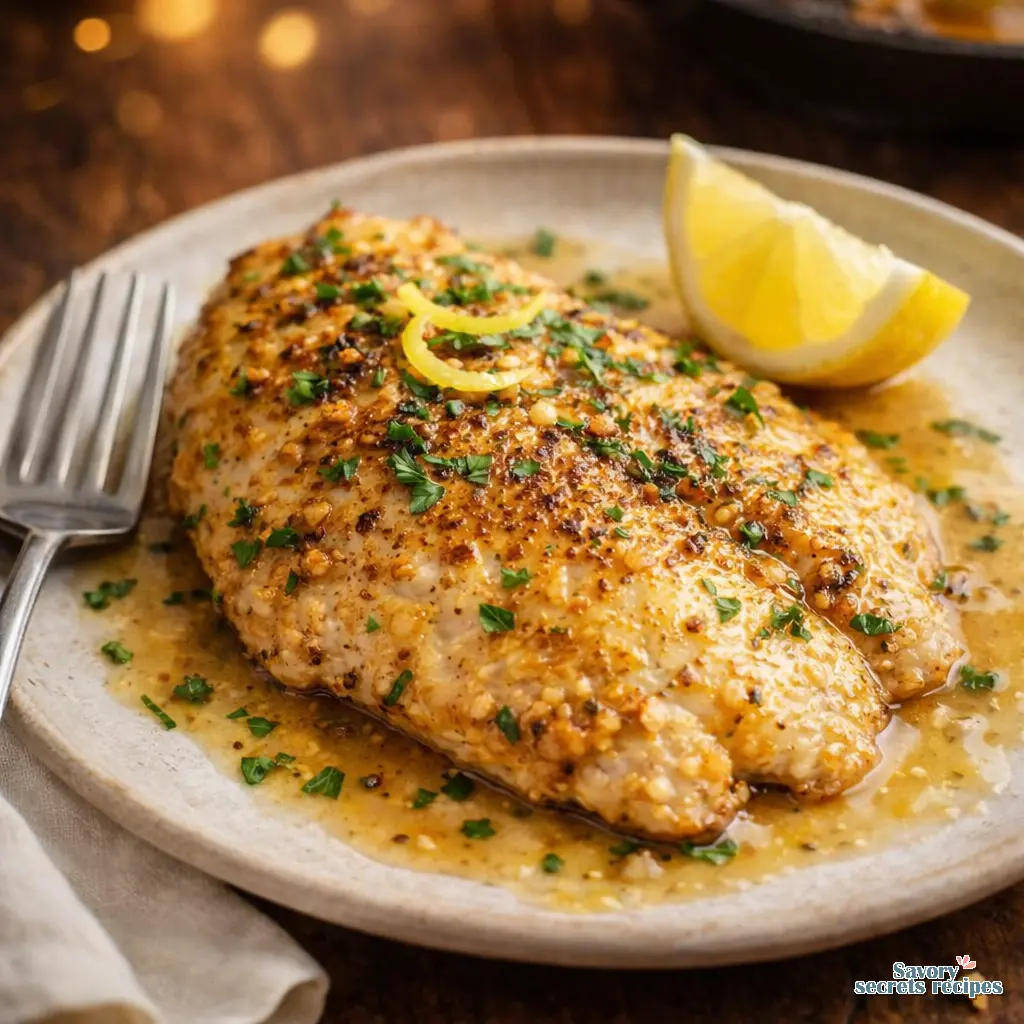
- Remove from heat. Top each fillet with 1 tablespoon of parsley lemon butter and reserve the remaining butter for future use.
- Transfer the fish from the pan and serve with lemon slices and fresh parsley.
Nutrition
Notes
- Prepare tilapia according to skillet instructions.
- Cook at 400ºF for 4 minutes on each side in the air fryer.
- Use an instant read thermometer to make sure the fish reached an internal temperature of 140ºF.
- Remove from the air fryer. Add 1 tablespoon of lemon parsley butter to the top of each filet. Serve.
The 15-Minute Restaurant Sear
My mother fried chicken every Sunday after church, and the rule was simple. The oil had to shimmer but not smoke, and you didn’t walk away. I stood on a stepstool next to her for two years before she let me turn a piece with the tongs. The sound of that first sizzle is still what I measure against. That sharp, aggressive crackle when protein hits hot fat tells you everything is going exactly right. Today we are chasing that exact sound with this pan seared lemon garlic tilapia.
I used to be intimidated by searing fish indoors. I think a lot of us are. You worry it will stick, or fall apart, or just turn into a steamed, pale mess. But I learned a few things over the years. Making a proper lemon garlic tilapia pan fried dinner is actually faster than driving to a restaurant. We are talking fifteen minutes from the fridge to your plate. The exterior gets this beautiful, peanut-butter-colored golden brown crust. The inside stays incredibly flaky and tender.
You might be eating late after a long commute through LA traffic, staring at the freezer, wondering if you should just heat up a frozen box. Don’t do it. You can pull off a restaurant-quality pan seared lemon garlic tilapia right now. Let me walk you through the process.
3 Quick Wins for Perfect Lemon Garlic Tilapia on Stove
Before we get into the details, I want to give you the three non-negotiable rules for this cook. First, you have to thaw the frozen fillets completely and pat them bone-dry with paper towels. I mean completely dry. Moisture is the enemy of a good sear. If the fish goes into the pan wet, it steams. You want a crust, not a sauna.
Second, let the pan get genuinely hot before you add the oil or the fish. Wait for the sizzle. You can test it with a tiny drop of water. If it dances and evaporates instantly, you are ready. Drop the fish in, and then you do absolutely nothing. Nothing for it but to wait. The meat will tell you when it’s ready to flip by releasing naturally from the metal.
Third, we are going to use the separate sauce pan strategy. I know everyone loves a one-pan meal. I usually do too. But making the lemon garlic butter sauce for pan fried fish in the same blazing hot skillet you just used for searing is a recipe for bitter, burned garlic. Keep a small saucepan on an adjacent burner over low heat. It changes everything.
Why This Recipe Works for Busy Nights
Here in California, we get those mild winter evenings where it actually drops to 55 degrees, and turning on the stove finally sounds like a good idea. But you still don’t want to spend an hour cooking. This lemon garlic tilapia skillet recipe is the answer. It is fast, it leans heavily on pantry staples, and it delivers massive flavor without much effort.
Tilapia is a fantastic blank canvas. It absorbs whatever you throw at it. By using a quick sear method, we lock in the moisture while building a savory crust using just garlic powder, paprika, and coarse salt. The fresh lemon wedges and unsalted butter come in at the very end to brighten the whole plate. It is the kind of meal that makes you feel like you really cooked, even if you only spent fifteen minutes doing it.
The Science of Searing: Cast Iron vs. Non-Stick
Let’s talk equipment. You have choices here. A well-seasoned cast iron skillet is my personal favorite for achieving that shattering golden brown crust. Cast iron holds onto heat like a vault. When you drop cold fish into it, the temperature doesn’t plummet. That sustained heat is exactly how to get a crust on tilapia in a pan. But I will admit, cast iron requires confidence.
If you are worried about sticking, a high-quality non-stick pan is perfectly fine. You just need to manage your expectations. The crust won’t be quite as aggressive, but the stress level drops to zero. Whichever pan you choose, you need the best oil for searing tilapia fillets. You want a high smoke point oil. Avocado oil or light olive oil are great choices. Save your expensive extra virgin olive oil for salads. It will just smoke and turn bitter at searing temperatures.
The Separate Sauce Pan Strategy
I learned about temperature control the hard way. I used to try making the pan drippings sauce right in the searing skillet. The pan would be sitting at 400 degrees. I would toss in minced garlic cloves and butter, and within ten seconds, the garlic was black. The whole dish tasted like ash. That is a mistake you only make once.
Now, I keep a small saucepan going on the next burner. While the fish is finishing its second side, I melt the unsalted butter over medium-low heat. I add the fresh garlic and let it gently infuse the butter without burning. Then comes the lemon juice and maybe some capers or fresh chopped parsley. You get this beautiful, glossy, emulsified sauce. When you spoon it over the crispy fish, it is magic. That tracks with how professional kitchens handle delicate sauces.
Sourcing Your Fish: Wild-Caught vs. Farmed
I get asked a lot about buying tilapia. You are going to see a lot of farmed options at places like Ralphs or Trader Joe’s. That is perfectly fine, but you want to check the origin. Look for fish farmed in the US, Canada, or places with strict aquaculture standards. If you can find wild-caught, it tends to have a slightly firmer texture, but farmed tilapia is incredibly consistent and budget-friendly.
Whatever you buy, avoid fillets that have a strong, fishy odor or look mushy in the package. Fresh tilapia should smell like the ocean on a cold day, nothing more. If you are using frozen fillets, just plan ahead. Thaw them overnight in the fridge. Do not try to rush it by running them under hot water. That ruins the texture before you even turn on the stove.
Visual Troubleshooting Guide
Mistake: The fish is sticking to the pan and tearing.
Solution: You are either using a cold pan, or you are trying to flip too soon. Let it ride. Give it another 60 seconds. Use a flexible fish spatula to gently test the edge.
Mistake: The crust is pale and soggy.
Solution: The fish was too wet when it hit the oil, or you overcrowded the pan. Pat the fillets bone-dry. Cook in batches if you have to. Space is heat.
Mistake: The garlic butter sauce broke and looks greasy.
Solution: The heat was too high. Emulsions need gentle warmth. Take it off the heat and whisk in a splash of cold water or a tiny piece of cold butter to bring it back together.
Getting the Perfect Flip
There is an art to flipping delicate white fish. I tend to hold my breath right before I do it. You want to slide a thin, flexible fish spatula under the thickest part of the fillet. Do not force it. If you feel resistance, stop. The crust hasn’t fully formed yet.
Once it slides under easily, lift the fish slightly, tilt the pan to move the hot oil away from you, and gently lay the fish over onto its raw side. The sizzle should start all over again. You will see that beautiful, caramelized surface. That is exactly what you are after. The second side always takes a little less time than the first, so keep an eye on it. You are aiming for an internal temperature of 145 degrees Fahrenheit, but honestly, if it flakes easily with a fork, it is done.
Storage and Reheating Pan Seared Lemon Garlic Tilapia
If you actually have leftovers, you need to store them right. Place the cooled fillets in an airtight container in the fridge. They will keep for about two to three days. The real trick is reheating them without turning the delicate meat into rubber.
Do not use the microwave. I know it is tempting, but the microwave steams the fish from the inside out and destroys that crust you worked so hard to build. Instead, put a skillet over medium-low heat with a tiny bit of oil or butter. Lay the fish in the pan and cover it loosely with foil. Let it warm through gently for about four minutes. It won’t be quite as crispy as day one, but it will still be fantastic. You can also use an oven set to 350 degrees Fahrenheit for about ten minutes.
Frequently Asked Questions
Wrapping It Up
There you have it. A perfectly executed pan seared lemon garlic tilapia that looks and tastes like you spent an hour in the kitchen, but only took fifteen minutes. I love the moment when you spoon that glossy garlic butter over the crispy crust. It smells incredible. Serve it with some roasted asparagus or a quick cucumber tomato salad, and you have a phenomenal weeknight dinner.
If you give this a try, let me know how your sear turned out. Don’t stress if the first flip isn’t flawless. Cooking is just practice and heat management. For more inspiration, check out my Pinterest boards where I save all my favorite quick skillet meals and Southern classics.
Reference: Original Source
How do I make the best pan seared lemon garlic tilapia on the stove?
The secret is a bone-dry fillet and a very hot pan. Wait for the oil to shimmer before adding the fish. Let it sear undisturbed for at least three minutes to build that crust, and always make your butter sauce in a separate pan so the garlic doesn’t burn.
How can I get a perfect golden crust on tilapia in a pan without it falling apart?
Patience is everything here. Do not force the flip. The fish will naturally release from the pan when the crust is fully formed. Use a wide, flexible fish spatula to support the entire fillet when you do finally turn it over.
What is the best oil for searing tilapia fillets to prevent them from sticking?
You need a high smoke point oil like avocado oil, light olive oil, or canola oil. These handle the medium-high heat required for searing without smoking out your kitchen or turning bitter. Save the butter for the finishing sauce.
Can I make this lemon garlic tilapia skillet recipe using frozen fish fillets?
You absolutely can, but you must thaw them completely first. Leave them in the fridge overnight. Before cooking, pat them aggressively dry with paper towels. Cooking them from frozen leads to uneven temperatures and a soggy, steamed exterior.
How do you make a rich lemon garlic butter sauce for pan fried fish?
Melt unsalted butter in a small, separate saucepan over low heat. Add minced garlic and let it gently infuse for a minute. Remove from heat, then whisk in fresh lemon juice and a pinch of salt. This creates a glossy, emulsified sauce that won’t break.
How can I tell that my fish is cooked completely?
Temperature is data, texture is truth. A meat thermometer should read 145 degrees Fahrenheit in the thickest part. Visually, the flesh should be opaque white all the way through and flake easily when gently pressed with a fork.