Crunchy Frozen Peanut Butter Banana Yogurt Bites
Ingredients
Method
- Line a medium-sized baking sheet with parchment paper.
- In a medium bowl, mix together the plain Greek yogurt, peanut butter, and maple syrup until fully combined.
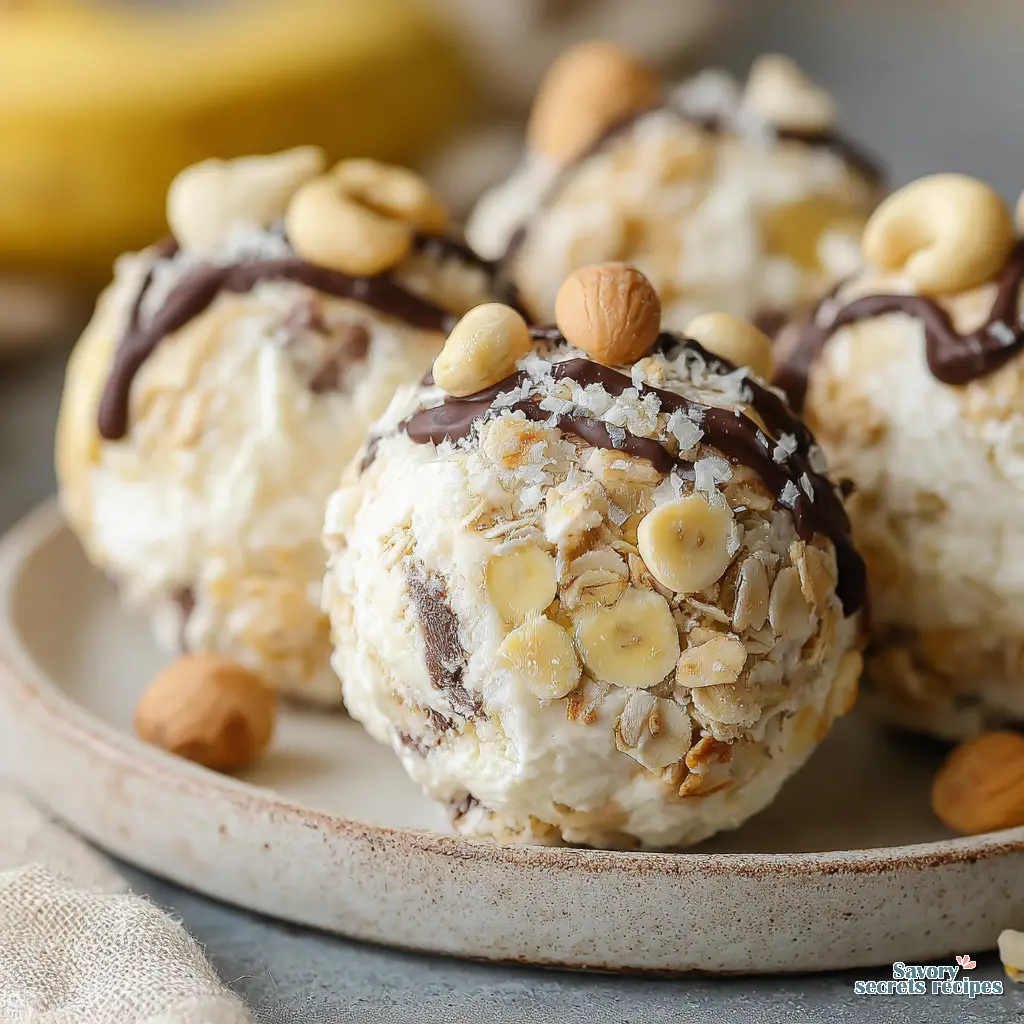
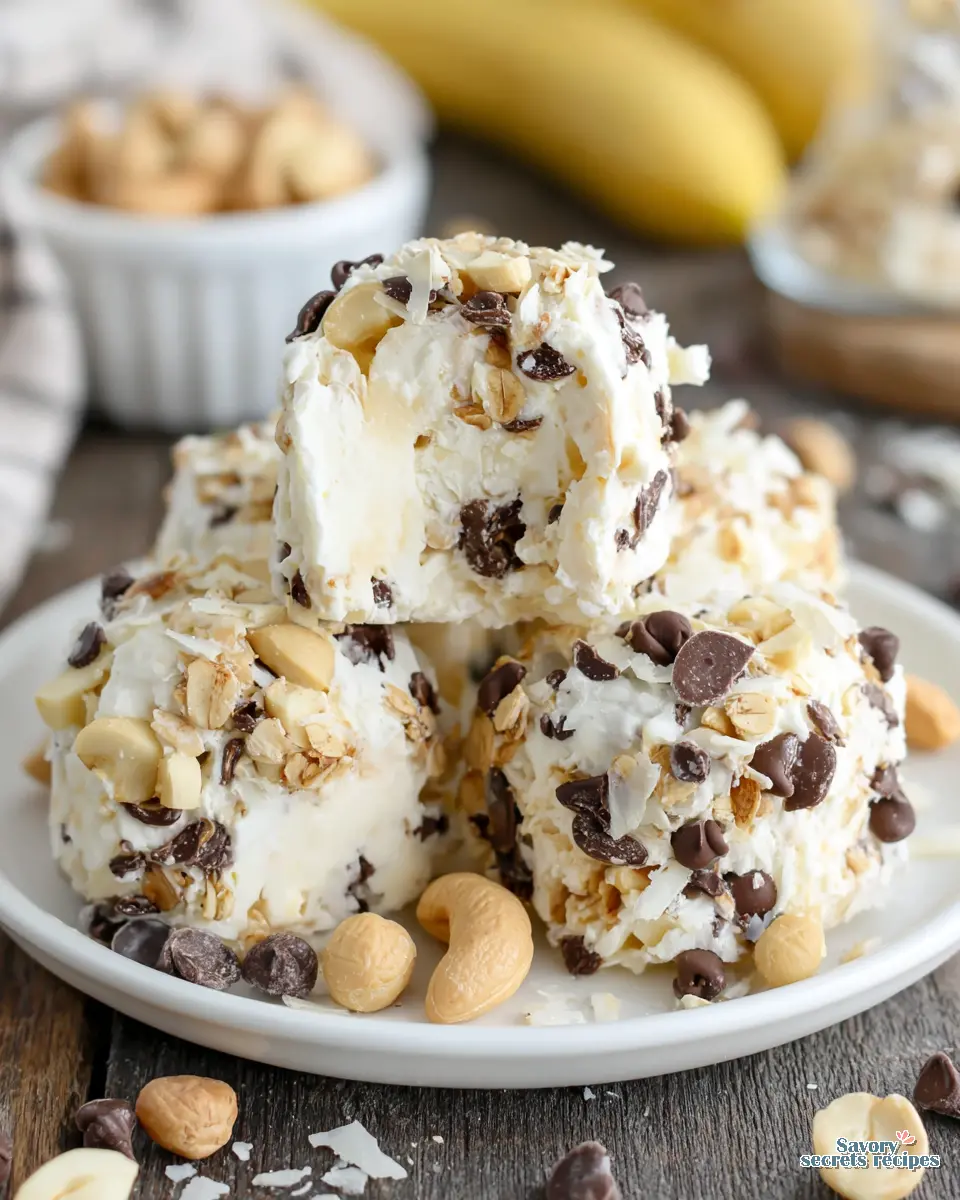
- Add the chopped banana and nuts; stir to combine. Scoop the mixture into 8 clusters (about 3 tablespoons each) onto the parchment-lined baking sheet. Freeze for 1 hour.
- After 1 hour, leave the clusters in the freezer. Meanwhile, melt the chocolate chips: add the chocolate chips and coconut oil to a small bowl. Microwave in 20-second increments, stirring after each increment until the chocolate chips are fully melted and combined.
- Once the chocolate is melted, remove the clusters from the freezer. Dip each cluster into the melted chocolate; the chocolate will form a shell as it sits.
- If desired, sprinkle a pinch of sea salt on each cluster. Return them to the freezer for 15 minutes to fully set. Enjoy immediately, or store in the freezer for up to 2 months.
- Before enjoying, remove the clusters from the freezer for 10 minutes.
Nutrition
Notes
Why You’ll Love These Frozen Yogurt Granola Clusters
You know that feeling, right? It’s a mild spring afternoon here in Los Angeles, maybe you’ve just come back from a walk, and you’re craving something cool, something crunchy, but you also want it to be, well, good for you. I get it. We’re all trying to balance a busy schedule with making smart food choices, and resisting those unhealthy snack cravings can be a real challenge. That tracks for most of us, I think.
That’s where these frozen yogurt granola clusters come in. They’re a revelation, honestly. We’re talking about a snack that’s not just delicious and refreshing, but also super simple to whip up, packed with protein and good stuff, and incredibly satisfying. It’s exactly what you want to see in a homemade snack.
My daughter, for example, she used to be a tough sell on anything that didn’t come in a brightly colored package. But these? She loves grabbing them straight from the freezer. It’s a win-win, offering a healthy dessert alternative to traditional sweets, and a convenient, grab-and-go option for busy days. This is the kind of design that makes sense, really, simplifying healthy eating for the whole family.
The Tools and Ingredients for Your Frozen Yogurt Granola Clusters
Good cooking, like good craftsmanship, starts with the right materials and the right tools. You don’t need anything fancy for these frozen yogurt granola clusters, which is a solid performance across the board in my book. We’re looking at basic kitchen items you probably already have, and ingredients easily found on your next Trader Joe’s or Ralphs run.
For tools, you’ll want a standard muffin tin (the 12-cup kind works perfectly), and here’s a pro tip from my testing: silicone liners are your friend. Your mileage may vary with paper cupcake liners, but in practice, silicone makes removal so much easier. A couple of mixing bowls, a spatula, and some parchment paper for lining your baking sheet, and you’re pretty much set. The tool should disappear in your hand, you know?
Ingredient-wise, it’s all about quality and simplicity. We’re using plain Greek yogurt for that creamy base and a good protein punch. Maple syrup gives us just the right sweetness without being overpowering. Peanut butter, that classic, brings a lovely richness. Chopped bananas, small chopped cashews or peanuts, and semi-sweet or dark chocolate chips add texture and flavor. A touch of coconut oil helps with the melt, and a sprinkle of sea salt really brings everything together. All things considered, it’s a short, effective list.
Building Your Frozen Yogurt Granola Clusters: A Step-by-Step Guide
Making these frozen yogurt granola clusters is genuinely easier than you think, a testament to simple, effective design in the kitchen. It’s about consistency, much like my Opa Klaus taught me about knife sharpening. He’d spend Sunday mornings in his Whitefish Bay kitchen, meticulously honing his Wüsthof, testing the edge on newspaper. It wasn’t magic, just consistent effort, and that applies here too.
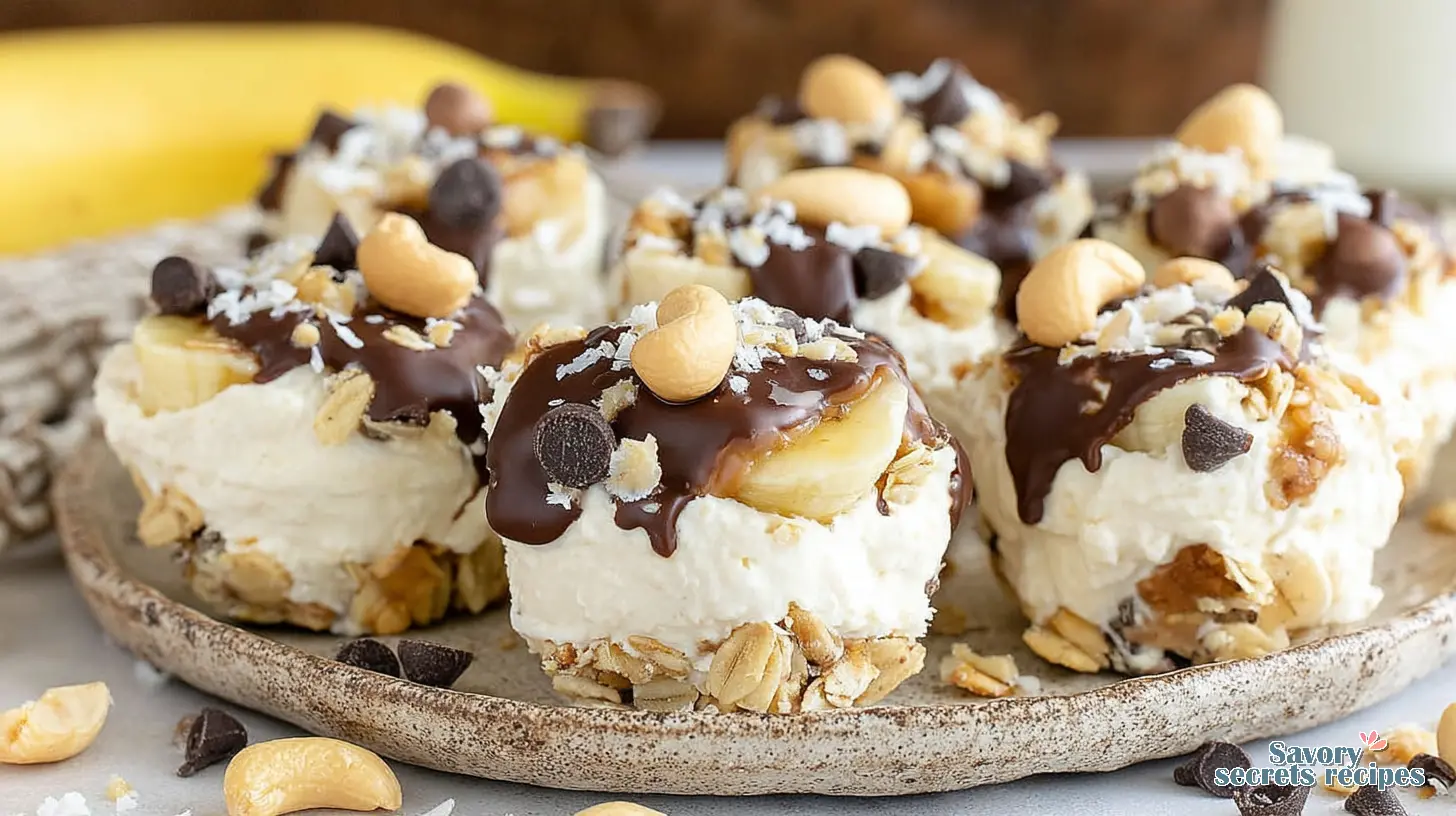
First, you’ll prepare your muffin tin. This might be personal preference, but I always recommend silicone liners. They’re reusable, and they prevent any sticking drama later. You’ll combine the yogurt, maple syrup, and peanut butter until it’s a smooth, cohesive mixture. This is your canvas, really.
Next comes the fun part: layering. A spoonful of granola at the bottom of each liner, then a generous dollop of your yogurt mix. Top that with more granola, chopped bananas, cashews or peanuts, and those delightful chocolate chips. You’re building little flavor bombs, see? Then, into the freezer they go. Let it do its work overnight for the best results, ensuring they’re perfectly set.
Pro Tips for Perfect Frozen Yogurt Granola Clusters
Even simple recipes benefit from a few insights, right? Worth noting, these little tweaks can make all the difference for your crunchy yogurt snack clusters. I’ve learned a few things in my testing that I think you’ll appreciate.
First, as I mentioned, those silicone liners are a game-changer for easy removal from the muffin tins. They’re far superior to paper cupcake liners, which can sometimes freeze and tear. Second, once your clusters are frozen solid, don’t just yank them out. Let them thaw for about 2 to 5 minutes before trying to remove them. A small spatula or even a butter knife can help gently pry them out if they’re being stubborn.
You’ll want to remove the frozen yogurt bites from the muffin tin or pan once they’re fully solid, and then store them in an airtight container in the freezer. This prevents freezer burn and keeps them fresh for weeks. For best results, allow the clusters to freeze overnight. That ensures they’re completely firm and hold their shape beautifully. It’s a small wait for solid performance across the board.
Serving Suggestions
These aren’t just a quick bite; they’re a versatile treat. Enjoy your frozen yogurt granola clusters straight from the freezer for a refreshing treat. They’re perfect as a high protein frozen snack after a workout or just when you need a little pick-me-up on a warm LA day.
For breakfast bites, you could add some extra fresh banana slices and a little drizzle of maple syrup just before serving. They’re also fantastic as a healthy dessert, a guilt-free indulgence that satisfies your sweet tooth without being too heavy. Case in point, my daughter thinks they’re better than ice cream.
Getting Creative: Flavor Variations & Toppings for Your Clusters
The beauty of these sweet granola yogurt mix clusters is how easily you can customize them. While our base recipe is fantastic, you’ve got room to play around with the toppings and even the yogurt itself. That tracks with a good recipe design, I think.
You can certainly switch up your granola. Whether it’s a hearty oat granola or something with a bit more crunch, your favorite store-bought or homemade granola will work great here. Just make sure it’s a type you really enjoy. For fruits, we’ve used bananas, but if you’re a big fan of them, feel free to add a bit more. To be clear, we’re sticking to the ingredients we know work well together, like those chopped bananas.
As for extra toppings, consider adding a few more small chopped cashews or peanuts for an even bigger crunch. More semi-sweet or dark chocolate chips are never a bad idea, honestly. You can also experiment with different types of yogurt. While plain Greek yogurt gives you that protein kick, you could use a dairy-free yogurt for a vegan option. Results may vary depending on the brand, but the principle holds: find what works for you.
Storing Your Crunchy Frozen Yogurt Granola Clusters
Proper storage is key to keeping your freezer snack clusters fresh and delicious. We’re aiming for that satisfying crunchy texture every time you pull one out, and that means protecting them from the freezer environment.
Once your clusters are completely frozen, usually after freezing overnight, you’ll want to carefully remove them from their liners and transfer them to an airtight, freezer-safe container. This is a high-value tip I’ve seen across the board, and for good reason. It prevents ice crystals from forming and keeps them from sticking together in one big block.
Stored this way, your homemade snack clusters will stay fresh and tasty for up to 4 weeks. Fair enough, right? They can last a bit longer, but I’ve found that after about a month, the texture might start to change a little. You can technically store them in the refrigerator for a short amount of time, but they’ll soften considerably and won’t hold their shape like they do when frozen. Enjoy them straight from the freezer for that perfect cool creaminess.
Common Mistakes & Fixes for Frozen Yogurt Granola Clusters
Mistake: The yogurt clusters stick to the pan.
Solution: This is a classic. You probably skipped the liners, or used flimsy paper ones. Use silicone liners or a good quality parchment paper in your muffin tin. Trust me, clean as you go or regret it later.
Mistake: The clusters are too hard to eat straight from the freezer.
Solution: Give them a minute. Let them thaw for about 2-5 minutes before you try to bite into them. This softens them just enough to be enjoyable without losing that refreshing chill. I learned this the hard way, trying to chip away at a rock-solid cluster once.
Mistake: The granola gets soggy.
Solution: The trick here is often in the layering and storage. Make sure your granola isn’t totally submerged in wet yogurt for too long before freezing. Also, ensure they’re stored in an airtight container once frozen to keep moisture out. Your mileage may vary with different granola types, but a good oat granola usually holds up well.
Frequently Asked Questions
So there you have it. These frozen yogurt granola clusters are a simple, delightful answer to the eternal snack dilemma. They deliver on that promise of a healthy, delicious, and easy-to-make treat that genuinely satisfies. When you make these, you’ll love the refreshing crunch and the cool creaminess. It’s a fantastic addition to your meal prep snack rotation, perfect for spring, and a great way to keep everyone happy and energized. Don’t forget to share your creations and any clever variations you come up with. And for more inspiration, check out my Pinterest boards.
Source: Nutritional Information
How do I stop the frozen yogurt granola clusters from sticking to the pan?
The best way to prevent your frozen yogurt granola clusters from sticking is to use silicone muffin liners. They peel away effortlessly once the clusters are frozen solid. Parchment paper also works well, but silicone is definitely my preferred tool for this job. This is the kind of design that makes sense.
Can I make bigger frozen yogurt granola clusters?
Absolutely! You can easily make bigger frozen yogurt granola clusters. Just swap out your mini muffin pan for a regular-sized muffin pan and use appropriately sized silicone liners. The freezing time might be a little longer, but the process for these easy prep bites remains the same. Does exactly what it promises.