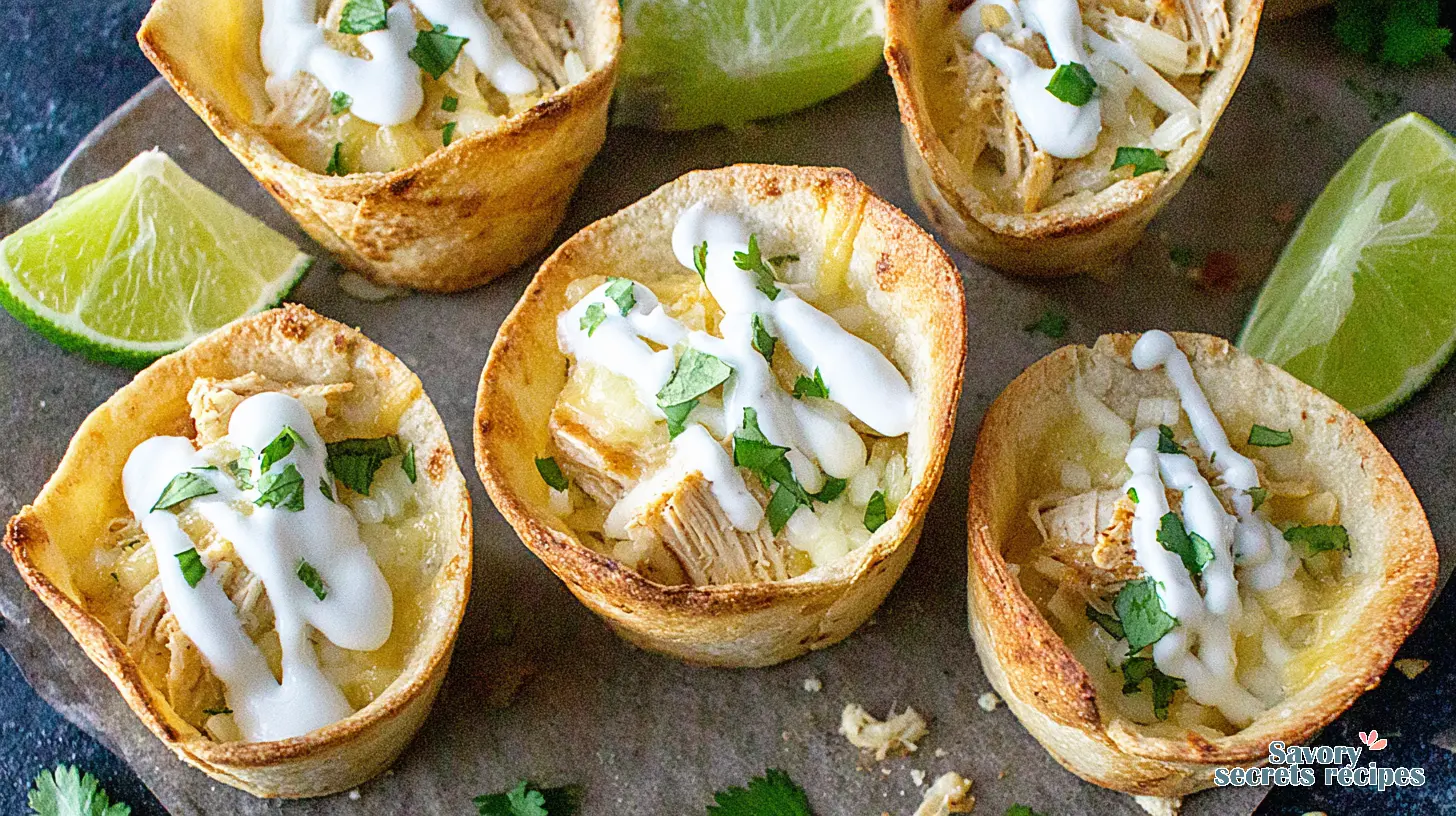
Creamy Chicken Quesadilla Party Bites
Ingredients
Method
- Whisk together sour cream, lime juice, zest, and hot sauce to make the crema. Refrigerate until ready to use.
- Chop the red onion and jalapeño pepper in a food processor. Scrape the bowl.
- Add the chicken and process. Scrape the bowl.
- Add the cheese and spices, then process. Scrape the bowl and process once more.
- Spray one side of the tortillas with olive oil, then flip and place them on a baking sheet.
- Place 2 tablespoons of the chicken mixture on the bottom half of each tortilla. Fold over the top half.
- Bake the quesadillas in a 400-degree oven for 15 minutes.
- Remove from oven and slice each filled tortilla in half.
- Transfer to a platter and serve with crema, pico de gallo, fresh lime, cilantro, or salsa.
Nutrition
Notes
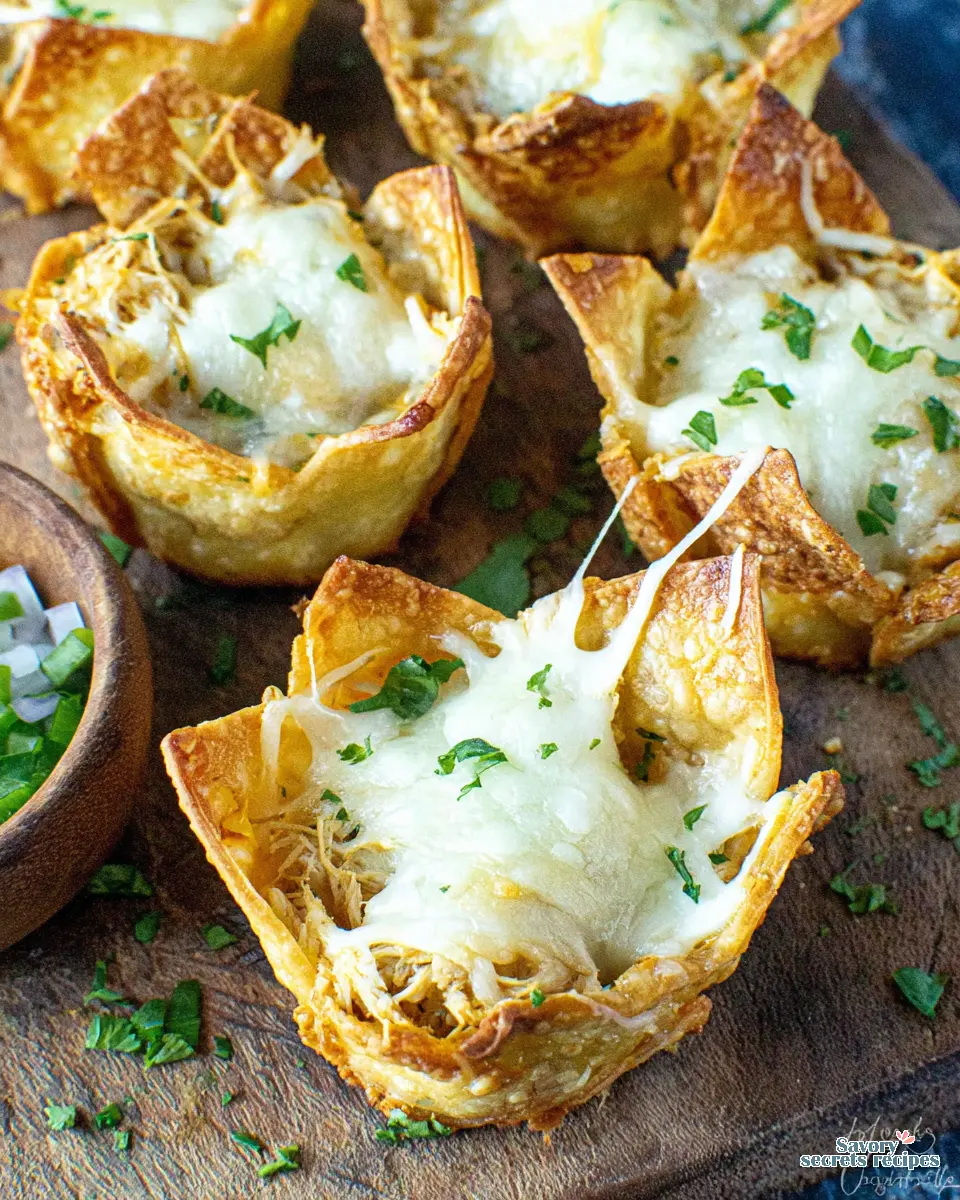
Why You’ll Love These Mini Chicken Quesadilla Cups
Okay, not gonna lie. I was in a full-on panic last Sunday. My daughter had, with zero warning, invited three of her friends over for a “study session” that was clearly just a code for “feed us, dad.” It was 4 PM. I had maybe 30 minutes before the chaos descended. I opened the fridge and saw the usual suspects: leftover rotisserie chicken, a block of cream cheese, some tortillas. Honestly, I was about to just order pizza and call it a failure.
But then I remembered my teta’s kitchen rule: good food doesn’t need fancy equipment, just attention and the right timing. I grabbed a muffin tin. Twenty-five minutes later, I pulled out a tray of these golden, crispy, cheesy mini chicken quesadilla cups. The girls went silent. Then they demolished the entire batch. One of them asked if I was a professional chef. That’s the move, right there.
Here’s the thing. These aren’t just a last-minute save. They’re your new secret weapon for spring gatherings, Cinco de Mayo, or any weeknight you need a family-friendly appetizer that feels special. They look impressive, but the process? Straight up simple. Let’s walk it back and I’ll show you why they work every time.
Gathering Your Ingredients: The Simple Foundation
I love a recipe that starts with stuff you probably already have. That tracks for busy weeknights. For these mini chicken quesadilla cups, you’re looking at a short list. Cooked chicken breast, cream cheese, a Mexican cheese blend, a little red onion and jalapeno for bite, and your basic taco seasoning. The tortillas are just standard flour ones. No special trip required.
Fair enough, you might not have a fresh jalapeno. That’s cool. A pinch of chili powder or a few drops of hot sauce from the fridge door will dial in the heat. The cream cheese is the real star here, though. It creates this luscious, creamy binder that holds everything together and keeps the shredded chicken moist. Without it, the filling can get a bit dry. Trust the process on this one.
I get my chicken from the rotisserie at Ralphs. It’s a solid shortcut. Just make sure you shred it finely and pat it dry with a paper towel. That little step prevents sogginess, which is the enemy of a crispy tortilla cup. In my experience, anyway, taking that extra minute makes all the difference.
The Method: Baking vs. Air Frying vs. Stovetop
Most recipes give you one path. I think you should know your options. It’s like my dad’s coffee beans. He measured by volume in the grinder, I measure by weight. Different methods, same satisfying result. So let’s compare.
The Oven (My Go-To): This is the set-it-and-forget-it method, perfect for making a big batch for a party. You heat your oven to 375°F (190°C). The even, surrounding heat crisps the tortilla cups all over and melts the cheese into one glorious, bubbly mass. The texture is uniformly crunchy. It’s the most hands-off approach.
The Air Fryer: Want them even faster? Your air fryer works great. Crank it to 370°F. They’ll cook in about 6-8 minutes. The hot, circulating air gives you an extra-shardy crisp on the tortilla edges. The only catch is you can only do one muffin tin’s worth at a time. So for a big crowd, the oven’s still your best bet.
The Stovetop (The “No Oven” Option): Could you make a giant quesadilla in a pan and cut it into squares? Sure. But you lose the adorable cup shape that holds the filling and makes these perfect party finger food. For true mini chicken quesadilla cups, you need the structural support of the muffin tin. So I’d stick with baking or air frying.
Assembly Line Tips for Perfect Bite Size Snacks
Now we’re talking. The assembly is where you can dial it in until it’s right. First, warming your tortillas for about 15 seconds in the microwave. This makes them pliable so they don’t crack when you press them into the muffin cups. Use a standard 3-inch round cutter or even a drinking glass to cut them down. Don’t stress if the circles aren’t perfect. They really don’t need to be.
Here’s a tip I learned from my teta’s manaeesh corners: how you place the tortilla circle matters. Don’t just drop it in. Gently press it down into the cup, then use your fingers to crease it along the bottom edges. You’re creating little edible bowls. A light spray of olive oil on each one before filling is what gives you that gorgeous, crispy quesadilla snack cup texture. It’s not being fussy. It’s the difference between leathery and light.
For the filling, just mix everything in one bowl. The cream cheese might be cold and stubborn. I use a fork to mash it first, then stir in the other ingredients. The ratio’s off if it’s too dry. A splash of that fresh lime juice from the recipe loosens it right up and adds a bright note. Fill each cup to just below the rim. They puff a little as they bake.
Common Hiccups & How to Fix Them
Hiccup: The tortilla cups are soggy on the bottom.
Fix: You probably skipped patting the chicken dry, or overfilled them. Too much moisture steams the tortilla. A drier filling and that olive oil spray are your best friends.
Hiccup: The filling is spilling over the sides.
Fix: You just got excited and overstuffed them. It happens to me too. Fill just to the rim, not above. The cheese will melt and bubble but usually stays put.
Hiccup: They’re sticking to the pan.
Fix: That olive oil spray on the tortillas is non-negotiable. If you’re nervous, a very light coating on the muffin tin itself won’t hurt. Silicone muffin cups are a foolproof option, too.
Make-Ahead Magic & Party Strategy
This is where these cheesy chicken tortilla cups truly shine for entertaining. You can prep everything hours ahead. I do this for my daughter’s soccer team parties. Cut all your tortilla circles and stack them with a piece of parchment paper in between. Keep them in a zip-top bag. Mix your filling completely, cover the bowl, and stash it in the fridge.
When your guests are about 30 minutes out, assemble and bake. The cold filling might need an extra minute or two in the oven, but that’s it. The smell of them baking? That’s your welcoming committee. It smells like butter, toasted flour, and spicy chili powder. It reminds me of the happy chaos of my aunt’s Sunday breakfasts, but in a neat, bite-sized package.
For a big spring gathering or Cinco de Mayo party food spread, I’ll often bake two trays and keep one warm in a 200°F oven while the first one gets devoured. They hold their heat and crispness surprisingly well.
Serving Them Up: Dipping, Dunking, Devouring
You could eat these mini chicken quesadilla cups plain. They’re that good. But the fun really starts with dipping sauces. It turns them into an interactive snack. My family has strong opinions here.
The recipe includes a simple, killer lime crema made with sour cream, lime juice, and hot sauce. It’s creamy, tangy, and cuts through the richness. That’s my personal favorite. My daughter demands a side of plain sour cream for dipping. For a fresh kick, a store-bought pico de gallo or some chunky salsa from the Santa Monica Farmers Market is solid. A smooth avocado crema? Also a winner.
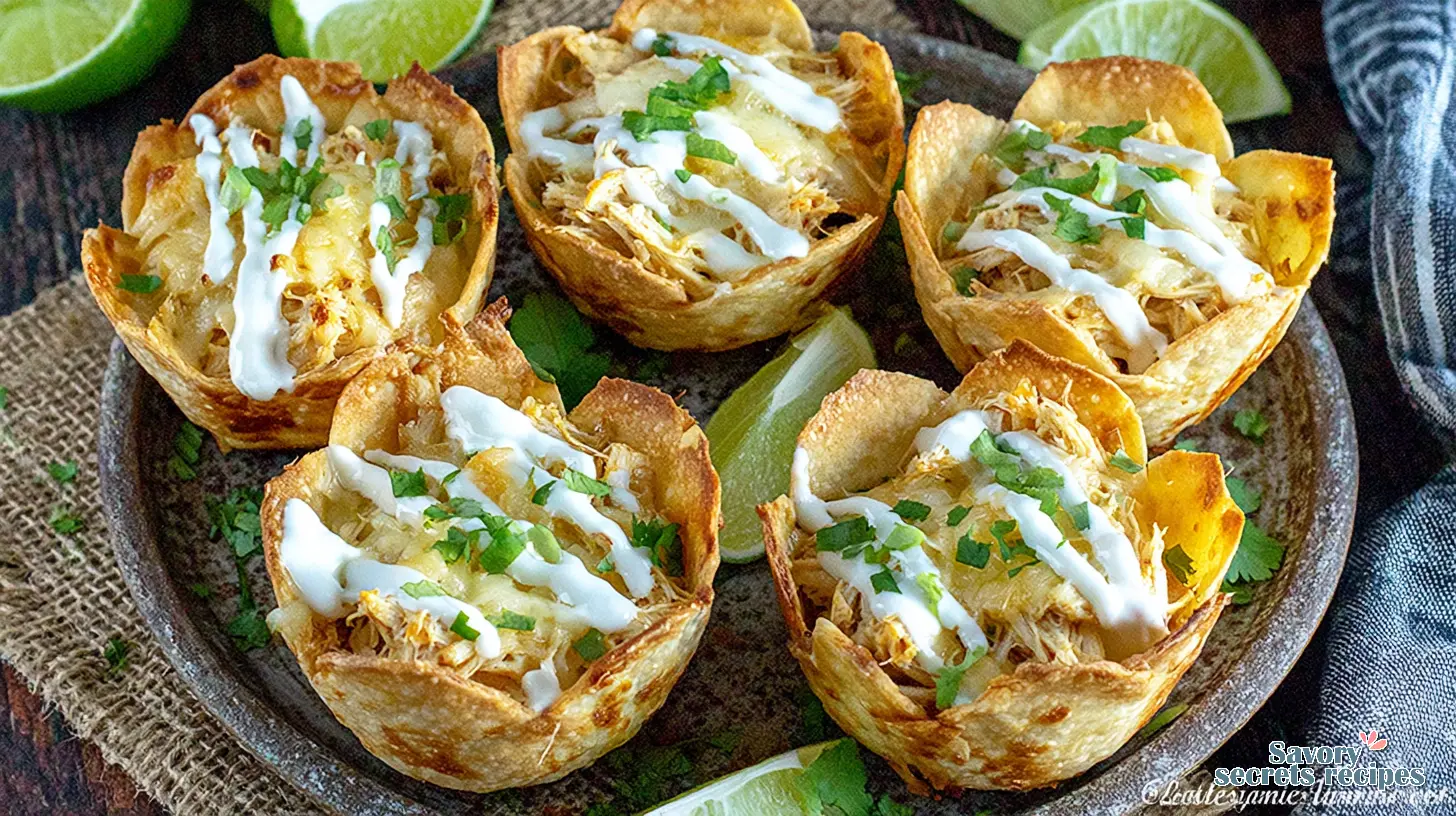
Arrange them on a platter with a few small bowls of different dips in the center. It looks abundant and inviting. That’s the presentation that always gets compliments. It says you thought about it, without actually stressing you out.
Storing Leftovers & Reheating for Later
Let’s be real, you might not have leftovers. But if you do, here’s how to handle them. Let the crispy quesadilla snack cups cool completely on a wire rack. This keeps steam from making them soft. Then, transfer them to an airtight container. They’ll keep in the fridge for 3-4 days.
Reheating is key. The microwave will make them tough and chewy. Don’t do it. Instead, warm them gently in a 350°F oven or your air fryer for 4-5 minutes. This heats the filling back through and, more importantly, crisps the tortilla back up. They won’t be *quite* as perfect as fresh, but they’re still a fantastic quick party snack the next day.
You can also freeze them after baking. Cool, then freeze in a single layer on a baking sheet before bagging. Reheat from frozen in a 375°F oven for about 10 minutes. Works every time.
Flavorful Twists & Dietary Tweaks
The base recipe is a crowd-pleaser. But maybe you’re cooking for different diets, or just want to play. Here’s how I adapt.
For a vegetarian version, swap the chicken for a can of black beans (rinsed and patted dry) and some roasted corn. You’ll still want that cream cheese for binding. Need gluten-free? Most major brands like Mission make decent gluten-free flour tortillas now. Find them at Whole Foods or even your local Vons. Just warm them carefully as they can be more brittle.
Want to dial down the spice for kid-approved recipes? Simply skip the jalapeno and use a mild taco seasoning. To boost the protein for a healthier chicken snack, add an extra handful of shredded chicken. The recipe is forgiving. I’ve even mixed in a little cooked, finely chopped spinach when my daughter wasn’t looking. She ate them anyway.
Frequently Asked Questions
Your Turn to Make Some Magic
When you pull that first tray of golden, bubbly mini chicken quesadilla cups from your oven, you’ll get it. That moment of pride is so simple. You took a handful of basic ingredients and made something that brings people together. It’s a little bite of joy.
I promise you, this recipe is built for real life. For the rushed afternoons, the unexpected guests, the desire to feed your people something genuinely good without the hassle. So grab those tortillas on your next Costco or Trader Joe’s run. Whip up a batch this weekend. Let me know how your family reacts.
For more easy, crowd-pleasing ideas like these cheesy chicken bites, check out my Pinterest boards. I’m always saving new twists on classic snacks there. Now go create something delicious.
Source: Nutritional Information
Can I make Mini Chicken Quesadilla Cups ahead of time?
Absolutely. You can prep the filling and cut the tortillas up to a day ahead. Keep them separate in the fridge. Assemble and bake just before serving for the crispiest results. The cold filling might need an extra minute or two in the oven.
What’s the best way to store leftover Mini Chicken Quesadilla Cups?
Let them cool completely on a rack first. Then, store in an airtight container in the fridge for 3-4 days. Reheat in the oven or air fryer, not the microwave, to bring back the crunch. They also freeze well for up to a month.
Can I use corn tortillas instead of flour?
You can, but it’s trickier. Corn tortillas are less pliable and can crack when forming the cups. If you try it, warm them thoroughly and be gentle. They’ll also have a different, more robust corn flavor. For guaranteed ease, flour tortillas are the move.
My cream cheese is cold and lumpy in the mix. Help?
No worries. Let it sit on the counter for 15 minutes to soften. Or, mash it aggressively with a fork in the bowl before adding anything else. A few small lumps are fine. They’ll melt away in the oven’s heat.
Can I make these bite size quesadilla muffins spicier?
For sure. Add a second jalapeno (seeds included), use a hot taco seasoning, or bump up the hot sauce in the filling or the lime crema. You control the heat. Dial it in until it’s right for your crowd.
Do I need a special pan for these party chicken quesadilla bites?
Just a standard 12-cup muffin tin. That’s it. A non-stick one is easiest, but a light spray of oil on a regular tin works perfectly. I don’t recommend silicone pans here. They don’t conduct heat as well for getting that crucial crispy texture.