


How To Make Authentic Kimchi At Home
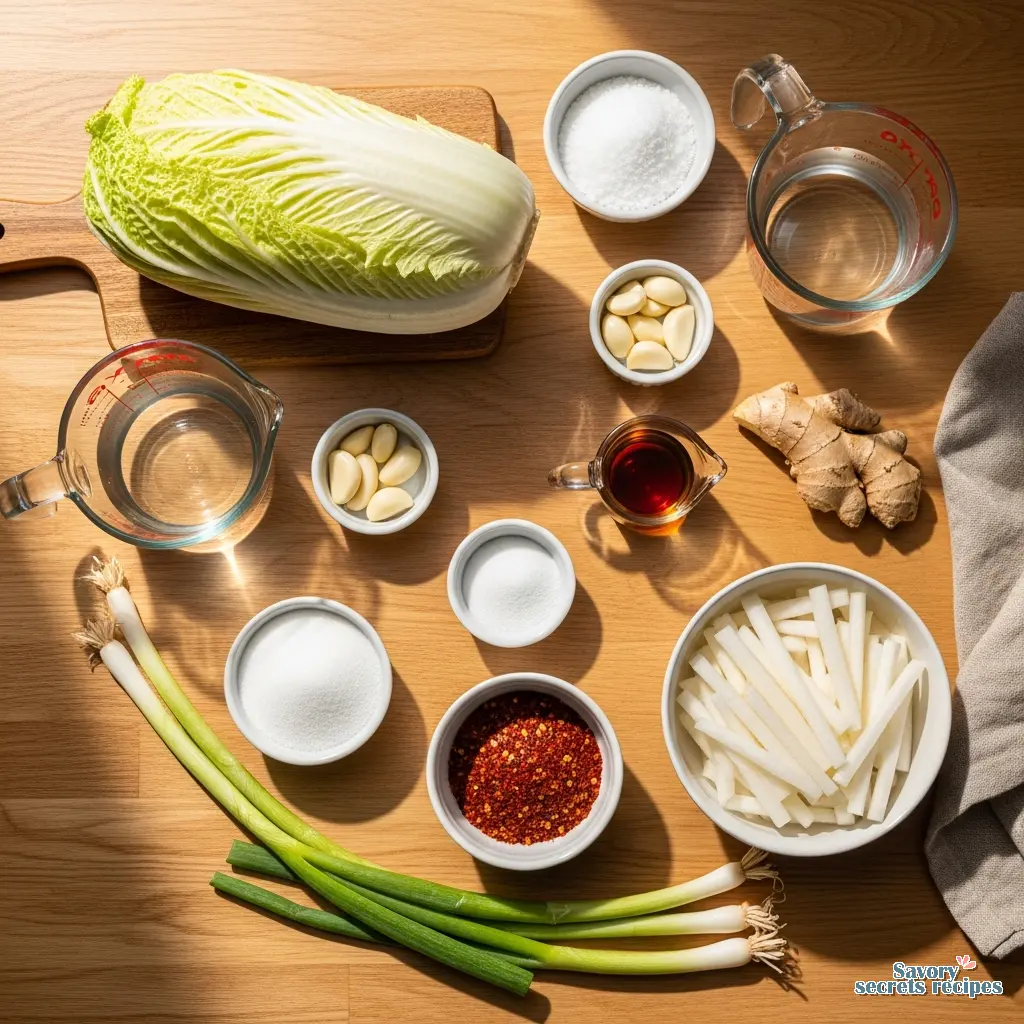
Ingredients
Method
- Cut the cabbage lengthwise through the stem into quarters. Remove the cores from each piece and cut the quarters crosswise into 2-inch-wide strips.
- Place the cabbage in a large bowl and sprinkle with salt. Massage the salt into the cabbage by hand until it softens slightly. Cover with water, weigh down with a plate and a heavy object, and let stand for 1 to 2 hours.
- Rinse the cabbage three times under cold water. Let it drain in a colander for 15 to 20 minutes while you prepare the spice paste.
- Clean and dry the mixing bowl. Combine the garlic, ginger, sugar, and your choice of fish sauce, shrimp paste, or water into a smooth paste. Stir in 1 to 5 tablespoons of gochugaru and set aside.
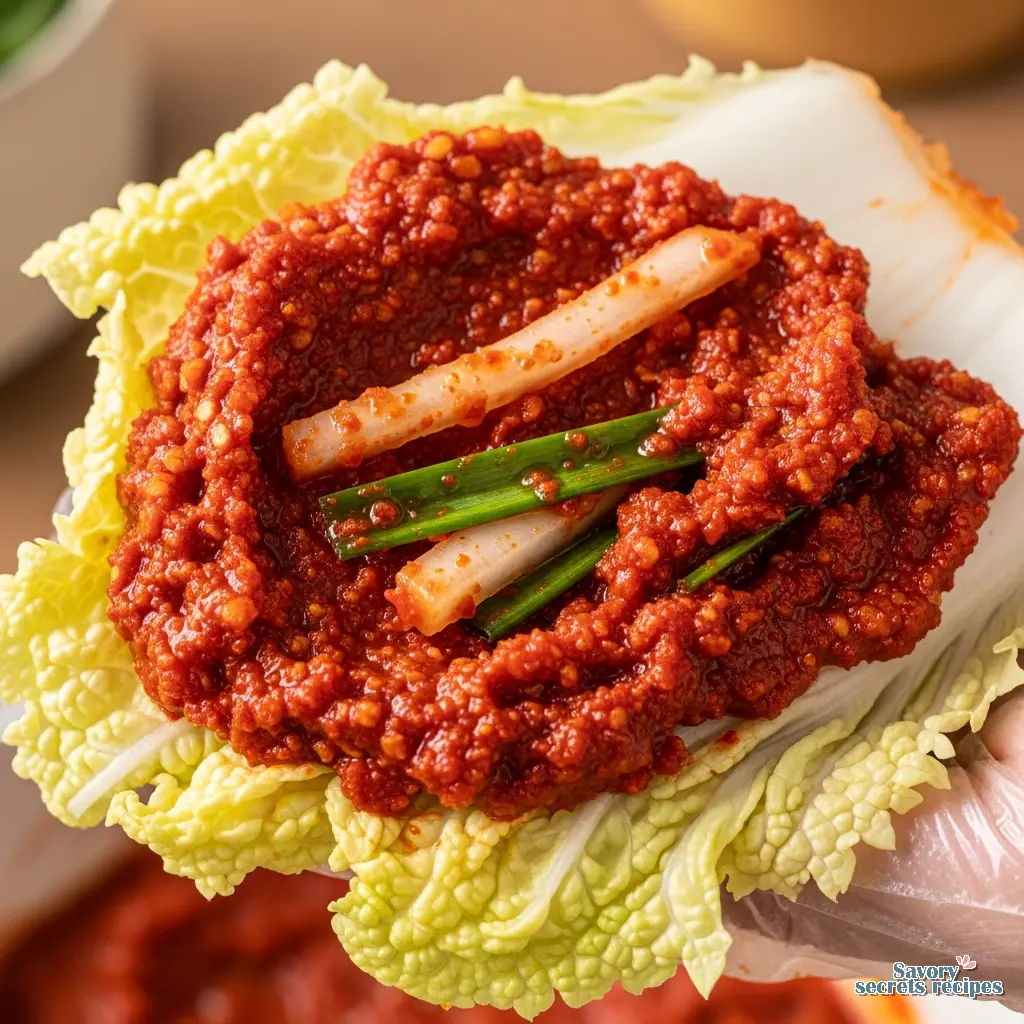
- Squeeze any excess water from the cabbage and add it to the spice paste along with the radish and scallions.
- Gently work the paste into the vegetables by hand until they are thoroughly coated. Use gloves to protect your hands from irritation and staining.
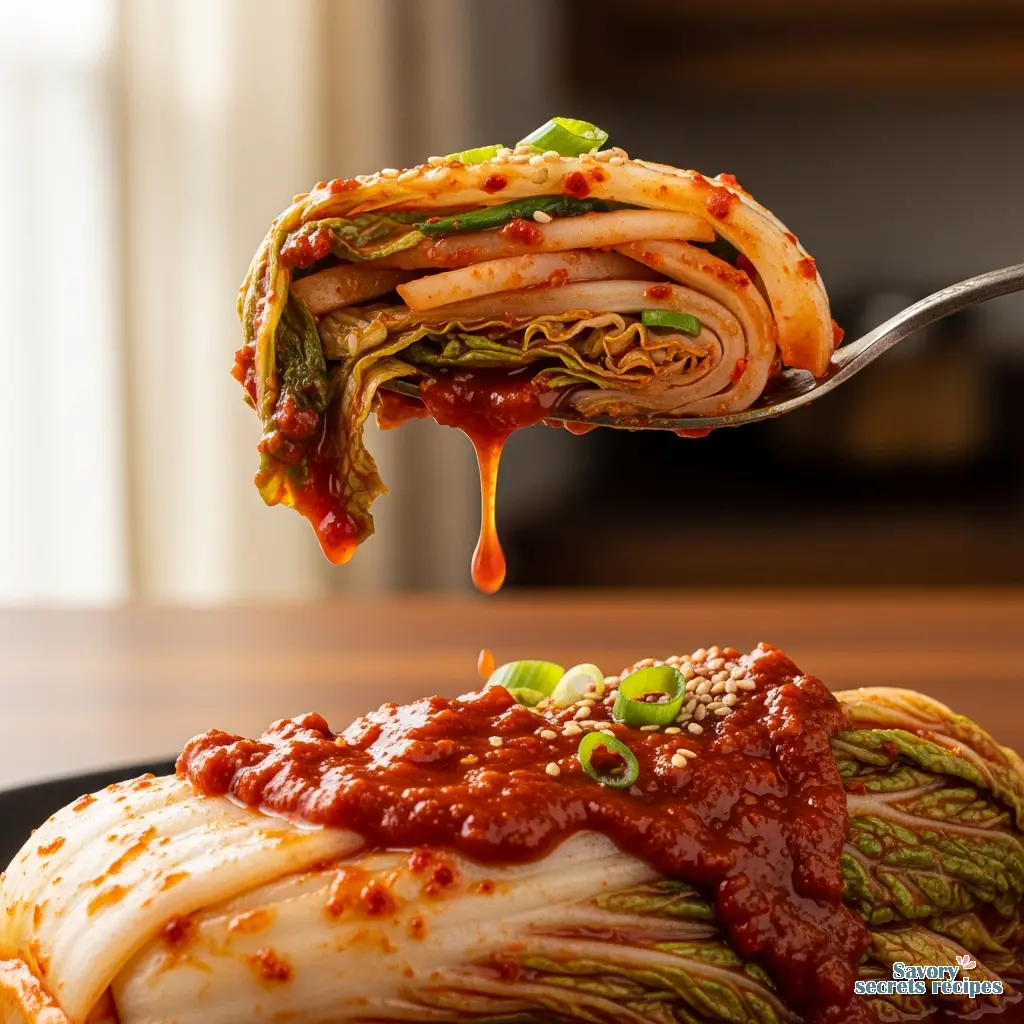
- Pack the kimchi into a 1-quart jar. Press down firmly until the brine rises to cover the vegetables, leaving at least 1 inch of headspace at the top, then seal the jar.
- Place the jar on a plate to catch overflow and let it ferment at cool room temperature, away from direct sunlight, for 1 to 5 days.
- Check the kimchi daily by pressing the vegetables down with a clean utensil to keep them submerged and release gases. Taste the kimchi regularly and transfer the jar to the refrigerator once it reaches your preferred level of ripeness.
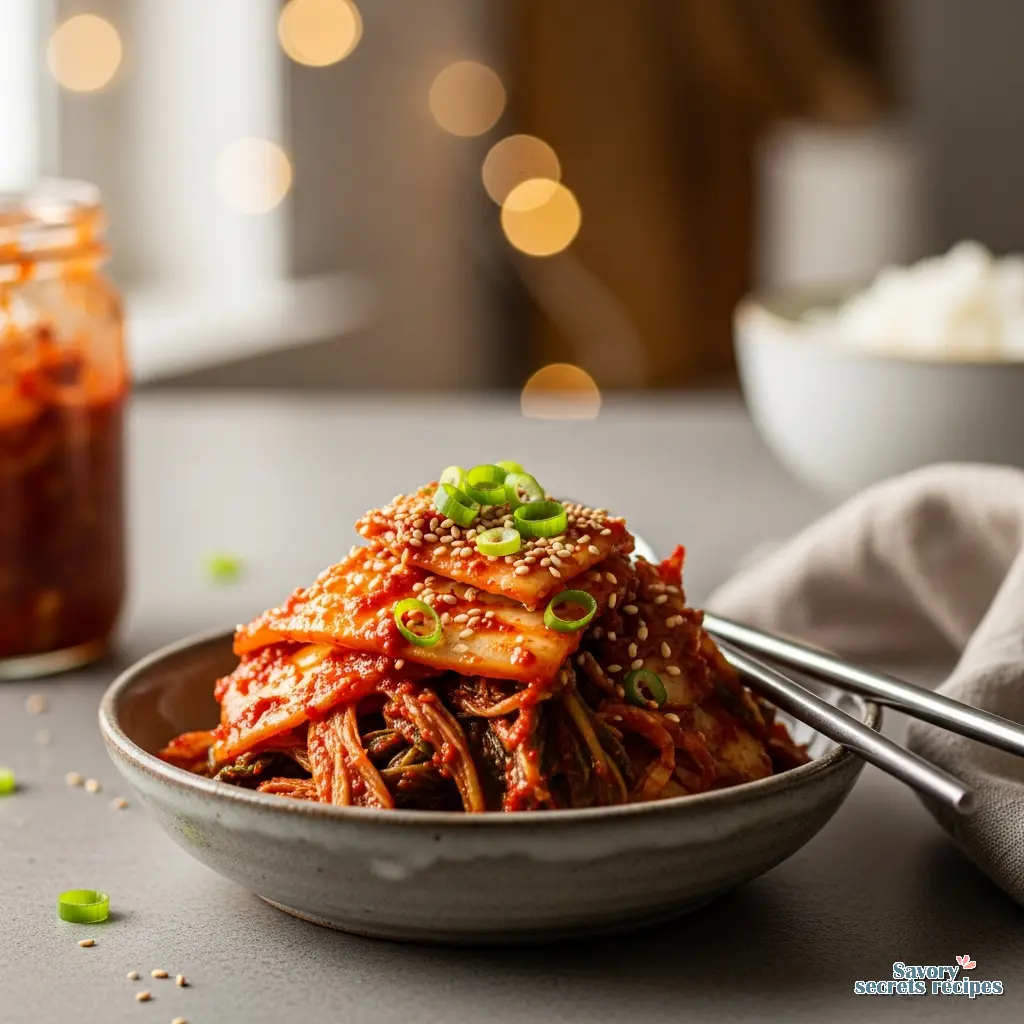
- Use iodine-free salt and filtered or spring water to ensure proper fermentation. Select seafood or vegetarian alternatives for umami flavor. Store the kimchi in the refrigerator for several months and always use clean utensils for serving.
Nutrition
Notes
Why This Authentic Kimchi Recipe is Worth the Wait
I still remember the first time I tried to make an authentic kimchi recipe in my tiny apartment kitchen. I had just come back from a trip to Koreatown here in LA, carrying a jar that cost me nearly fifteen dollars, and I thought, surely I can do this better for less.
I was wrong. Well, the first time I was wrong. I used iodized table salt because I didn’t know any better, and the result was mushy, overly salty, and frankly, a little sad. It didn’t have that signature fizz or the complex depth I was craving.
But that failure sent me down a rabbit hole of research. As a dietitian, I’m obsessed with the “why” behind food. Fermentation isn’t just cooking; it’s biology. It’s creating a selective environment where the good bacteria thrive and the bad ones can’t survive. When you finally nail an authentic kimchi recipe, you aren’t just making a side dish. You are cultivating a living ecosystem that tastes incredible.
If you’ve been intimidated by the idea of fermentation, don’t be. It’s actually safer than canning and more forgiving than baking. This recipe is my go-to because it balances traditional methods with the realities of a modern American kitchen. It tracks with what I’ve seen in successful fermentations: patience, the right salt, and a little bit of trust in the process.
The Science of Lacto-fermentation
Let’s geek out for a second. Understanding what’s happening in your jar makes the whole process less scary. An authentic kimchi recipe relies on lacto-fermentation. This doesn’t mean it has dairy (lacto refers to Lactobacillus bacteria). These bacteria are naturally present on the surface of the cabbage.
When we salt the cabbage, we are doing two things. First, we are drawing out water via osmosis to create a crunchy texture. Second, we are creating a saline environment. Pathogens (the bad guys) hate salt. Lactobacillus (the good guys) can tolerate it. By submerging the vegetables in the brine, we cut off oxygen, which prevents mold.
As the bacteria eat the sugars in the cabbage and the added rice flour paste, they produce lactic acid. This acid preserves the vegetables and gives kimchi that tangy, sour kick. It’s a beautiful, self-preserving cycle. My avó Helena used to say that good food takes care of itself if you give it the right start, and that tracks perfectly here.
Essential Ingredients for Success
You can’t fake an authentic kimchi recipe with shortcuts. The ingredients matter more than the technique.
The Salt: This is non-negotiable. You must use coarse sea salt or kosher salt that is free of iodine and anti-caking agents. Iodine inhibits bacterial growth, which is exactly what we don’t want. If you use fine table salt, your cabbage will be too salty and might turn mushy.
The Water: If you are using tap water, let me think about that for a second. Does your city chlorinate heavily? Chlorine is designed to kill bacteria, including the good ones we need for fermentation. Use filtered, spring, or distilled water. It’s a small variable that makes a huge difference.
Gochugaru: This is Korean red pepper flakes. Do not substitute this with crushed red pepper from the pizza place or cayenne powder. Gochugaru has a specific smoky, sweet, and spicy profile that defines the flavor of an authentic kimchi recipe. You can find it at any Asian market or online.
Fish Sauce: This provides the umami backbone. If you are vegetarian, you can swap this for soy sauce or a kelp broth, but for the traditional taste, a good quality fish sauce is key. It smells pungent now, but it mellows into savory depth later.
The Art of Brining: The Bend Test
The most critical step in this authentic kimchi recipe is salting the cabbage. This is where texture is born. If you under-salt, your kimchi will be watery and prone to spoiling. If you over-salt, it’s inedible.
I usually quarter the cabbage lengthwise and salt between every single leaf. It takes time. Put on a podcast and get into the rhythm of it. Once it’s salted, it needs to sit. I usually let it go for about 2 hours, turning it every 30 minutes so the brine distributes evenly.
How do you know it’s ready? We use the bend test. Take a thick piece of the white stem and bend it. If it snaps, it needs more time. If it bends gracefully, touching end-to-end without breaking, it’s ready to be rinsed. And please, rinse it thoroughly. You want to wash off the excess salt, or you’ll be drinking water all night after dinner.
Visual Ripeness Chart: What to Expect
One thing that freaks people out is how the kimchi changes over time. An authentic kimchi recipe is a living thing, so it evolves. Here is what I look for during the process.
Day 1 (Just Made): The flavor is raw. The cabbage is crunchy, and the spice feels separate from the vegetable. It’s delicious, like a spicy salad (we call this geotjeori), but it’s not fully fermented kimchi yet.
Day 3-7 (The Sweet Spot): Depending on your room temperature, you will start to see bubbles rising in the jar. This is carbon dioxide, a byproduct of fermentation. The smell will shift from “spicy cabbage” to that signature sour, pungent aroma. The taste is tangy, crisp, and deeply savory. This is usually when I move it to the fridge.
Day 30+ (Mature): The texture softens slightly, and the sourness intensifies. It becomes potent. This is my favorite stage for cooking. I use this “old” kimchi for stews (kimchi-jjigae) or pancakes because that strong acid cuts through rich pork or oil beautifully.
Equipment: Onggi vs. Mason Jar
You might see traditional photos of huge earthenware pots buried in the ground. Those are called onggi. They are microporous, meaning they let the kimchi “breathe” without letting air in. I’d love to have a backyard full of them, but I live in an apartment.
For most of us making an authentic kimchi recipe at home, glass Mason jars are perfect. The trick is managing the gas. Fermentation creates pressure. If you screw the lid on tight and walk away for three days, you might have a glass explosion (and a very messy kitchen).
I recommend using a simple fermentation lid with an airlock, or just “burping” your jars. This means cracking the lid open once a day to let the gas hiss out. It’s satisfying, honestly. It tells you the bacteria are working hard.
Storage & Shelf Life
Once you move your jar to the fridge, the fermentation slows down drastically, but it doesn’t stop. Cold is a pause button, not a stop button.
Keep your kimchi submerged in its brine. I use a clean spoon to press the vegetables down every time I take some out. Exposure to air is what causes mold or off-flavors. If you keep it submerged and chilled, your authentic kimchi recipe can last for months. I’ve eaten kimchi that was six months old, and while it was too sour to eat plain, it made the best fried rice of my life.
If you see white film on top, don’t panic immediately. It might be Kahm yeast, which is harmless but tastes gross. You can scrape it off. However, if you see fuzzy blue, green, or black mold, that’s a hard stop. Throw it out. It’s not worth the risk.
Frequently Asked Questions
Mistakes to Avoid
Mistake: Not using enough salt or rinsing it too much.
Solution: The cabbage should taste pleasantly salty, like a well-seasoned chip, before you add the paste. If it tastes bland, add a little more fish sauce to the paste.
Mistake: Packing the jar too tight.
Solution: Leave at least 1-2 inches of headspace at the top of your jar. Fermentation produces gas and liquid will rise. If it’s too full, it will overflow and stain your counter.
Mistake: Floating vegetables.
Solution: Anything exposed to air is a breeding ground for mold. Use a fermentation weight, a small ziplock bag filled with brine, or just a cabbage leaf wedged on top to keep everything submerged.
When you finally crack open that jar of your own authentic kimchi recipe and smell that complex, spicy, sour aroma, you’ll get it. It’s a project, sure, but it’s one that keeps on giving. I love having a jar in the fridge to top fried eggs, stir into rice, or just eat straight from the jar when I need a savory snack.
If you give this a try, I’d love to hear how it went. Did you go for the full fermentation time, or did you dive in early? Let me know in the comments!
For more inspiration, check out my Pinterest boards where I save all my favorite fermentation projects.
Reference: Original Source
How long does it take for this authentic kimchi recipe to ferment?
It depends on the temperature! In a warm LA kitchen, you might see bubbles in 24 hours. In cooler climates, it could take 2-3 days at room temperature. I usually ferment mine on the counter for 1-2 days until it smells sour, then move it to the fridge to slow down.
Can I use regular green cabbage instead of Napa?
Technically yes, but the texture will be completely different. Napa cabbage has tender, crinkly leaves that hold the paste perfectly. Regular green cabbage is thicker and waxy; it makes for a much crunchier, harder ferment. For an authentic kimchi recipe experience, stick to Napa.
Is it worth making your own authentic kimchi recipe?
Absolutely. Not gonna lie, it takes some effort, but the flavor is incomparable to store-bought. Plus, you control the ingredients (no preservatives) and the spice level. It’s also significantly cheaper than buying those tiny jars at the grocery store.
How do I know when the fermentation is done?
Taste as you go! There is no “done” time, only “done for you.” When it tastes pleasantly sour and tangy, it’s fermented. If you like it funkier, leave it longer. If you prefer it fresh, eat it sooner. Your palate is the best gauge.
Does kimchi need to be kept in the dark?
Direct sunlight can heat up the jar and kill the bacteria (or make them ferment too fast and get mushy). You don’t need a pitch-black cave, but a cool corner of the counter away from direct sun is best for your authentic kimchi recipe.
How long does kimchi last in the fridge?
Months! As long as you use clean utensils every time and keep the veggies submerged, it can last 3-6 months. It will get more sour over time, which just means it’s transitioning from “eating raw” kimchi to “cooking” kimchi.


