Garlic Butter Pan Seared Shrimp for Crispy Juicy Results
Ingredients
Method
- Heat olive oil and butter in a skillet over medium-high heat for 1 to 2 minutes until shimmering.
- Add minced garlic and stir constantly for 30 seconds to 1 minute until fragrant and lightly golden.
- Arrange seasoned shrimp in a single layer and cook for 2 minutes per side until pink and opaque.
- Season with salt, pepper, and optional red pepper flakes to taste, then toss gently.
- Pour fresh lemon juice into the skillet and scrape up any browned garlic bits from the bottom.
- Remove from heat, garnish with chopped parsley, and serve immediately.
Nutrition
Notes
The 15-Minute Promise: Mastering the Easy Shrimp Skillet
My nani in Chandigarh taught me to temper spices by sound and smell, not timers. She’d hold my hand over the kadhai so I could feel the heat rising before adding jeera. I genuinely love the moment when you add jeera to hot oil and it blooms. There’s actual chemistry happening and it smells incredible. I apply that exact same sensory approach when making an easy shrimp skillet. You have to listen for that satisfying sizzle of the sear. You’ll know it when you hear it.
I know seafood intimidates a lot of home cooks. Wednesday night dinner panic sets in, and cooking shrimp feels like a high-stakes gamble. You’re worried about rubbery, overcooked results. I get it. But I promise this easy shrimp skillet takes about 15 minutes total. It’s a foolproof foundation. Perfect for those busy December evenings after a Trader Joe’s run when you need something fast but impressive. During these cooler LA winter months when we actually use our stoves, this dish brings bright, fresh flavors without heating up your apartment too much.
Early in my career, I wrote a piece about pressure cooking dal and confidently stated optimal cooking times without actually testing them across different dal varieties. A reader wrote in to say my timing turned her masoor dal to mush. She was right. I had extrapolated from one test with toor dal. I issued a correction and now I test every variable I write about. That tracks with what I’ve seen in skillet cooking too. Variables matter. Let’s break down exactly how to get a perfect seafood sear every single time.
The Science of the Sear: Why Your Easy Shrimp Skillet Needs High Heat
Let’s talk about the Maillard reaction. In practical terms, this is the chemical reaction between amino acids and reducing sugars that gives browned food its distinctive flavor. The browning equals flavor. To achieve this in an easy shrimp skillet, you need two things: a completely dry surface and high heat.
This is genuinely interesting from a food science perspective. If your shrimp are wet, the heat energy from the pan goes into evaporating that surface water rather than creating a crust. You end up steaming the shrimp instead of searing them. They turn gray and sad. That said, simply patting them dry with a paper towel solves this entirely. Pat dry. Then pat dry again.
For the fat, you want a high smoke point oil to start. Avocado oil is my go-to here. It handles the high heat necessary for a great crust without burning. We’ll finish with cold butter cubes at the very end. If you add butter too early, the milk solids will burn and turn bitter before the shrimp finish cooking. The data on this is actually quite clear. High heat oil for the sear, butter at the end for the rich pan juices.
Shrimp Sizing Guide: Decoding the Numbers
I’m not entirely convinced that most people know what “jumbo” actually means at the seafood counter. It’s an unregulated marketing term. What you really need to look at is the count per pound. You’ll see numbers like 16/20 or 21/25 on the bag.
Those numbers tell you exactly how many shrimp make up one pound. A 16/20 count means there are 16 to 20 shrimp per pound. The smaller the number, the larger the shrimp. For an easy shrimp skillet, I prefer 16/20 or 21/25. They’re substantial enough to develop a beautiful golden brown crust without overcooking the center immediately. Worth noting here, if you use smaller shrimp (like 31/40), your cooking time will drop drastically. Taste and adjust as you go.
Fresh vs. Frozen: Setting Up Your Easy Shrimp Skillet for Success
I’d want to see more research before claiming “fresh” grocery store shrimp is superior. Look, I’ll be honest. Unless you live on the coast and are buying directly from a boat, the “fresh” shrimp at your local Ralphs or Vons was almost certainly frozen at sea and thawed for display. You’re usually better off buying frozen shrimp and thawing it yourself.
To thaw frozen shrimp quickly and safely, place them in a colander and run cold water over them for about 10 to 15 minutes. Never use warm water. Warm water initiates the cooking process and breeds bacteria. Once thawed, you must address the moisture. Frozen shrimp retain a lot of water. If you don’t extract it, your easy shrimp skillet will turn into a watery soup. Soak them briefly in a mild salt water solution to revive their texture, rinse, and then aggressively pat them dry.
Pro-Tips for Searing: Tools and Techniques
This is where it gets complicated if you overthink it. Don’t. Let’s talk equipment. What is the best skillet for pan searing shrimp? Cast iron cooking is fantastic because it holds heat incredibly well. When you drop cold protein into a pan, the temperature plummets. Cast iron prevents that massive drop. A high-quality stainless steel skillet is my second choice because it’s brilliant for developing fond (those sticky, flavorful browned bits on the bottom). You can easily deglaze those bits with a splash of broth or lemon juice.
Here’s what I wish someone had told me earlier. Overcrowding the pan is the enemy of a good sear. If you pile 30 shrimp into a 10-inch skillet, the temperature drops, they release their moisture, and they boil in their own juices. Cook in batches if you have to. Leave space between each piece. Use tongs to place them individually. Giving the shrimp space is how you achieve the signature texture of a buttery garlic shrimp.
Once they hit the hot oil, leave them alone. Until the raw smell cooks off and the edges turn opaque, don’t touch them. Let it develop some fond. You need about 2 minutes undisturbed to get that crust.
Visual Doneness Guide: The C-Shape vs. O-Shape Rule
My daughter recently decided she doesn’t like “mixed-up food,” so I’ve been serving deconstructed meals. It’s basically a small clinical trial with an n of 1. But it taught me to pay close attention to the visual cues of individual ingredients. With an easy shrimp skillet, visual cues are everything. You don’t need a meat thermometer here.
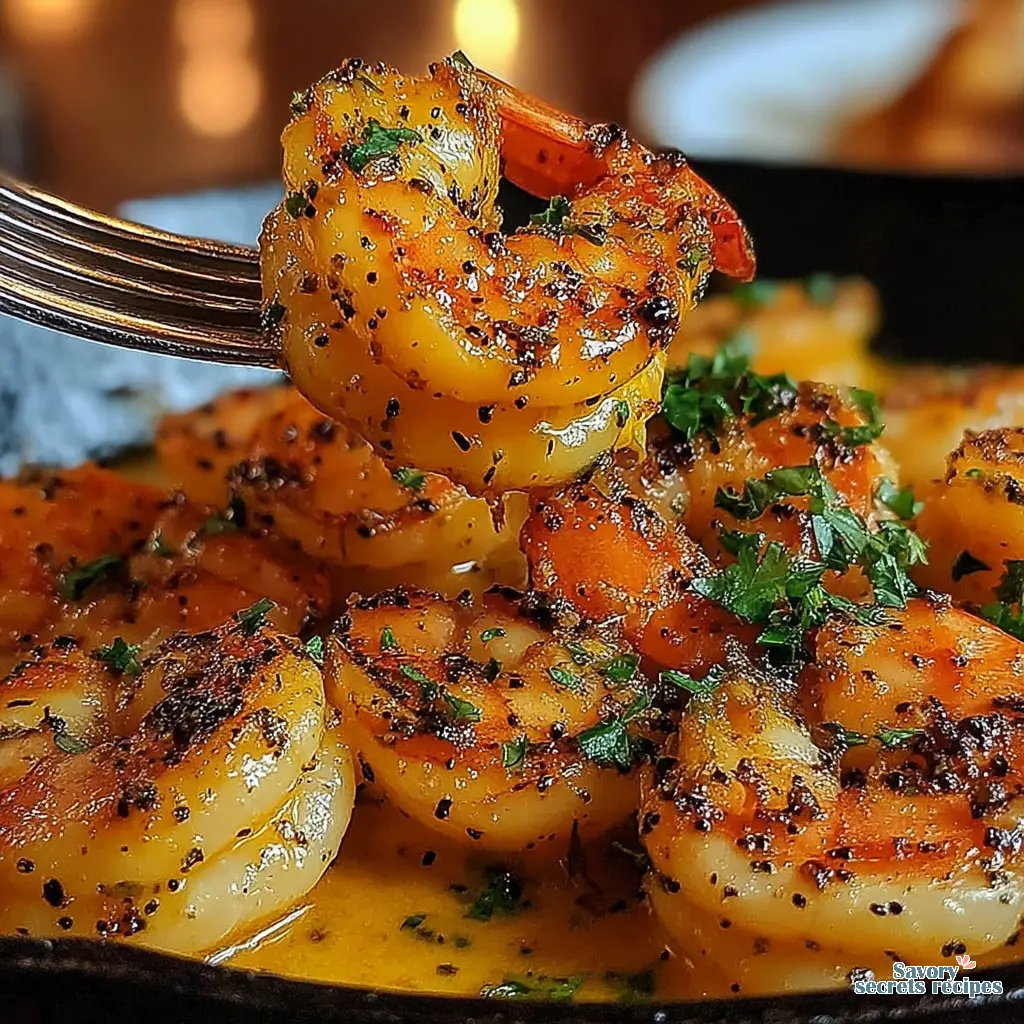
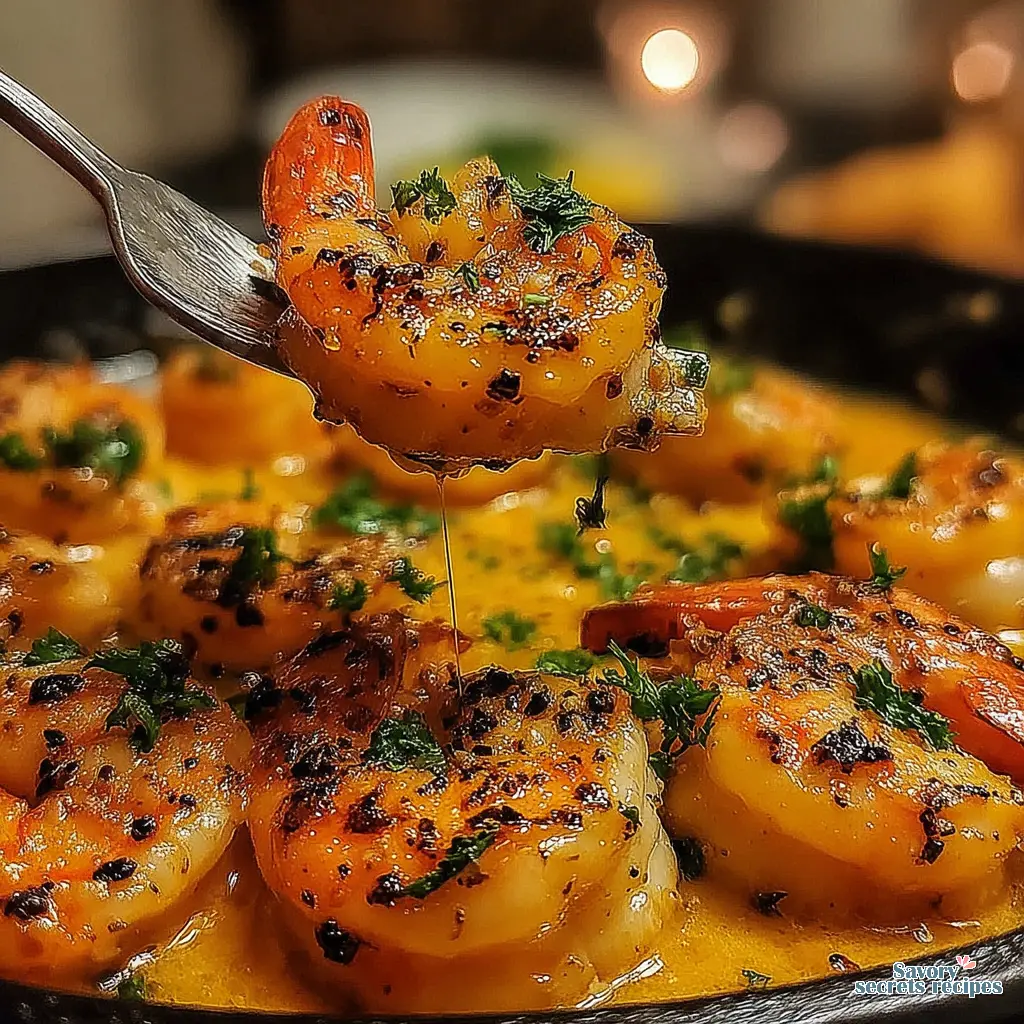
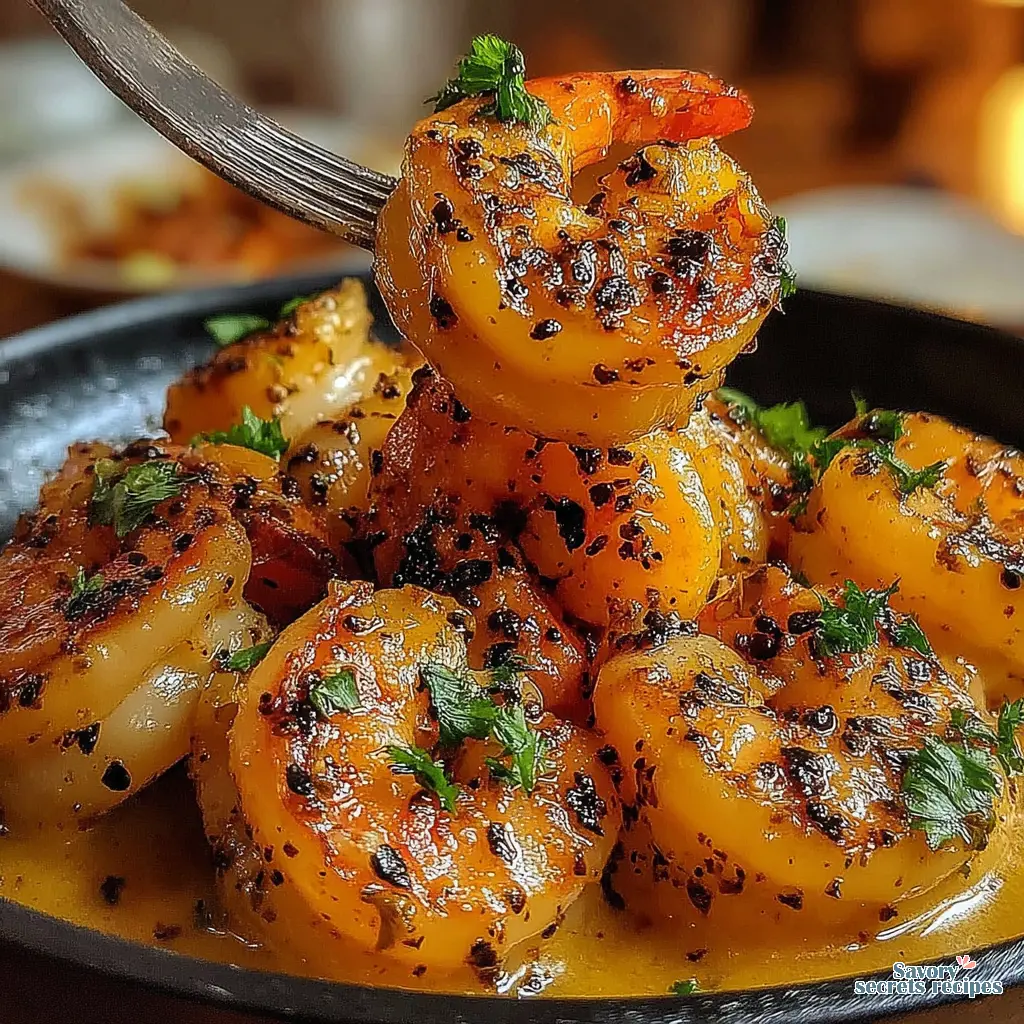
Watch the shape. Raw shrimp are relatively straight. As the proteins coagulate and tighten during cooking, they curl.
A relaxed “C” shape means Cooked.
A tight “O” shape means Overcooked.
Pull them off the heat the second they form that gentle C. They will continue cooking slightly from residual heat in the pan. The internal shrimp temperature should ideally hit 120-145°F, but honestly, trusting your eyes is faster and more reliable here.
Common Mistakes & Fixes
Mistake: The shrimp look gray and lack a crust.
Solution: This usually happens if the shrimp were wet or the pan wasn’t hot enough. Always pat dry thoroughly and wait for the oil to shimmer before adding the protein.
Mistake: The garlic burned and tastes bitter.
Solution: You likely added the minced garlic cloves too early. Garlic burns in about 30 seconds over high heat. Add it during the last minute of cooking, right when you drop the heat and add the butter.
Mistake: The shrimp are tough and rubbery.
Solution: Classic overcooking. They curled into a tight O-shape. Next time, pull them off the heat sooner. They only need about 2-3 minutes per side.
Meal Prep Strategy & Storage for Your Easy Shrimp Skillet
I’m impressed by how well this holds up if you store it correctly. If you’re making this easy one pan shrimp skillet with vegetables for meal prep, my best advice is to divide the sauce. Use half for a quick marinade or cooking liquid, and save the other half to drizzle fresh over the reheated dish later in the week.
Store leftovers in an airtight container in the refrigerator for up to 3 days. When reheating, please, whatever you do, step away from the microwave. Microwaving seafood destroys the texture and turns it into pencil erasers. Instead, pan-sear over low to medium-low heat just until warmed through. You can add a splash of broth or water to help create a gentle steam environment without overcooking.
Frequently Asked Questions

Bringing It All Together
This makes good sense when you think about it. High heat, dry surface, quick cooking time, and finishing with butter off the heat. That’s the formula. Once you master the technique for this easy shrimp skillet, you’ll find yourself making it constantly. It’s versatile enough to serve over rice, tossed with zucchini noodles, or just eaten straight out of the pan with some crusty sourdough bread to mop up those incredible garlic pan juices.
Don’t let seafood intimidate you. Just listen for that sizzle, watch for the C-shape, and trust your instincts. I’m always excited when I find a technique that has both traditional wisdom and solid food science backing it up. For more inspiration, check out my Pinterest boards where I save all my favorite quick dinner variations. Now go grab your skillet and get searing.
Reference: Original Source
Can I use frozen shrimp in this recipe?
Absolutely. Just ensure you thaw them completely under cold running water first. The most crucial step is to pat them aggressively dry with paper towels before they hit the pan. Any residual ice or water will steam the shrimp instead of giving you that beautiful sear.
What type of pan should I use?
A heavy-bottomed pan is essential for an easy shrimp skillet. I highly recommend a cast iron skillet because it retains high heat perfectly when cold protein is added. A thick stainless steel pan is my second choice, as it’s excellent for developing flavorful fond on the bottom.
How do I know when the shrimp is cooked?
Watch the shape and color. They are done when they turn opaque white with bright pink accents and curl into a loose “C” shape. If they curl into a tight “O” shape, they are overcooked. The whole process usually takes just 2 to 3 minutes per side.
How to best store this recipe?
Store your leftover easy shrimp skillet in an airtight glass container in the refrigerator for up to 3 days. To reheat, gently warm them in a skillet over low heat with a tiny splash of water or broth. Avoid the microwave entirely, as it ruins the texture.
Should you rinse cooked shrimp?
No, you shouldn’t rinse them after cooking. Rinsing cooked shrimp washes away all the incredible pan juices, garlic butter, and seasoning you just worked hard to build. If you need to cool them quickly for a salad, an ice bath in a sealed bag is a better method.
How long does it take to cook shrimp in the oven?
If you prefer roasting over a skillet method, it typically takes 6 to 8 minutes at 400°F. However, you won’t get the same deep, caramelized Maillard reaction crust in the oven that you achieve with a hot cast iron skillet on the stovetop.
Do you season shrimp before or after cooking?
Always season right before cooking. If you salt them too early, the salt will draw out moisture, making it harder to get a good sear. Toss them with salt, pepper, and smoked paprika right before they hit the hot oil for the best results.
Why did my shrimp turn out rubbery?
Rubbery texture is the direct result of overcooking. Shrimp cook incredibly fast. Once they hit that tight “O” shape, the muscle fibers have contracted too much, squeezing out all the moisture. Pull them off the heat the second they form a relaxed “C” shape.
Is shrimp healthy?
Yes, from a nutritional standpoint, it’s an excellent lean protein source. It’s low in calories and packed with iodine, selenium, and antioxidants like astaxanthin. While it contains cholesterol, dietary cholesterol has a minimal impact on blood cholesterol for most people. It’s a fantastic addition to your diet.