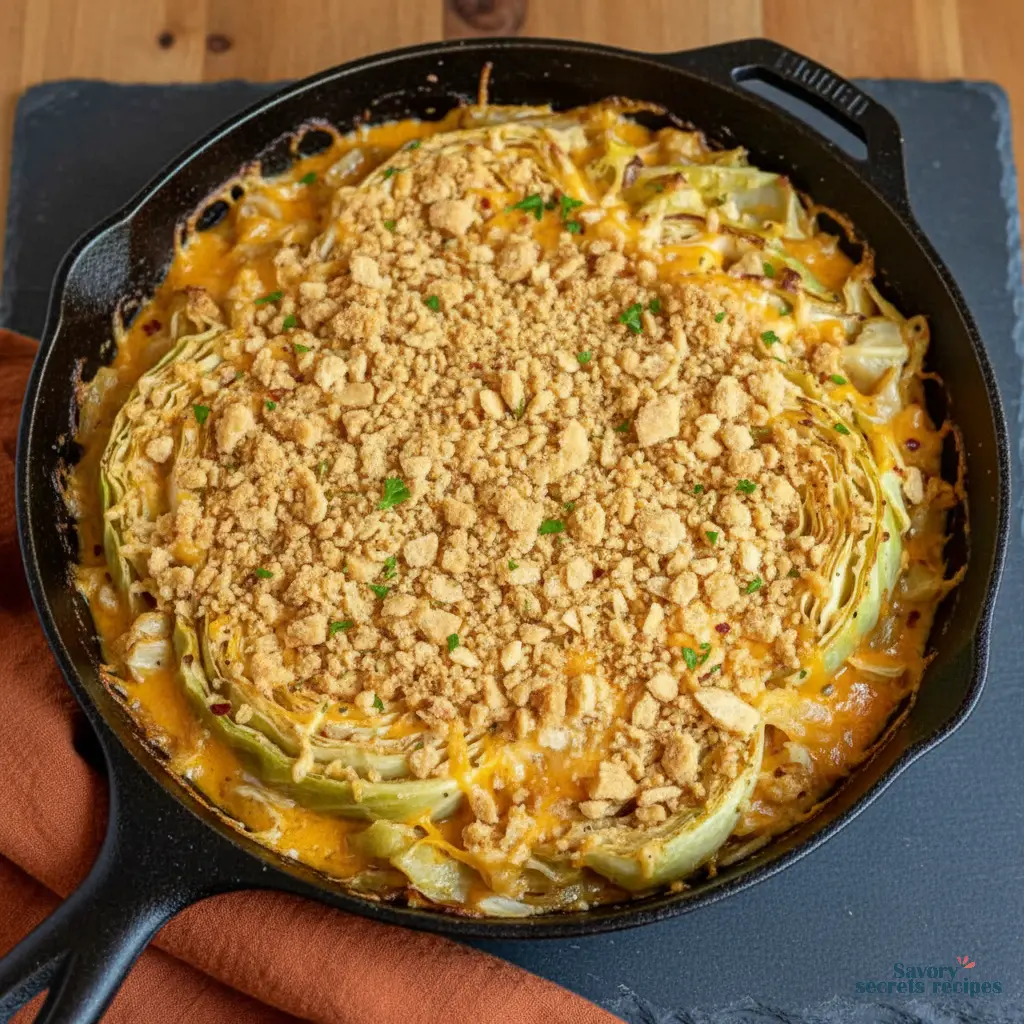
Baked Cabbage with Cheese, Mama Lu's Way
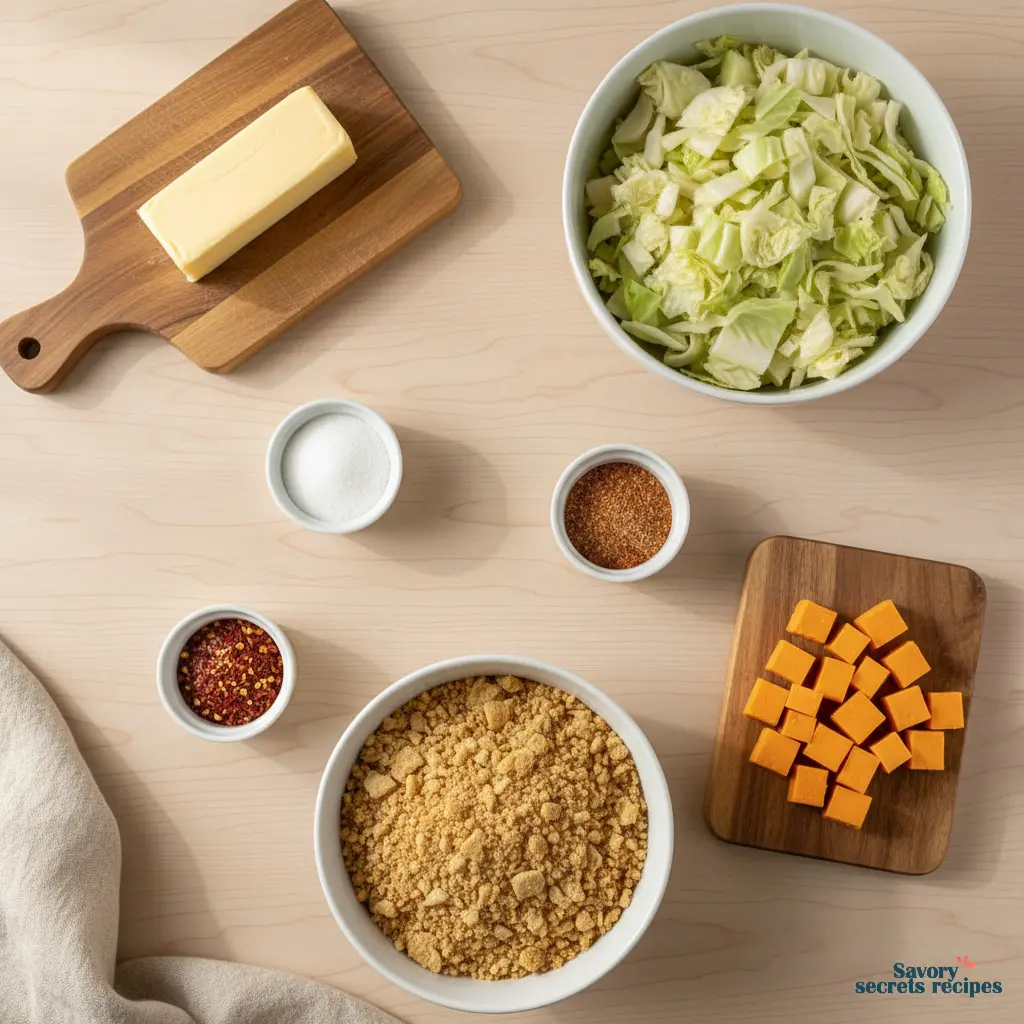
Ingredients
Method
- Preheat the oven to 350°F. Grease a 13x9-inch or 3.5 to 4-quart baking dish with butter or non-stick cooking spray. Set the dish aside.
- Slice the cabbage into 1-inch pieces with a sharp knife.
- Melt 2 tablespoons of butter in a large skillet over medium heat. Add the cabbage and cook, stirring occasionally, until tender, for about 10 to 12 minutes.
- Add cubes of Velveeta cheese, sugar, seasoned salt, and crushed red pepper flakes. Gently fold until the cheese is melted.
- Transfer the cabbage mixture to the prepared baking dish.
- Melt the remaining 4 tablespoons of butter in a small bowl. Mix the melted butter with the crushed crackers. Evenly sprinkle the mixture over the casserole top.
- Bake for 20 to 25 minutes, until the top turns golden brown and the casserole bubbles at the edges.
- Remove the dish from the oven and allow it to cool briefly. Garnish with chopped parsley or sliced green onions as desired.
Nutrition
Notes
Southern Cook Tips and Substitutions
-
- Cheese swap: If you prefer a more natural cheese, swap Velveeta for shredded cheddar or a cheese blend like Colby Jack or Monterey Jack. You can also opt to use American Cheese.
-
- Spice level: For a spicier kick, increase the crushed red pepper flakes or add a pinch of cayenne pepper.
-
- Cracker topping: You can substitute the butter round crackers with panko bread crumbs or crushed corn flakes for a different texture. Adding a 1/4 cup shredded parmesan cheese to the cracker mixture is also an excellent addition.
-
- Make it a meal: For a heartier dish, add cooked bacon, ham, or ground sausage into the cabbage before baking.
Storage Instructions
Store any leftover cabbage casserole in an airtight container in the refrigerator for up to 3-4 days. Reheat individual portions in the microwave or reheat the entire casserole in the oven at 350°F for 15-20 minutes. You can freeze the unbaked casserole for up to 2 months. Assemble the casserole but don’t add the cracker topping. Cover tightly with plastic wrap and aluminum foil. When ready to bake, thaw in the fridge overnight, add the cracker topping, and bake as directed.When a Head of Cabbage Becomes a Hug in a Dish
Here’s the thing about January in Minneapolis. The dark comes early, the air hurts your face, and you start craving food that feels like a warm blanket. I’m not going to lie, I’ve stared down many a sad, boiled cabbage in my life. Soggy. Bland. The vegetable equivalent of a sigh. But then I discovered this baked cabbage with cheese situation, and honestly? It’s a game-changer for weeknights. It turns that humble, budget-friendly head into something crispy, cheesy, and deeply comforting. My grandma Evelyn, with her garage freezer full of casseroles, would have absolutely approved of this kind of practical magic. It tastes like coming home to a kitchen that smells like someone cared, even on a Wednesday.
This baked cabbage with cheese recipe is my answer to the winter vegetable blues. It’s totally doable, even if you’re racing the clock between daycare pickup and bedtime. And I promise, it solves the soggy cabbage problem for good. You get crispy, caramelized edges, a creamy, savory cheese sauce, and a topping that adds the perfect crunch. It’s the side dish that might just steal the show.
Why This Baked Cabbage With Cheese Actually Works
Real talk: most baked vegetable dishes fail because of moisture. Cabbage holds a lot of water, and if you don’t handle it right, you end up with a steamed, sad pile. This recipe works because of a few smart tricks. First, we’re not just dumping raw cabbage into a dish. The quick sauté with butter and a pinch of sugar isn’t just for flavor—it starts the cooking process and drives off some of that initial moisture, giving you a head start on crispiness. Second, the high oven heat is non-negotiable. That blast of 400°F is what gives you those gorgeous, browned edges and prevents the whole thing from turning into a soup.
Finally, the cheese sauce. Using Velveeta might feel a little old-fashioned, but that’s the point. Its melting properties are kind of genius for a bake like this. It stays creamy and smooth instead of breaking or getting oily. Combined with the buttery cracker topping, it creates this incredible contrast of textures. It’s a lesson from my mom’s Sunday cooking marathons: sometimes, the simple, reliable ingredients are the ones that make a dish truly foolproof.
Getting Your Ingredients Ready (The Sunday Job)
Okay, let’s talk prep. This isn’t complicated, but doing it right sets you up for success. The cabbage is your main character. You’ll want a firm, dense green cabbage—give it a squeeze at the store; it should feel heavy for its size. Chopping it is the only real “work” here. I like pieces that are about 1 to 1.5 inches—big enough to hold their shape and get crispy, not so small they’ll vanish. Don’t stress about perfection. Rustic chunks are totally fine.
For the cheese, a block of Velveeta is what we’re using. Just cut it into small cubes so it melts evenly. The crackers get crushed, but not into dust. You want a mix of textures—some fine crumbs to soak up butter, some little pebbles for crunch. A quick pulse in a food processor or a bash in a zip-top bag with a rolling pin does the trick. Get all this measured and set out before you heat the skillet. Future you, standing at the stove at 6 PM, will thank you.
The Step-By-Step Walkthrough
I’ll guide you through the process, but remember, the full details are in the recipe card above. Think of this as the “why” behind the “what.”
Starting Strong in the Skillet
You begin on the stovetop. Melting the butter in a large oven-safe skillet is your first move. That’s going to be your workhorse pan—we’re building flavor and starting the cook right there. When you add the cabbage, it’s going to look like a mountain. Don’t panic. It wilts down dramatically. The sprinkle of sugar isn’t for sweetness, not really. It’s a chef’s trick to promote caramelization. You’re looking for the cabbage to just start getting some golden spots and to lose that raw, crunchy bite. This step is your insurance policy against sogginess in the baked cabbage with cheese.
The Cheesy Transformation
Once the cabbage is sautéed, you stir in the cubed Velveeta and the seasonings. This is where the magic happens. The residual heat from the cabbage starts melting the cheese almost immediately, creating this instant, creamy sauce that coats every piece. You want to stir it off the heat until it’s mostly melted and everything is happily combined. The smell right now is honestly kind of genius—buttery, savory, with just a hint of spice from the pepper flakes.
The Final Bake
Here’s where we get that iconic texture. You scatter the buttery cracker crumbs over the top in an even layer. Then, it all goes into a hot, hot oven. That 400°F heat is crucial. It finishes cooking the cabbage through, sets the cheese sauce, and transforms the topping into a golden-brown, crispy crust. You’ll know it’s done when the topping is deeply golden and the edges of the cabbage pieces you can see are browned and crisp. The whole kitchen will smell like comfort.
Tips for Perfect Baked Cabbage With Cheese
I’ve made this enough times to learn what makes it sing and what can go slightly off-key. Here’s what I wish I knew the first time.
Preparation Tips
Dry your cabbage after washing it. I mean it. A salad spinner is perfect, or just pat it thoroughly with kitchen towels. Any extra water is the enemy of crispiness. Also, use an oven-safe skillet from the start. Cast iron is ideal because it holds and distributes heat so well, giving you those fantastic crispy edges on your baked cabbage with cheese. If you only have a regular skillet, you’ll need to transfer everything to a greased baking dish before the oven, which is totally doable but one more thing to wash.
Cooking Tips
Don’t crowd the pan when sautéing. If your skillet isn’t giant, do the cabbage in two batches. Steaming instead of sautéing is the fast track to limp results. And watch the oven! Ovens vary, so start checking at the 15-minute mark. The topping should be the color of a well-done graham cracker crust, and you should see active bubbling around the edges. That’s your visual cue.
Storage & Reheating Tips
This keeps okay, but it’s truly best fresh. The topping will soften. If you have leftovers, store them in an airtight container in the fridge for up to 3 days. To reheat, skip the microwave—it’ll make everything soggy. Spread it in a single layer on a baking sheet and pop it under the broiler for a few minutes to re-crisp the top. It won’t be *quite* as perfect, but it’s still pretty great.
Variations & Substitutions
This recipe is wonderfully adaptable. Think of it as a template. If you’re looking for more ways to use up a whole head of cabbage, check out our guide to what to do with lots of cabbage.
Dietary Adaptations
Need it gluten-free? Use your favorite gluten-free crackers or even crushed pork rinds for the topping (check labels). For a dairy-free baked cabbage with cheese, it’s trickier because of the Velveeta, but you could try a dairy-free cheese sauce made from blended cashews and nutritional yeast, though the texture will be different. Honestly, for vegan, I might pivot to a different recipe altogether—this one is pretty cheese-centric.
Ingredient Substitutions
No Velveeta? A mix of sharp cheddar and a slice of American cheese will give you a similar melt. You can use panko or regular breadcrumbs instead of butter crackers, but toss them with melted butter first so they brown. The seasoning salt is just a blend; use your favorite all-purpose seasoning or make your own with salt, paprika, garlic powder, and a touch of celery salt.
Flavor Variations
Add a diced onion to the butter at the very beginning and let it soften before adding the cabbage. Stir in a teaspoon of caraway seeds with the seasonings for a classic Eastern European vibe. Or, for a heartier dish, mix in a cup of cooked, shredded chicken or browned ground turkey with the cheese. It becomes a full one-pan meal.
Common Baked Cabbage With Cheese Mistakes to Avoid
❌ Mistake: Skipping the stovetop sauté and just mixing raw cabbage with cheese and baking it.
✅ Solution: Always sauté first. This step drives off moisture and starts the caramelization process, which is the foundation for flavor and texture in your baked cabbage with cheese.
❌ Mistake: Using a low oven temperature (like 350°F) to “cook it through gently.”
✅ Solution: Crank that heat to 400°F. High heat is what gives you crispy edges and prevents a steamed, watery result. It’s the difference between roasted and soggy.
❌ Mistake: Cutting the cabbage pieces too small.
✅ Solution: Go for hearty, 1-inch plus chunks. Smaller pieces will overcook and lose all texture, becoming mushy in the cheese sauce.
❌ Mistake: Not using an oven-safe skillet and having to transfer to a baking dish.
✅ Solution: Use cast iron or a stainless steel skillet that can go from stovetop to oven. It maintains the heat and makes for easier cleanup. If you must transfer, preheat the baking dish in the oven while you sauté.
Frequently Asked Questions
How to Store and Serve Your Creation
This baked cabbage with cheese is best served piping hot from the oven. I love it as a hearty side dish next to something simple like roasted chicken or seared fish. It’s rich enough to stand up to a steak, too. For leftovers, cool completely and store in an airtight container in the fridge for up to 3 days. Reheat in a 350°F oven or toaster oven until warmed through to help the topping re-crisp a bit. I don’t recommend freezing this one—the cabbage texture gets too watery when thawed.
Your New Go-To Winter Side
So there you have it. A humble head of cabbage, transformed. This baked cabbage with cheese is more than a recipe; it’s a little bit of weeknight alchemy. It’s the dish that turns “what’s for dinner?” into something you actually look forward to. It’s affordable, it’s comforting, and it just works. When you pull that skillet out of the oven, all bubbly and golden, you’ll feel that same pride my grandma must have felt stocking her freezer—the pride of making something good, something satisfying, without a huge fuss. You’ve totally got this. Now go make your kitchen smell amazing.
Do cabbage and cheese go together in the oven?
Absolutely, and it’s a fantastic pairing. The cabbage becomes sweet and nutty when roasted, which balances the rich, savory cheese perfectly. This baked cabbage with cheese recipe is proof—they’re a comfort food dream team.
How long does it take to cook a cabbage in the oven?
For this baked cabbage with cheese, the total oven time is about 20 minutes at 400°F. But remember, we sauté it first on the stovetop! That pre-cooking is key so the cabbage is tender and the topping crispy without over-baking.
What is the best cheese to pair with cabbage?
For a meltable sauce, Velveeta or a sharp cheddar are my top picks. Velveeta gives that ultra-creamy, nostalgic sauce, while cheddar offers a sharper tang. In this baked cabbage with cheese, Velveeta’s meltability is honestly kind of perfect.
How do you keep baked cabbage from getting soggy?
The two big secrets: sauté it first to remove water, and bake it at a high temperature (400°F). Also, make sure your cabbage is thoroughly dried after washing. Moisture is the enemy of crispy baked cabbage with cheese.
What temperature is best for roasting cabbage?
High heat is best. I never go below 400°F for roasted or baked cabbage. It gives you those delicious caramelized, crispy edges instead of steamed, soft pieces. It makes all the difference.
Can I make this baked cabbage with cheese ahead of time?
You can prep the components. Sauté the cabbage and mix with the cheese, then store it covered in the fridge. Keep the cracker crumbs separate. When ready, top and bake, adding a few extra minutes since it’s cold. The topping will stay crisper this way.
What are the health benefits of eating cabbage?
Cabbage is a powerhouse! It’s packed with Vitamin C, fiber, and antioxidants. It’s also low in calories. Baking it like this preserves more nutrients than boiling, and hey, everything’s better with a little cheese, right? Balance.