Easy Vegan Kimchi Recipe Without Fish Sauce
Ingredients
Method
- Maintain clean surfaces and utensils and wash hands frequently throughout the process to prevent bacterial contamination and ensure proper fermentation. Refer to the provided photos for visual guidance.
- Quarter the rinsed and dried cabbage, then use a sharp knife to remove and discard the hard white bottom core.
- Place the cabbage in a large mixing bowl. Lift each leaf and sprinkle a generous amount of sea salt between them until all leaves are salted. Press down on the cabbage and let it rest for 30 minutes to soften and draw out moisture.
- Whisk all vegan fish sauce ingredients in a small mixing bowl while the cabbage rests, then set aside.
- Combine fresh ginger, garlic, onion, and red chili flakes in a food processor or blender. Start with 3-4 tablespoons of chili flakes for mild heat or 1/2 cup for a spicier version, then taste and adjust the flavor as needed.
- Add the vegan fish sauce to the chili mixture and pulse to combine, then set aside.
- Flip each cabbage section over and pack down firmly to compress. Repeat this process three more times for a total of four flips, waiting 30 minutes between each and washing hands before touching the cabbage.
- Stir the sauce together with chopped carrots and optional green onions in a medium mixing bowl, then cover and set aside.
- Sterilize storage containers by pouring boiling water over them in a clean sink. Allow them to cool slightly, then dry with a clean towel and set aside.
- Rinse each cabbage section in very cold water to remove excess salt after the final flip. Pat dry with clean towels and separate the leaves for easier handling.
- Clean and dry the large mixing bowl, return the cabbage to it, and coat each leaf thoroughly with the sauce mixture. Use gloves if necessary to avoid skin irritation.
- Apply the sauce generously while ensuring enough remains to coat all the cabbage. Wash hands and prepare the sterilized containers once finished.
- Pack the coated leaves into the sterilized containers with clean hands, pressing down firmly to eliminate air pockets. Seal with a sterilized lid and store in a cool, dark place to ferment.
- Ferment the kimchi at room temperature for 36 to 48 hours, then transfer it to the refrigerator for one week to develop a softer texture and deeper flavor.
- Continue fermentation for up to 21 days for a tangier, more intense flavor and more tender cabbage.
- Open the container daily and press the kimchi down with a clean utensil to release air bubbles and keep the cabbage submerged in liquid.
- Monitor the scent of the kimchi; once it smells pleasant and tangy, transfer it to the refrigerator.
- Store the kimchi in the refrigerator for 3-4 weeks or up to several months. Discard if mold forms or if the smell becomes unpleasant.
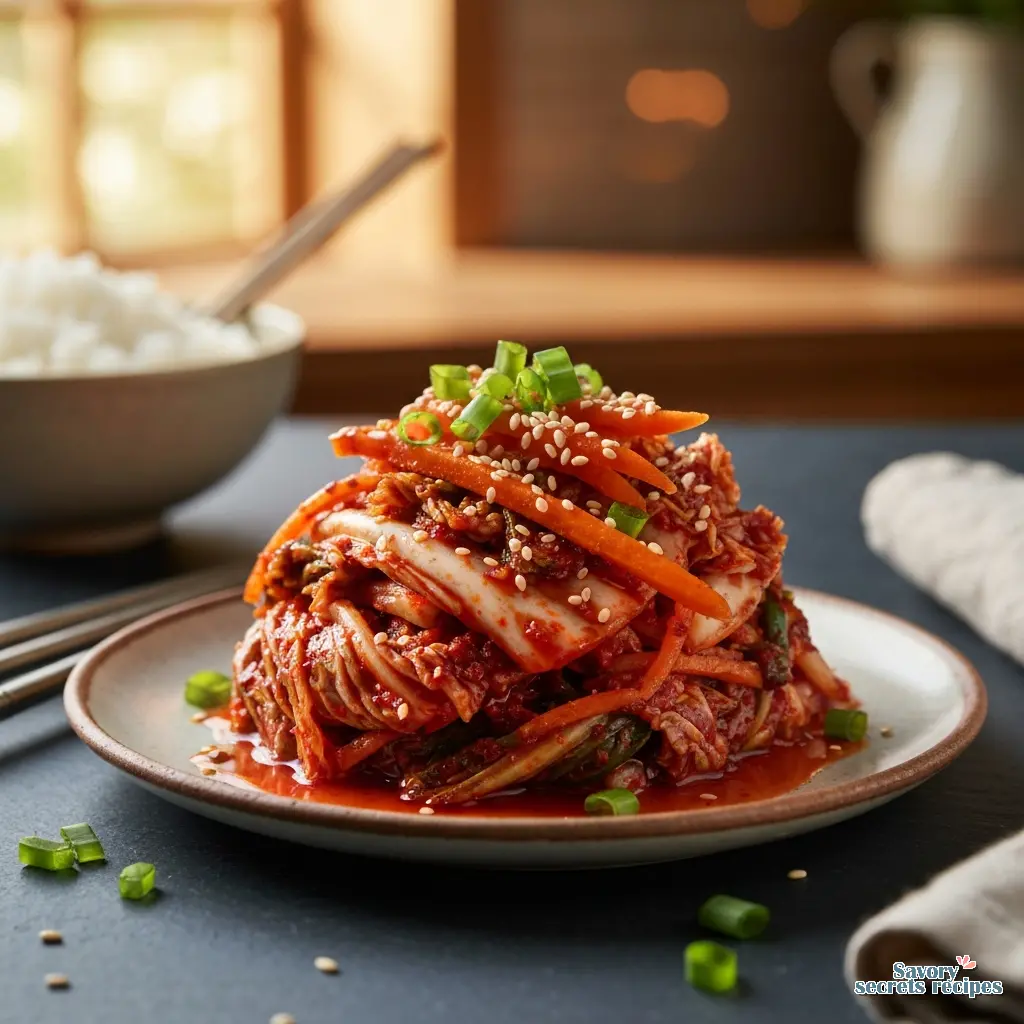
- Serve the kimchi as a side dish or addition to Asian-inspired meals like fried rice, spring rolls, or tofu stir-fry.
Nutrition
Notes
Why I Finally Stopped Buying Jarred Kimchi
I remember standing in the aisle at H Mart, reading the back of a jar for the third time, convinced I must have missed something. Salted shrimp. Anchovy extract. Fish sauce. It felt like every single brand had a hidden animal ingredient, and honestly, it was exhausting. I just wanted that spicy, tangy crunch without the side of label anxiety.
That was five years ago. Since then, I’ve learned that making the **best vegan kimchi** at home isn’t just a workaround; it’s actually better. You get control. You get to decide exactly how spicy it is, and you never have to wonder “does kimchi have meat” again.
In my testing, I found that people get intimidated by fermentation. I get it. Leaving a jar of vegetables on your counter for two days goes against everything we’re taught about food safety. But let me walk you through this. Once you understand the simple science of salt and time, you’ll realize it’s safer (and easier) than cooking a Sunday roast. Plus, when you crack open that jar and smell the garlic and ginger, you’ll know it was worth the wait.
The ‘Bendy’ Test: How to Know Your Cabbage is Ready
This is the part that matters most. If you get the salting wrong, nothing else works. The goal here is osmosis. We are using salt to draw water out of the napa cabbage cells, which concentrates the flavor and creates the crunch we want.
I use a method my mother-in-law Sofia taught me for eggplant, but it applies perfectly here. You aren’t just timing the salting process; you are feeling for a specific texture.
**The Bendy Test:**
After salting your cabbage and letting it sit (usually 90 minutes to 2 hours), pick up a thick piece of the white stem. Bend it in half.
* **If it snaps:** It needs more time.
* **If it bends completely touching end-to-end without breaking:** It is ready.
In my experience, though yours may differ depending on humidity, this usually takes about two hours. Don’t rush this. If you skip this step, your **vegan kimchi** will be watery and dilute your beautiful seasoning paste.

Umami Without the Fish: The Secret Sauce
The biggest question I get is, “how to make vegan kimchi taste authentic without fish sauce?” Traditional recipes rely on salted shrimp or anchovies for that deep, savory funk. If you just leave them out, your kimchi tastes flat.
Here is what I have found works to replace that depth:
* **Miso Paste:** White or yellow miso adds a fermented, salty kick that mimics the complexity of seafood.
* **Tamari or Soy Sauce:** Provides the salt base and dark color.
* **Kelp (Kombu) Powder or Broth:** This is my favorite trick. It brings the taste of the ocean without the fish.
* **Fruit:** I use pear, apple, or even pineapple juice in the paste. It feeds the bacteria (sugar) and adds a fresh sweetness that balances the heat.
For this **best vegan kimchi recipe**, we are using a blend of tamari and fruit to get that umami bomb. Trust me, you won’t miss the shrimp.
The 24-Hour Room Temp Guide
This is where the magic happens. You’ve mixed your cabbage with the paste. It looks red and angry and delicious. Now, you have to wait.
Pack the kimchi into clean glass jars. Press it down hard. You want to remove air pockets because air is the enemy here. Leave about an inch of headspace at the top because this stuff is alive. It will bubble and rise.
**The Timeline:**
* **Hours 0-12:** Nothing much happens visually. The flavors are melding.
* **Hours 12-24:** You might see small bubbles rising to the surface. This is good! It means the lactobacillus bacteria are waking up and eating the sugars.
* **The Smell Test:** Open the jar after 24 hours. It should smell garlicky and slightly sour, but fresh. If it smells like rotten garbage, something went wrong (usually dirty equipment), but that is rare.
In my kitchen in New Jersey, where we keep the house around 68°F, I usually let it sit for 36 hours. If you are in Los Angeles and it’s a warm 75°F day, 24 hours might be plenty. You will know it is ready when you see bubbles and it tastes slightly tangy.

Kimchi Rescue Guide: Fixing Common Issues
I have ruined my fair share of batches. It happens. But before you toss it, see if you can save it.
**Problem: It’s too salty.**
This usually happens if you didn’t rinse the cabbage enough after the initial brining.
* **The Fix:** Add sliced Korean radish (mu) or daikon. The fresh radish will absorb some of the saltiness over the next few days in the fridge.
**Problem: It’s not fermenting (no bubbles).**
* **The Fix:** Check your temperature. If your kitchen is cold (below 65°F), it just needs more time. Move it to a warmer spot, like on top of the fridge. Also, check your salt. Did you use iodized table salt? The iodine can inhibit good bacteria. Always use sea salt or kosher salt.
**Problem: It’s too spicy.**
* **The Fix:** This one is tough to reverse, but you can dilute it. Mix in more plain, salted cabbage or radish to spread the heat out. Next time, cut back on the **gochugaru**.
Aroma Management (Because It Smells)
Let’s be real. Kimchi smells. It’s a pungent, sulfurous smell that I love, but your roommates or family might not.
To be safe, I always use glass jars with rubber seals. Plastic containers are a nightmare; they absorb the smell and stain red forever. I once used a plastic Tupperware and had to throw it out because everything I put in it afterwards tasted like garlic.
Store the jar in the back of the fridge, not the door. The temperature is more stable there, which keeps the fermentation slow and controlled, reducing gas buildup.
Storage & Serving: When to Eat It
You can eat this **easy vegan kimchi recipe** right away as “fresh kimchi” (geotjeori), but the real probiotic benefits kick in after fermentation.
Once you move it to the fridge, it will keep fermenting slowly.
* **Week 1-2:** Crisp, fresh, slightly tangy. Perfect for side dishes.
* **Week 3-4:** Sour, softer, pungent. This is “ripe” kimchi.
* **Month 2+:** Very sour. Do not throw this away! This is exactly what you need for **vegan kimchi stew** or fried rice. The sourness balances the rich flavors of cooked dishes.
Frequently Asked Questions
Ready to Ferment?
When you finally taste your own **homemade kimchi**, crunchy and perfectly spiced, you’ll realize why people get obsessed with fermentation. It is a little bit of science and a little bit of magic. Plus, having a jar of this in your fridge means you are always five minutes away from an incredible kimchi fried rice or a spicy stew on a cold night.
For more inspiration, check out my Pinterest boards where I save all my favorite ways to use up a batch of kimchi.
I would love to see how yours turns out. Tag me if you make it, and don’t be afraid to experiment with the spice levels!
Reference: Original Source