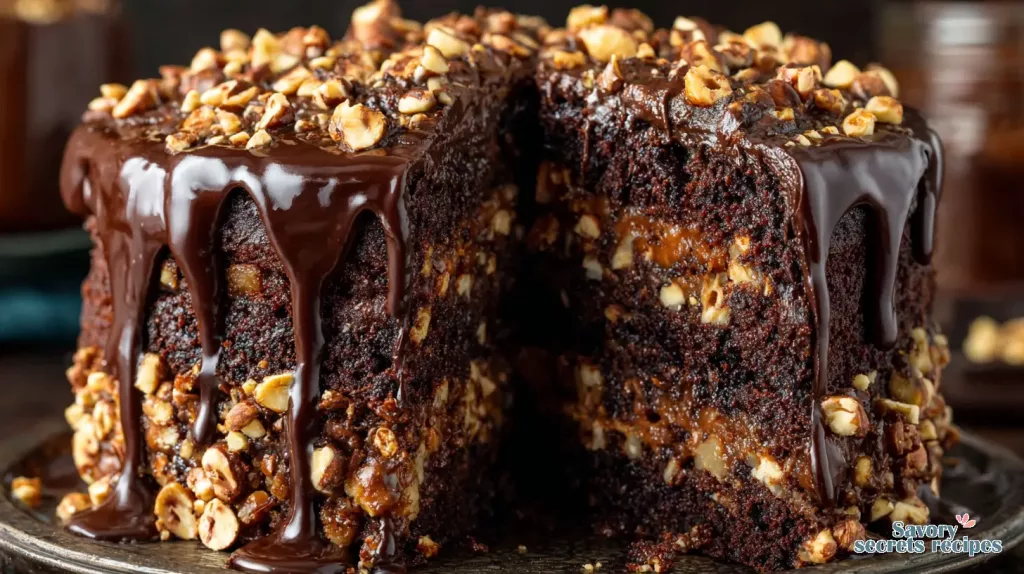
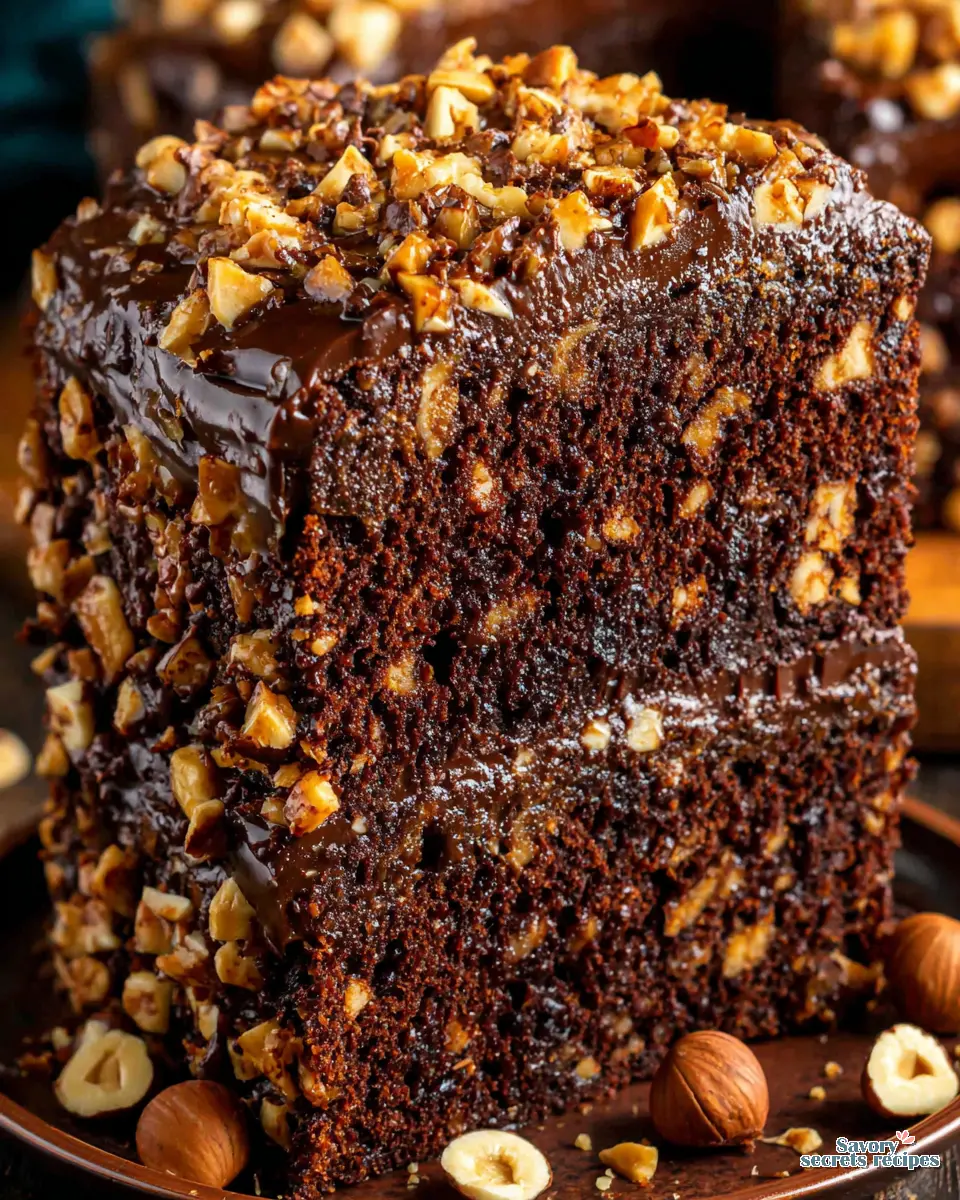
Rich Chocolate Hazelnut Cake with Espresso Glaze
Ingredients
Method
- Preheat your oven to 350°F (175°C). Meticulously grease a 10-inch bundt pan with softened butter, getting into every nook. Dust with flour, tapping out any excess.
- In a medium bowl, whisk together the all-purpose flour, ground hazelnuts, baking powder, baking soda, and salt.
- In a large bowl, beat the softened butter and granulated sugar on medium-high speed for 3-4 minutes until light in color and fluffy in texture.
- Add the room-temperature eggs one at a time, beating well after each addition. Beat in the vanilla extract.
- Reduce mixer speed to low. Add the dry ingredients in three parts, alternating with the sour cream and cooled espresso in two parts (begin and end with dry). Mix only until the last streaks of flour disappear.
- Spoon the batter into the prepared bundt pan and spread evenly. Bake for 45-55 minutes, or until a wooden skewer inserted into the thickest part comes out clean.
- Let the cake cool in the pan on a wire rack for exactly 15 minutes. After 15 minutes, confidently invert the cake onto the rack to release it. Let it cool completely.
- Place the finely chopped chocolate in a heatproof bowl. In a small saucepan, heat the heavy cream and butter until it just begins to simmer. Pour the hot cream over the chocolate and let it sit undisturbed for 5 minutes. After 5 minutes, whisk gently until a smooth, glossy glaze forms.
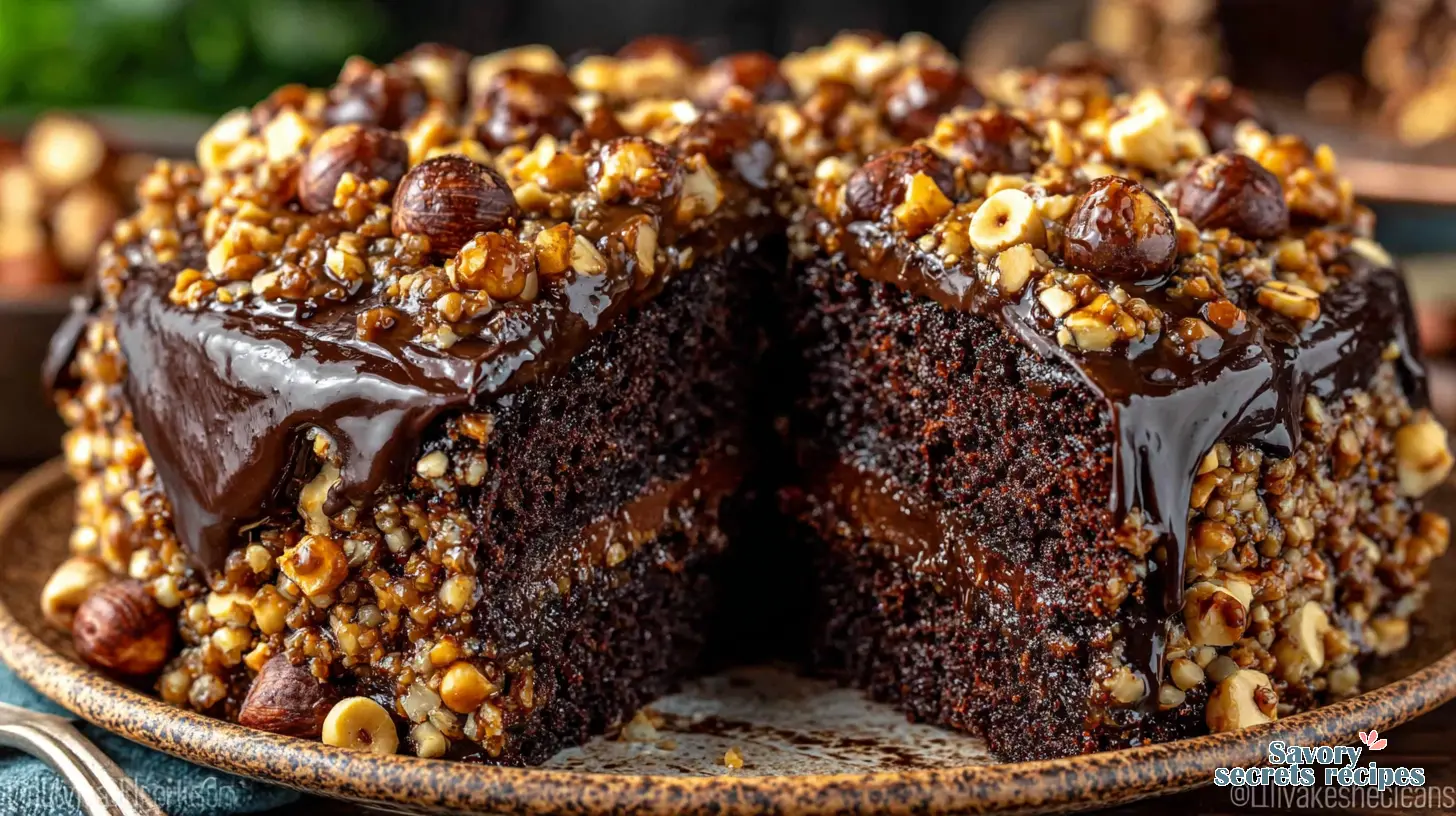
- Ensure the cake is completely cool. Slowly pour the slightly cooled chocolate glaze over the top, allowing it to drip down the sides. Immediately, while the glaze is still wet, sprinkle the chopped toasted hazelnuts over the top.
Nutrition
Notes
Why You’ll Love This Chocolate Hazelnut Cake
You know, there’s just something about a really good chocolate hazelnut cake. It hits different. I’m talking about that rich, deeply cocoa flavor meeting the nutty warmth of toasted hazelnuts, all wrapped up in a moist, melt-in-your-mouth experience. It’s like a hug in cake form, honestly. I’ve always thought of it as a grown-up version of that beloved hazelnut spread we all grew up with, but elevated, you know?
I remember one time, I was trying to make a quick dessert for a get-together, and I decided to wing it with a chocolate cake. Let’s just say the ratio’s off, and it ended up drier than the Sahara. Not gonna lie, I almost gave up on special occasion cakes right then and there. But then I found myself craving that specific blend of chocolate and hazelnut, and I knew I had to dial it in until it’s right. This chocolate hazelnut cake recipe, this is the one that works every time.
It’s the kind of dessert that makes people stop and ask for the recipe, that gets compliments from family or guests. And here’s the thing, it looks impressive, but it’s totally achievable, even if you’re juggling a busy schedule. You’ll feel a real sense of accomplishment, trust me. Plus, with spring in full swing here in Los Angeles, and Mother’s Day just around the corner, what better way to celebrate than with a stunning homemade cake?
Essential Ingredients for a Stellar Chocolate Hazelnut Cake
Alright, let’s talk ingredients. Good food doesn’t need fancy equipment, my teta always said, just attention and the right timing. That tracks, especially when you’re looking for that perfect, smooth nut chocolate sponge. You really want to make sure you’re starting with quality stuff here. We’re building something special, so let’s set ourselves up for success.
You’ll need your standard all-purpose flour, baking powder, baking soda, and salt. For the chocolate magic, we’re using good quality dark or semi-sweet chocolate and cocoa powder. Don’t cheap out on the cocoa, it makes a huge difference. Then, unsalted butter, granulated sugar, large eggs, pure vanilla extract, and full-fat sour cream for that incredible moist cake layers. And of course, the stars of the show: finely ground toasted hazelnuts and coarsely chopped toasted hazelnuts.
One pro tip, and this is something my teta taught me about baking: always use room temperature dairy ingredients and eggs. If your butter is too cold, it won’t cream properly with the sugar, and you’ll end up with a lumpy batter. That’s just how I do it, anyway. It’s a small step, but it makes a huge difference in the texture of your finished cake.
Choosing the Right Cocoa Powder
Here’s the thing about cocoa powder: it’s not all created equal. For this rich hazelnut cocoa dessert, you’ve got a couple of choices. Natural cocoa powder is more acidic and provides a strong, almost fruity chocolate flavor. Dutch-processed cocoa, on the other hand, is treated to reduce acidity, giving it a darker color and a smoother, milder chocolate taste. For this chocolate hazelnut cake, I prefer a good quality Dutch-processed cocoa. It really helps deepen that rich, dark chocolate color and flavor without any bitterness.
I’m not totally sure, but I think using a high-quality cocoa powder is one of those small details that really elevates the whole experience. It’s like choosing the right beans for your coffee; it just makes everything sing. You can find excellent options at places like Whole Foods or even your local Ralphs. Just make sure to sift your dry ingredients, especially the cocoa powder, to remove any clumps. Nobody wants a lump of unmixed cocoa in their slice, right?
Toasting Hazelnuts for Best Flavor
Toasting hazelnuts, this is the move. It brings out their natural oils and deepens that nutty flavour, making all the difference in your layered hazelnut chocolate cake. You’ll want to preheat your oven to about 350°F (175°C). Spread your hazelnuts in a single layer on a baking sheet. Pop them in the oven for about 10-15 minutes, giving them a shake halfway through. You’re looking for them to be lightly golden and smell wonderfully fragrant, like a warm, nutty hug.
Watch them carefully; they can go from perfectly toasted to burnt in a flash. My dad never measured his coffee, but he knew exactly when it was done by smell. That’s the same principle here. Once they’re out, let them cool a bit. Then, you’ll want to rub them in a clean kitchen towel to remove most of their skins. This isn’t just for aesthetics, it helps reduce any bitterness. Some skins are fine, don’t sweat it if you don’t get every single one. Then you’ll grind some finely for the cake batter and chop the rest for garnish and filling.
How to Make This Decadent Chocolate Hazelnut Cake
Alright, let’s get into the nitty-gritty of making this smooth nut chocolate sponge. It might seem like a lot of steps, but trust me, we’re just building layers of flavor and texture. Think of it like a good playlist, each song builds on the last. You’ve got this, it’s easier than it looks.
We’ll start with the cake layers, then move onto that velvety buttercream, and finally, the fun part: assembly and decoration. Precision matters here, but so does intuition. My teta’s kitchen always smelled like cardamom before sunrise, and she’d measure everything by eye, but it was because she’d done it a thousand times. We’ll use a scale for now, but you’ll get that intuition too.
Prepare the Moist Cake Layers
First up, the cake batter. You’ll cream butter and sugar together until it’s light and fluffy. This step is crucial for incorporating air, which gives your cake a lovely texture. Then, you’ll beat in the eggs one at a time, followed by the vanilla extract. In my experience, anyway, don’t rush this part. Let each egg fully incorporate before adding the next. That’s the move.
Next, you’ll alternate adding your dry ingredients with the sour cream and espresso or coffee. Here’s a little secret tip: the very strong brewed espresso or coffee isn’t just for flavor; it actually enhances the chocolate, making it taste even richer without making the cake taste like coffee. That tracks, right? When you fold in eggs and the dry ingredients, be gentle. Overmixing develops gluten, which can lead to a dense, tough cake. We want light and airy here, a really moist cake layers.
Don’t forget to line your cake pans with parchment paper for easy removal. This is a high-value tip; it works every time. I’ve had cakes stick before, and it’s frustrating. You’ll divide the batter evenly and bake them at the right baking temperature. Use a skewer to test for doneness; it should come out with just a few moist crumbs. Over-baking is a common pitfall, especially with hazelnuts, which can have a drying effect.
Craft the Velvety Hazelnut Buttercream
Now for the creamy hazelnut cake slice magic: the buttercream. This is where we get that Nutella-style chocolate cake vibe. You’ll start by creaming unsalted butter until it’s super light and fluffy. Then, gradually add powdered sugar, followed by melted dark or semi-sweet chocolate, pure vanilla extract, and a touch of heavy cream to get that perfect consistency. This whole process is about achieving that smooth, spreadable texture.
The trick is to really let the mixer do its thing. You want it to be airy and light, not dense. If it seems too thick, a tiny splash more heavy cream will dial it in until it’s right. If it’s too thin, a bit more powdered sugar. It’s a dance, you know? The coarsely chopped toasted hazelnuts go in last, adding that delightful crunch and intensifying the hazelnut flavor. This isn’t just frosting; it’s a rich dessert experience on its own.
Assemble and Decorate Your Cake
Okay, the cake layers are baked, the buttercream is ready. Now for the grand finale: assembling your layered hazelnut chocolate cake. This is where you visualize that stunning centerpiece. First, and this is a high-value tip, let cake layers cool completely before assembling. I mean completely. If they’re even a little warm, your beautiful buttercream will melt, and you’ll have a sliding mess. I’ve learned that the hard way, trust me. Nobody wants a leaning tower of cake.
Use an offset spatula to spread an even layer of buttercream between each cake layer. If your cake domes a bit, you can use a serrated knife to level cake domes for flat layers. This helps with stability and a professional look. After stacking, give the whole cake a crumb coat, which is a thin layer of frosting to trap any loose crumbs. Chill it for 15-20 minutes, then apply your final layer of velvety buttercream. For a really clean finish, place parchment under cake on platter while frosting to keep it clean. That’s the one. Garnish with more coarsely chopped toasted hazelnuts, and perhaps a drizzle of chocolate ganache if you’re feeling fancy. Now we’re talking!
Tariq’s Expert Tips for a Perfect Chocolate Hazelnut Cake
Baking is a science, but it’s also an art, and honestly, a bit of intuition. I’m still not convinced bloom time matters as much as everyone says for coffee, but for cake, some things are non-negotiable. Here are some of my go-to tips for making sure your chocolate hazelnut cake comes out perfect every single time.
- Room Temperature Ingredients: This is huge. Make sure your butter and eggs are at room temperature. It helps them emulsify better, creating a smoother, more uniform batter. Cold ingredients can cause the batter to curdle or become lumpy, and nobody wants that.
- Sift Your Dry Ingredients: Always sift your flour and especially your cocoa powder. Cocoa powder can be clumpy, and sifting ensures a smooth, lump-free batter and even distribution of leavening agents. It’s a small step that makes a big difference in your smooth nut chocolate sponge.
- Parchment Paper is Your Friend: Line your cake pans with parchment paper. This is a high-value tip I can’t stress enough. Cut a circle for the bottom and even strips for the sides if you want. It guarantees easy removal and prevents sticking, which is a huge win, especially for delicate cake layers.
- Level Cake Layers: After baking, if your cake layers have a dome, use a serrated knife to level them once they’re cool. This creates flat layers, making your layered hazelnut chocolate cake much easier to assemble and giving it that professional bakery look.
- Cool Completely: This is another critical high-value tip. You absolutely must let your cake layers cool completely before frosting. Warm cakes will melt your buttercream, turning your beautiful creation into a gooey mess. Patience is a virtue here.
- Weigh Your Ingredients: For accuracy, especially with flour and cocoa powder, weigh them with a kitchen scale. This avoids a dry cake. If you’re using cups, spoon the flour into the measuring cup and level it off with a straight edge; don’t scoop directly from the bag.
- Don’t Reduce the Sugar: Sugar isn’t just for sweetness; it plays a vital role in keeping your cake moist and tender. Reducing the sugar can significantly alter the texture and moisture content, leaving you with a dry cake. Trust the process.
- Watch Baking Time: Keep a close eye on your cake in the oven. Test for doneness with a skewer; it should come out with a few moist crumbs attached. Over-baking, especially with the hazelnuts, can lead to a dry cake. You want it lightly golden, not deeply brown.
- Sheet Cake or Cupcakes: This recipe is super versatile. For a chocolate hazelnut sheet cake version, bake it in a 9×13 inch pan for about 18-20 minutes. You’ll want to halve the buttercream recipe for a sheet cake. It’s also solid for making cupcakes; bake them for 18-20 minutes too.
- Olive Oil for Flavor: For an extra special flavor and moisture, you can use a good quality olive oil in place of some of the butter, or in addition to. I’m not totally sure, but I think it adds a subtle richness that’s really nice in a rich hazelnut cocoa dessert.
Delicious Chocolate Hazelnut Cake Variations & Smart Substitutions
Look, I’ll be honest, sometimes you don’t have exactly what the recipe calls for, or you just want to switch things up. Fair enough. This chocolate hazelnut cake is pretty forgiving when it comes to a few tweaks. That’s the move, making it work for you. Here are some ideas for variations and substitutions that I’ve tried, or that I think would work well.
- Nutella Substitute: If you don’t have finely ground hazelnuts or just want that classic hazelnut spread flavor, you can definitely use a Nutella substitute in the buttercream. Just swap out some of the butter for an equal amount of your favorite chocolate hazelnut spread. Could be wrong here, but that’ll give you a super creamy hazelnut cake slice.
- No Hazelnuts? No Problem: Can I make this recipe without hazelnuts? Straight up, yes. If you omit the hazelnuts, you might need to increase the flour slightly, maybe by about 1/4 cup, to maintain the right cake consistency. It’ll be more of a straight chocolate cake, but still delicious.
- Oil Choices: What type of oil is best for cakes? For the oil in the cake batter, you can use sunflower, canola, safflower, or even a light olive oil. Each will give a slightly different, subtle background flavor. Olive oil, in my experience, anyway, adds a lovely richness.
- Espresso Alternative: What can I use if I don’t have espresso for the glaze on this chocolate hazelnut cake? Hot water works perfectly fine in place of the very strong brewed espresso or coffee. The coffee just enhances the chocolate flavor, but water won’t hurt the texture.
- Sour Cream Swap: You can use full-fat Greek yogurt in place of the sour cream for a similar tang and moisture. Just make sure it’s plain and unsweetened.
- Ferrero Rocher Fun: For a truly decadent twist, you could add chopped Ferrero Rocher into the cake filling instead of just roasted hazelnuts. Or, top the finished cake with whole Ferrero Rocher candies for a showstopping presentation. Now we’re talking!
- Buttercream Consistency: If your Nutella-style chocolate cake buttercream seems a little too thick, you can add a tablespoon or two of milk or water instead of heavy cream to thin it out slightly. Just add a little at a time until you reach your desired consistency.
Storage & Make-Ahead Strategies for Your Cake
Let’s walk it back to practicality for a minute. You’ve put all that effort into making this incredible chocolate hazelnut cake, so you want to make sure it stays fresh. Good storage is key, especially if you’re making it ahead of time for a special occasion cake. I like breakfast foods that taste good cold because mornings are unpredictable, but cake, I mean, it’s best at room temperature, but it needs to be stored properly.
Room Temperature Storage: This chocolate hazelnut cake can stay at room temperature for about one day. Make sure it’s covered in an airtight cake dome or container. If it’s already cut, cover the exposed slices with plastic wrap or parchment paper to prevent them from drying out. The buttercream acts as a good protective layer for the rest of the cake.
Refrigeration: After that first day, or if your kitchen is on the warmer side (and let’s be real, LA kitchens can get warm), you’ll want to refrigerate the cake. It’ll keep for up to 3 additional days in the fridge. Again, make sure it’s well-covered to prevent it from absorbing any fridge odors. For the best texture, bring it back to room temperature for about 30-60 minutes before serving. That’s the move.
Freezing Cake Layers: Can I make the cake layers ahead of time? Absolutely. Once your cake layers are completely cool, wrap each one individually and tightly in plastic wrap, then a layer of aluminum foil. You can freeze them for up to 3 months. When you’re ready to use them, thaw them at room temperature, still wrapped, before assembling and frosting. This makes meal prep Sundays for baking a lot easier.
Freezing a Whole Cake or Slices: Can I freeze chocolate hazelnut cake? Yes, you can! For a whole cake, flash freeze it uncovered for about an hour until the frosting is firm. Then, wrap it tightly in multiple layers of plastic wrap and aluminum foil. It’ll keep in the freezer for up to 2 months. For slices, flash freeze them on a parchment-lined baking sheet, then wrap each slice individually and store them in a freezer-safe bag. Thaw at room temperature before enjoying. The buttercream can also be frozen separately in an airtight container for up to 2 months; just thaw and re-whip before using. Trust the process, it works.
Frequently Asked Questions
Troubleshooting Common Chocolate Hazelnut Cake Issues
Look, even the best bakers run into snags sometimes. I once tried to streamline my morning routine by pre-grinding a week’s worth of coffee, and by day three, it tasted like cardboard. Some shortcuts aren’t worth it, and I wasted a week of good beans learning that. Baking this layered hazelnut chocolate cake is similar; knowing what can go wrong and how to fix it is half the battle. Here are some common pitfalls and their straightforward solutions.
Common Mistakes & Fixes for Chocolate Hazelnut Cake
Mistake: Your cake batter is lumpy.
Solution: This usually happens when your butter and eggs aren’t at room temperature. Cold ingredients don’t cream together smoothly. Make sure to let them sit out for at least 30 minutes before you start. That’s the move for a smooth batter.
Mistake: The cake layers stick to the pan.
Solution: Did you forget to line your cake pans with parchment paper? This is a crucial step! Always grease and flour your pans, then line the bottom with parchment. It prevents sticking and ensures easy removal. Trust me on this one.
Mistake: The cake comes out dry.
Solution: This is often due to over-baking or incorrect measurement of dry ingredients. Watch your baking time carefully; test with a skewer. Also, weigh your flour and cocoa powder for accuracy. Reducing sugar can also lead to a dry cake; sugar helps with moisture. Could be wrong here, but that’s usually the culprit.
Mistake: Your buttercream is too runny or too stiff.
Solution: The ratio’s off. If it’s too runny, add more powdered sugar, a tablespoon at a time. If it’s too stiff, add a tiny bit more heavy cream or milk, a teaspoon at a time, until it’s spreadable. Dial it in until it’s right, you’ll know it when you feel it.
Mistake: The frosting melts and slides off the cake.
Solution: This means your cake layers weren’t completely cool before you frosted them. Warm cakes are the enemy of buttercream. Be patient! Let those layers cool down completely on a cooling rack before even thinking about frosting. That’s the one thing you can’t rush.
Mistake: The cake sinks in the middle.
Solution: This can be from opening the oven door too early, overmixing the batter, or expired leavening agents. Make sure your baking powder and soda are fresh. Don’t open the oven door until at least two-thirds through the baking time. And remember to fold gently when combining wet and dry ingredients. That tracks for a stable cake.
I mean, nobody wants a dense cake or a melted mess. These simple fixes can really turn a potential baking fail into a solid win. It’s about understanding why things happen and what adjustments to make. You’ve got this, and honestly, even when they’re not perfect, they’re still pretty great. That’s just how I do it.
Ready to Bake Your Best Chocolate Hazelnut Cake Yet?
So, there you have it. A really solid recipe for a rich hazelnut cocoa dessert that’s perfect for any celebration, or just because you’re craving something truly special. This chocolate hazelnut cake, with its moist cake layers and velvety buttercream, is going to be a showstopper. You’re going to love that incredible buttery smell when it bakes, and that first bite where the pastry shatters and the warm, creamy filling just melts in your mouth.
When you serve this beautiful layered hazelnut chocolate cake, your family and friends will be impressed, I promise. It’s the kind of homemade treat that rivals bakery quality, and you’ll feel so proud of mastering a seemingly complex dessert. So, next time you’re at Ralphs or Trader Joe’s, grab those hazelnuts and get ready to bake. I can’t wait to see what you create!
If you try this recipe, I’d love to hear about it! Share your results, your tweaks, your triumphs. For more inspiration, check out my Pinterest boards. Happy baking!
Source: Nutritional Information
Can I make the cake layers ahead of time?
Yes, you absolutely can! Once your cake layers are completely cooled, wrap them tightly in plastic wrap and then in aluminum foil. You can freeze them for up to one month. Thaw them at room temperature before you’re ready to assemble your chocolate hazelnut cake.
Can I use natural cocoa powder?
You can, but it will result in a lighter colored cake with a slightly different flavor profile. Natural cocoa powder is more acidic, so it interacts differently with the baking soda. For the deep, rich hazelnut cocoa dessert flavor, I generally recommend Dutch-processed cocoa.
Does the chocolate hazelnut cake need to be refrigerated?
This chocolate hazelnut cake can stay at room temperature for about one day. After that, it’s best to refrigerate it for up to 3 additional days. For optimal texture and flavor, let it come to room temperature before serving, though some people prefer it cold. Fair enough.
How do I transfer a layer cake?
Transferring a layer cake can feel tricky, but you’ve got this. The easiest way is to build your cake directly on a sturdy cake board or serving platter. If you need to move it, use a wide, thin offset spatula to gently lift from the bottom, supporting the cake’s weight. It takes confidence, honestly.
What type of oil is best for cakes?
For cakes, a neutral-flavored oil like sunflower, canola, or safflower oil works well as it won’t interfere with the chocolate hazelnut cake’s flavor. A light olive oil can also add a lovely subtle richness without being overpowering. That’s the move for moisture.
What is a substitute for Nutella?
If you’re looking for a Nutella substitute in your chocolate hazelnut cake, any other brand of chocolate hazelnut spread will work just as well. You could also try almond butter or peanut butter for a different, but equally delicious, nutty flavor in the buttercream. Not gonna lie, it’s solid.
Can I make this recipe without hazelnuts?
Yes, you can! If you omit the hazelnuts, your chocolate hazelnut cake will become more of a rich chocolate cake. You might want to increase the all-purpose flour by about 1/4 cup to maintain the cake’s structure since the ground hazelnuts contribute to the dry ingredients. It’ll still be a delicious dessert.
Can I freeze chocolate hazelnut cake?
Absolutely! You can freeze whole chocolate hazelnut cakes or individual slices. For a whole cake, flash freeze it before wrapping tightly in plastic and foil. Slices can be wrapped individually. Both will keep for up to 2 months. Thaw at room temperature for the best results.
Why are my cakes flat?
Flat cakes often happen if your baking powder or baking soda is old or expired. Overmixing the batter can also deflate the air you’ve incorporated, leading to a dense cake. Make sure your leavening agents are fresh and you’re folding gently. That tracks for a good sponge.
Can I use this recipe to make cupcakes?
Yes, this chocolate hazelnut cake recipe is perfect for cupcakes! Simply divide the batter among lined cupcake tins and bake for approximately 18-20 minutes, or until a skewer inserted into the center comes out clean. Adjust the baking time and cooling rack approach accordingly.
Can I double the chocolate frosting?
You definitely can double the chocolate frosting recipe if you want extra for piping or a thicker layer. Just ensure you have enough heavy cream and chocolate. It’s always better to have a little too much than not enough, especially if you’re going for elaborate cake decorating tips. That’s just how I do it.