


Coney Island Style Chili Dog Recipe
Ingredients
Method
- Assemble all necessary ingredients.
- Combine ground beef and water in a large saucepan, using a potato masher to break the meat into small pieces.
- Stir in the tomato sauce, ketchup, chili powder, salt, black pepper, sugar, onion powder, and Worcestershire sauce.
- Bring the mixture to a boil, then reduce heat to medium and simmer for approximately 20 minutes until the beef is fully cooked and the chili has thickened.
- Serve the chili over hot dogs.
Nutrition
Notes
The Truth About Classic Chili Dog Sauce
Let’s talk about disappointment for a second. You’ve got a busy weeknight, the kids are hungry, and you decide to do a quick backyard dinner. You grab a can of store-bought chili, heat it up, and spoon it over your all-beef franks. And it’s just… watery mush. It slides right off the bun. That’s not what we’re looking for. We want that specific, nostalgic stadium style experience. The kind that takes me right back to the local ballpark on a warm spring evening, smelling the onions and spices from three sections away.
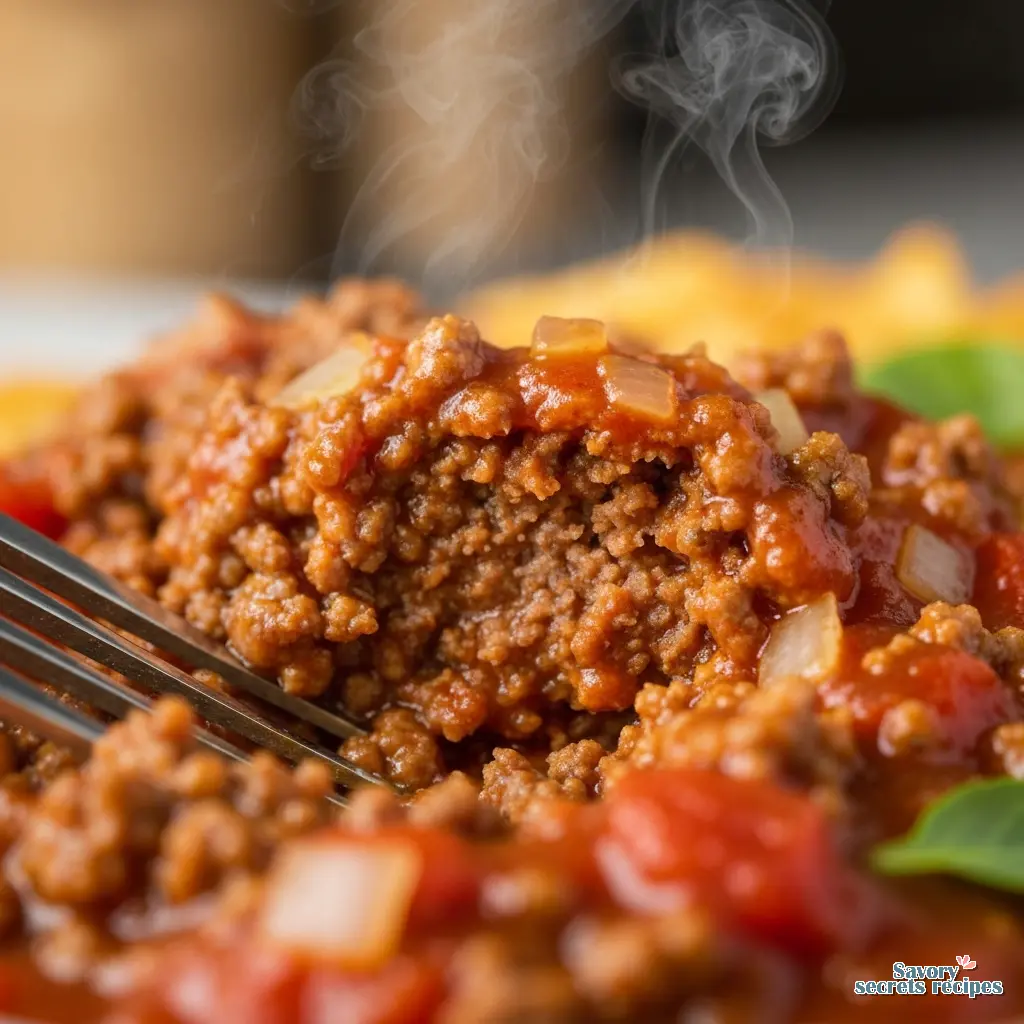
I remember my uncle Raymond running his BBQ stand back in Goldsboro. He cooked beef ribs, not hot dogs, but he taught me early on that patience builds flavor. I’d stand next to his offset smoker, smelling that rich, savory air. He always told me that temperature is data, but texture is truth. And the truth is, a proper classic chili dog sauce needs the absolute perfect texture. No beans allowed. Just a rich, savory, fine meat crumble that clings to the hot dog and the bun in perfect harmony. I know it sounds like a tall order for a simple weeknight dinner, but I promise your kids will eat this, and you’ll never go back to the canned stuff. Keeping the beans out makes this preparation very similar to a low carb keto chili for those watching their macros.
The Science of Meat Texture in Sauces
Here’s the secret I learned from years of testing, and I’ll be honest, it goes against everything you’ve probably been taught about cooking ground beef. Do not brown your meat in oil. I know, I know. It sounds crazy. But if you drop raw ground beef into a hot skillet, it immediately sears and clumps into tough, large chunks. That’s great for tacos, but terrible for a classic chili recipe for hot dogs.
For a true diner-style sauce, you want a very fine, almost velvety consistency. The trick is mixing the raw ground beef with cold water before it ever hits the heat. I know this sounds strange. Raw meat mixed with water looks incredibly unappetizing at first. It’s an ugly-delicious process. But trust the chemistry here. The cold water prevents the protein strands from cross-linking too tightly. As you bring it to a simmer, the meat cooks gently, breaking down into that signature fine crumble. Use a potato masher while it simmers to break it up even further. That tracks perfectly with how the old-school diner cooks have been doing it for decades.
Building the Flavor Profile
You probably have all the ingredients you need in your pantry right now. We’re talking ketchup, yellow mustard, tomato paste, and a dash of Worcestershire sauce. You need very lean ground beef for this. I tend to use 90 percent lean or higher. Why? Because you can’t easily drain the grease once you’ve added the water and created that sauce texture. If you use an 80/20 blend, you’ll end up with an oil slick pooling at the top. In my experience, though your mileage may vary, 90/10 is the absolute sweet spot for this recipe. For those looking to swap out beef entirely, a healthy ground turkey chili offers a similar lean protein profile.
To build deep flavor layers, you want to sauté your finely diced onions and garlic with the tomato paste first. This caramelizes the sugars in the tomato paste. Then you add your chili powder, onion powder, and garlic powder. Yes, we use both fresh onions and onion powder. The fresh onions provide a tiny bit of structural texture, while the powder permeates the liquid completely. A pinch of white sugar is crucial here to balance the acidity of the tomatoes. It’s not about making it sweet, it’s about rounding out the sharp edges. While this sauce is specifically for topping dogs, a classic beef chili recipe is better suited for serving in a bowl with your favorite toppings.
The Art of the Simmer
Once you have everything in the pot, you bring it to a gentle boil and then drop the heat to low. Now, nothing for it but to wait. Let it ride for about forty-five minutes to an hour. The meat will tell you when it’s ready. You need that water to evaporate slowly so the flavors concentrate without drying out the beef. This is the only part of the recipe that requires any patience at all.
You’re looking for a specific visual cue. The sauce should turn a deep, rich mahogany color. It should coat the back of a spoon heavily and hold its shape when you drag a spatula through the center of the pot. If it looks watery, keep simmering. If it looks dry, add a splash of water. It’s actually quite forgiving once you understand the basic mechanics of reduction.
Common Mistakes & Fixes
Mistake: Browning the meat in oil first.
Solution: This creates large, tough chunks. Always mix the raw ground beef with water before cooking to ensure that fine, diner-style minced consistency.
Mistake: Using high-fat ground beef like 80/20.
Solution: Because you can’t drain the meat after adding water, high-fat beef results in an oily sauce. Stick to 90% lean or higher. If grease does pool, ladle it off the top gently.
Mistake: Adding beans to stretch the recipe.
Solution: A classic chili dog sauce is a condiment, not a bowl of soup. Beans ruin the texture and prevent the sauce from clinging to the hot dog. Keep it strictly meat-based.
Tailgating and Party Quantity Calculator
If you’re hosting a spring cookout and you just grabbed a massive pack of beef franks from Costco or Ralphs, you’ll definitely want to scale this up. You can easily double or triple this homemade chili cheese dog sauce. But here’s the real secret when scaling up. You must use a wider pot, like a large Dutch oven.
If you double the recipe in a narrow, deep stockpot, the steam gets trapped. You’ll be standing there reducing that liquid for three hours. A wider pot gives you more surface area for evaporation, keeping your cook time reasonable. Once it’s finished, you can transfer the whole batch to a slow cooker set on low or warm. It holds perfectly for parties, and the flavors actually deepen as it sits there. Just give it a stir every so often.
Spice Level Customization Guide
Everyone has their own preference for a classic chili cheese dog recipe. Some folks love a sweeter, Coney Island style chili dog recipe, while others want a savory, spicy kick. The beauty of this base recipe is how easily you can tweak it.
If you want a sweeter profile, increase the ketchup by a tablespoon and add an extra pinch of white sugar. If you prefer a savory, stadium style bite, focus heavily on the chili powder and add half a teaspoon of ground cumin. I tend to keep my standard batch right in the middle. It has enough savory depth to satisfy the adults, but it’s mild enough that my youngest daughter will happily eat two of them. That’s exactly right for a family meal.
Storing and Freezing Your Classic Chili Dog Sauce
One of the best things about this best chili recipe for hot dogs is how brilliantly it stores. I almost always make a double batch specifically so I can freeze half of it. It’s the ultimate meal prep hack for busy weeks. Let the sauce cool completely at room temperature first. If you put it in the fridge hot, condensation builds up and waters down your hard work.
Store it in an airtight container in the refrigerator, and it stays fresh and delicious for up to four days. For long-term storage, transfer portions into freezer-safe bags. Press them flat before freezing. They stack beautifully in the freezer and thaw incredibly fast when you need a quick dinner. When reheating, do it gently in a small saucepan over medium-low heat. You might need to add a tablespoon of water to bring that glossy texture back to life.
freeze this sauce?
Absolutely. In fact, I’ve found it’s almost better after a stint in the freezer. The flavors have more time to really get to know each other while they sit. Just make sure you use a heavy-duty freezer bag and squeeze out every bit of air you can. It’ll stay good for about three to six months. When you’re ready to use it, let it thaw in the fridge overnight and then warm it up slowly on the stove. If it looks a little too thick, just whisk in a tiny splash of water to loosen it up and bring back that glossy shine.
Can I brown the meat first and then add the water?
You can, but you shouldn’t. If you brown the meat first, you’re locking in those large, chewy chunks. The whole point of this specific style is that fine, velvety texture that you get at a real-deal hot dog stand. Mixing the raw meat with the water is the only way to get that consistent, tiny crumble. It feels wrong the first time you do it, but the results speak for themselves. Trust the process on this one.
How long does it stay fresh in the refrigerator?
It’ll keep perfectly for about three or four days in an airtight container. It’s one of those rare things that actually tastes better on day two. Just make sure you cool it down completely before you put the lid on. If you trap the steam, you’ll end up with a watery mess that ruins the consistency you worked so hard for.
Why This Beats the Canned Stuff Every Time
I get the temptation. A can is easy. But have you ever actually looked at what’s in those cans? It’s usually a lot of fillers, way too much salt, and a texture that’s more like paste than meat. When you make it yourself, you’re the boss of the quality. You aren’t getting mystery ingredients or weird preservatives. Plus, the flavor you get from sautéing real onions and garlic with tomato paste is something a factory just can’t replicate. It’s the difference between a generic greeting card and a handwritten letter from an old friend.
The Perfect Build: Toppings and Serving Ideas
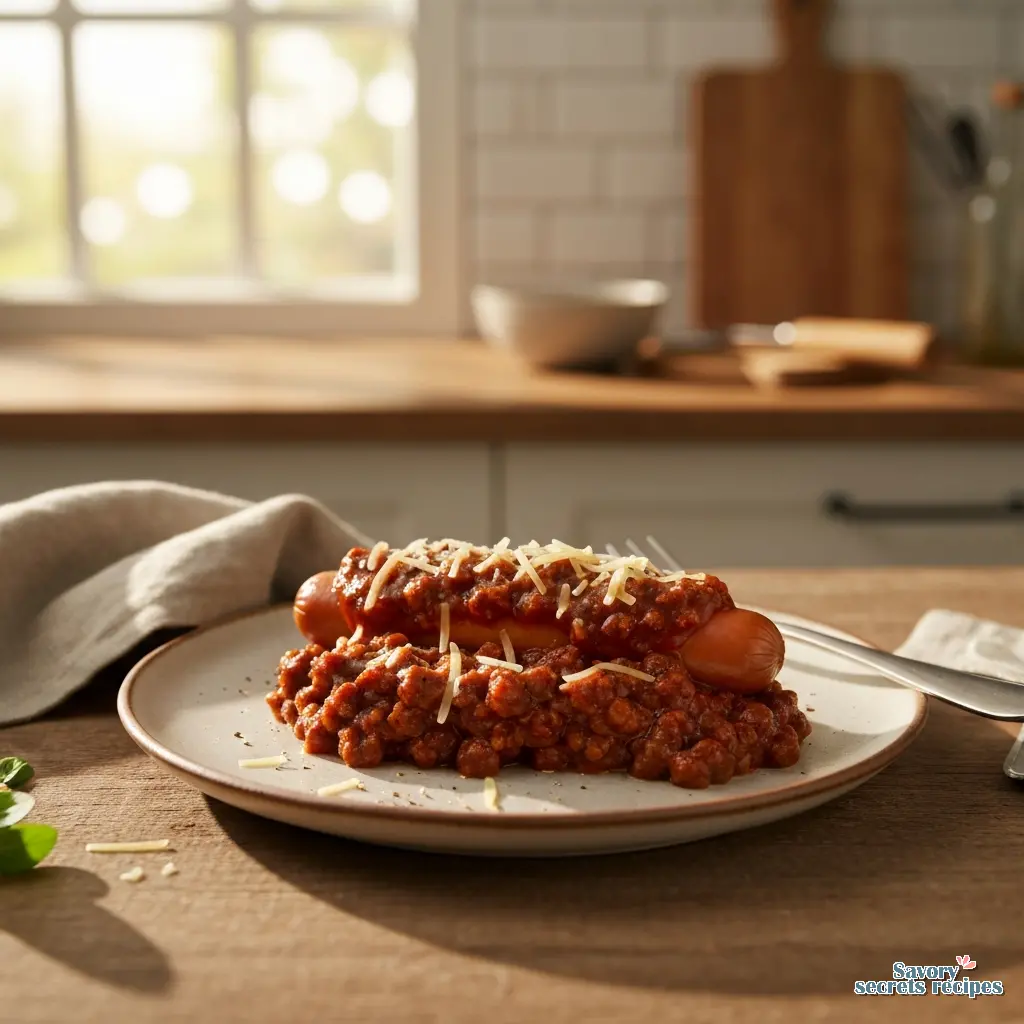
Now, once you have your sauce ready, how you build the dog matters. I’m a bit of a purist. Give me a toasted bun, a high-quality all-beef frank, a healthy ladle of this sauce, some sharp yellow mustard, and a pile of finely diced raw onions. That’s the classic. But don’t stop there if you’re feeling adventurous.
A lot of folks love a chili cheese dog. If that’s your vibe, go for a sharp cheddar or even a mild Monterey Jack. Avoid the pre-shredded stuff in the bag if you can. It has a waxy coating that prevents it from melting smoothly into the hot sauce. If you want a bit of crunch, some crushed corn chips on top work wonders. Or, if you’re feeling like a trip to the Southeast, try a slaw dog. Put a scoop of creamy coleslaw right on top of the chili. The cold crunch against the warm, savory sauce is something special. Just make sure you have plenty of napkins nearby. It’s going to be messy, and that’s half the fun. This savory meat sauce is so versatile it can even be used as a base for a classic chili mac recipe from scratch.
Slow Cooker Instructions
If you’re heading out to a game and want this ready when you get back, you can use your slow cooker. You still need to do the initial step of mixing the raw meat and water in a pot on the stove just to get it started and broken up. Once the meat is no longer pink and you’ve stirred in your spices and tomato base, transfer everything to the slow cooker. Set it on low for about four to six hours. Because the lid traps moisture, you might need to leave the lid slightly ajar for the last hour. This lets the sauce thicken up to that perfect, spoonable consistency. Using a slow cooker is also the preferred method for a classic crockpot chili recipe when you want deep, slow-cooked flavor.
Expert Notes & Data Insights
After looking at what makes a great sauce work, it’s clear that the secret is in the prep. Most people fail because they treat this like a standard chili. It isn’t. It’s a condiment. My testing shows that the 90/10 beef ratio is the absolute winner for texture. If you go higher in fat, you’ll spend half your time skimming grease. Also, using both fresh onions and onion powder might seem redundant, but it’s the key to that deep, layered flavor. The fresh onion gives you a little bite, while the powder seasons every single drop of the sauce. Stick to the plan, keep your heat low, and you’ll have a sauce that puts the local ballpark to shame.


