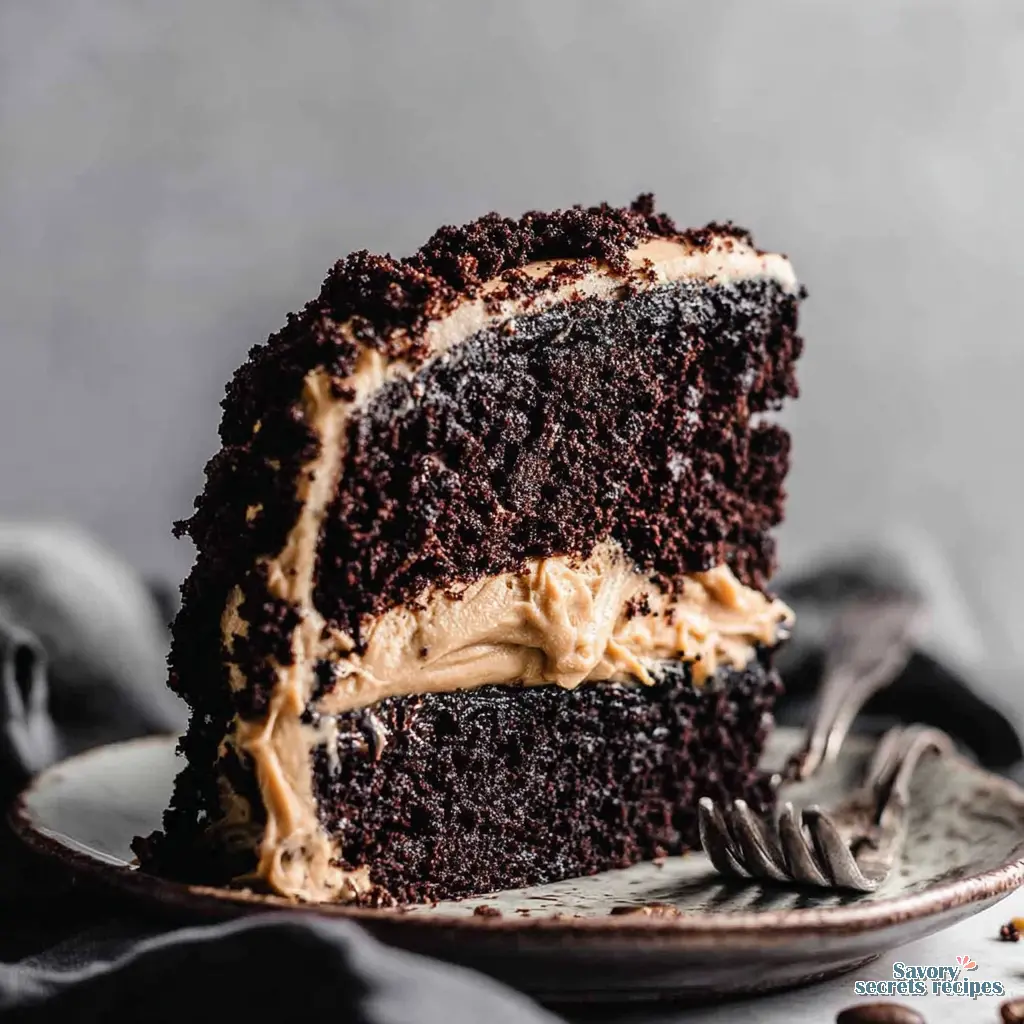
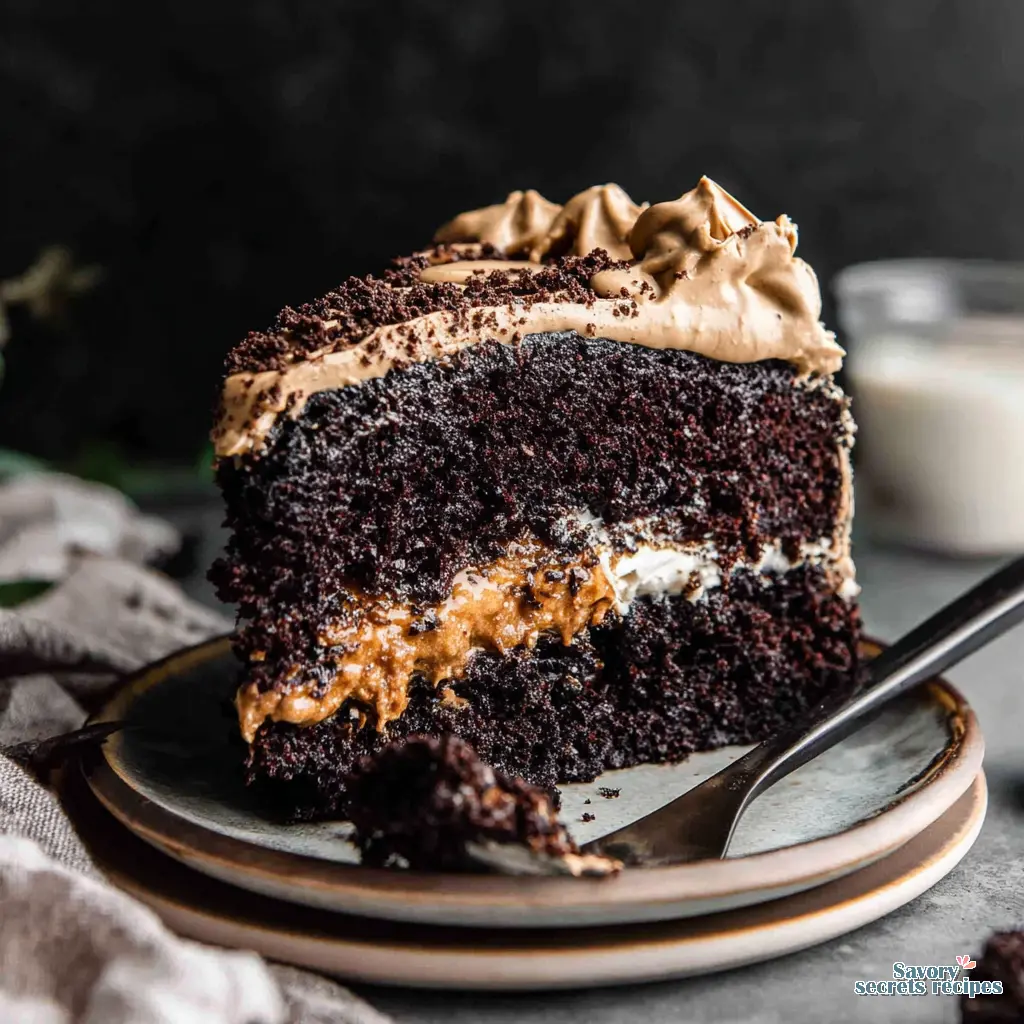
Mocha Chocolate Cake with Coffee Frosting
Ingredients
Method
- Preheat the oven to 350°F. Butter two 8-inch round cake pans. Sprinkle about ½ tablespoon of flour in each pan, tapping the sides of the pan while tilting it slowly in a circle to spread the flour evenly over the butter. Tip the pans over the sink, one at a time, to tap out any excess flour. Set aside
- In a medium bowl, whisk together the cocoa powder, brewed coffee, sour cream, and vanilla to make a shiny fudge. Set aside.
- In the bowl of a stand mixer, beat the butter until smooth and shiny, about 2-3 minutes.
- Add the granulated and brown sugars and continue beating until fluffy, then beat in the eggs one at a time, mixing well between each addition.
- In a separate bowl, whisk together the flour, baking soda and salt. Add the flour mixture to the butter mixture in thirds, alternating with the fudge mixture, scraping down the bowl with a spatula several times as you go.
- Divide the batter evenly between the prepared cake pans and bake for 25 - 28 minutes. A toothpick inserted into the center of the cakes should come out clean when they are done. If there’s batter on the toothpick, continue baking for a few minutes more until it comes out clean.
- Let the cakes cool in their pans for 10 minutes before turning them out on a wire rack to cool completely before frosting.
- In the bowl of a stand mixer, add the instant coffee, sugar and boiling water. Whisk by hand for 30-60 seconds until the mixture begins to thicken a little and get frothy and has increased in volume.
- Switch to whisking with the stand mixer using the whisk attachment. Whisk on medium to high speed for a few minutes until stiff peaks form and the coffee is a light brown color.
- Scrape gently into a clean bowl and set aside. Wipe out the mixing bowl and add to it the mascarpone, heavy cream and powdered sugar.
- Whisk, starting on low speed and gradually increase speed, until mixture is light and fluffy, about 1-2 minutes.
- With the mixer off, scrape the whipped Dalgona coffee into the whipped mascarpone and whisk on medium speed for 30-60 seconds to combine evenly.
- Be sure the cakes have cooled completely before filling and frosting.
- Level both cakes by trimming the domed top off with a serrated knife or with a cake leveler.
- Frost one layer with about ½ the Dalgona coffee frosting.
- Top with the second cake layer and frost the top with the remaining coffee frosting.
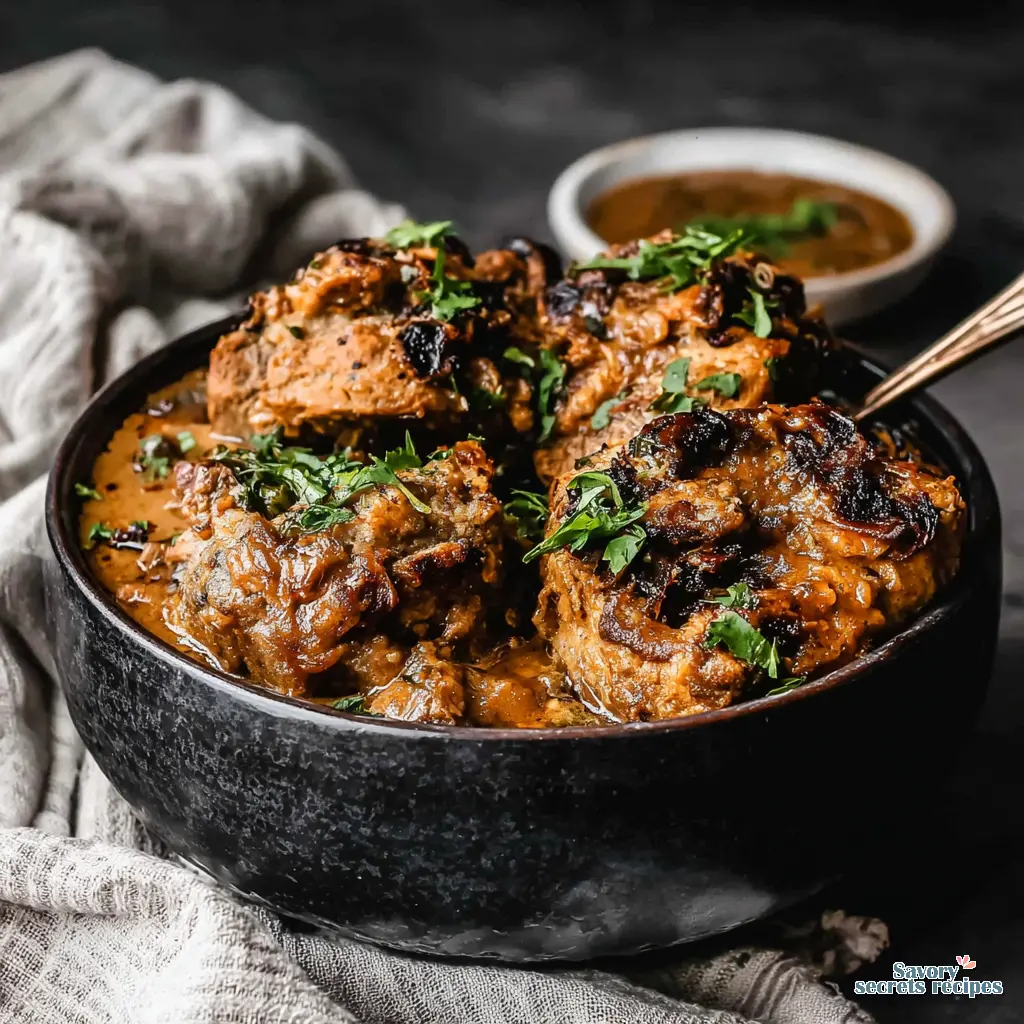
- Garnish with chocolate shavings and serve.
Nutrition
Notes
Why This Coffee Chocolate Cake Recipe Works Every Time
Ever pulled a chocolate cake from the oven, only to find it’s just… fine? It’s a letdown, right? You’ve spent the time, used the good cocoa, and it’s still missing that deep, soul-satisfying richness. I’ve been there, too. I remember testing a chocolate cake for a story years ago, and after three batches, they all tasted flat. It was my grandmother who, over the phone from Casablanca, simply asked, “Did you try it with coffee?” That was the missing piece.
This coffee chocolate cake is the solution to that exact problem. Imagine a cake where coffee doesn’t just add flavor, it unlocks the chocolate. It’s like turning up the volume on your favorite song. The texture is what we’re after, too. Moist, tender, with a crumb that holds together beautifully under a cloud of mocha frosting. It’s the kind of dessert that feels special enough for a birthday but straightforward enough for a Tuesday when you need a win. Let me walk you through why this one’s a keeper.
The Ingredients: What’s Doing the Heavy Lifting
Before we start mixing, let’s talk about our players. I’m keeping an eye on a few key things here, because each one has a specific job. Using Dutch-processed cocoa powder gives us that intense, dark chocolate flavor without any bitterness. It’s worth a trip to the baking aisle at Whole Foods or a quick online order. The brewed coffee and instant coffee granules work as a team. The liquid coffee deepens the chocolate’s richness, while the instant granules in the frosting give you that clear, robust mocha punch.
Then there’s the sour cream. This is your insurance policy against dryness. It adds moisture and a slight tang that balances all the sweetness. If all you have is full-fat Greek yogurt, that’s a great alternative. Your mileage may vary slightly, but it works. And the mascarpone in the frosting? It gives a luxurious, silky texture that’s less sweet than a standard buttercream. It’s so satisfying when it comes together.
How to Build Your Coffee Chocolate Cake, Step-by-Step
Okay, let’s get into it. First, give your ingredients a minute to settle. I mean that literally. Your eggs, sour cream, and butter should be at room temperature. This isn’t being fussy, it’s the difference between a smooth, emulsified batter and a lumpy one. Cold ingredients don’t incorporate as well, and you can end with a dense cake. I learned this the hard way with a batch of cupcakes that never rose properly.
When you whisk your dry ingredients, use a scale if you have one. If you’re using cups, fluff your flour and cocoa with a spoon before gently spooning it into the cup. Don’t pack it down. That extra air keeps the cake light. Now, for the wet ingredients. Whisk the oil, sugars, and eggs until they’re fully combined and look a bit paler. This is where you’re building the structure. Then, you’ll alternate adding the dry mix and the coffee-sour cream mixture. Start and end with the dry ingredients. This method helps prevent overmixing, which can make the cake tough.
Pour the batter into your prepared pans. I always line the bottoms with parchment paper. It’s a tiny extra step that guarantees easy release. No more cakes stuck in the pan. Trust me on this. Bake until the tops are springy to the touch and a toothpick comes out with a few moist crumbs, not wet batter. That’s the sweet spot.
My Top Tips for the Best Coffee Flavor
You want that mocha magic to sing, right? Here are a few things that make a huge difference. Use strong-brewed coffee. If you have an espresso machine, pull a shot and dilute it with hot water. If not, just make your drip coffee a little stronger than you normally would. Instant coffee granules are non-negotiable for the frosting, in my experience. Espresso powder is ideal, but a good quality instant coffee works. Don’t skip the simple coffee syrup soak for the cake layers. It seems like an extra step, but it adds incredible moisture and an extra layer of flavor right where you need it.
And here’s a tip I don’t see often: when you’re making the frosting, start your mixer on low speed. If you blast that powdered sugar on high, you’ll create a cloud that coats your entire kitchen. I’m speaking from a very messy, sugary experience. Mix on low until it’s incorporated, then crank it up to get it fluffy.
Ingredient Notes and Smart Substitutions
I like to give you options. That tracks with what I’ve seen in my own kitchen when I’m missing one thing. For the flour, cake flour will give you the most tender crumb, but all-purpose works perfectly well. If you want to try cake flour, use 2 cups plus 3 tablespoons for every 2 cups of all-purpose. For the oil, stick with something flavorless like canola or vegetable. Olive oil has a strong flavor that will compete with your chocolate and coffee.
Can you use decaf? Absolutely. The coffee is there to enhance the chocolate, not just for caffeine. The flavor compounds will still do their job. For a dairy-free version, you can try a plant-based sour cream and a vegan butter/mascarpone alternative for the frosting. Just know the texture might be a bit different. I tend to find that coconut-based alternatives work best here for richness.
Recipe Variations and Ideas to Make It Yours
This coffee chocolate cake recipe is wonderfully adaptable. For a 9-inch cake, divide the batter between two pans. They’ll bake faster, so start checking at 20 minutes. Want to make cupcakes? This batter will give you about 24. Fill the liners two-thirds full and bake for 18-22 minutes. Perfect for a party.
For a stunning spring dessert, try a different presentation. Instead of a layer cake, bake it in a sheet pan for a 9×13 sheet cake. Top with the frosting and some fresh berries. It’s so pretty and easy to serve at a garden party. If you’re a frosting lover, go ahead and double the icing recipe. I won’t judge. It’s your cake.
Common Mistakes & Fixes
Mistake: The cake is dry or dense.
Solution: You likely overmeasured the flour or overmixed the batter. Use a scale or the spoon-and-level method. Mix just until the last streaks of flour disappear.
Mistake: Frosting slides off the cake.
Solution: Your cake layers were probably still warm. Cool them completely. Then, do a thin “crumb coat” of frosting and chill the cake for 20 minutes before your final frosting layer.
Mistake: Weak coffee flavor.
Solution: You might have used weak brewed coffee or skipped the instant granules in the frosting. Use strong coffee and don’t omit the granules for that true mocha hit.
Mistake: Cake sticks to the pan.
Solution: Always line the bottom with parchment paper. Greasing and flouring the sides isn’t enough for these moist layers.
Storing, Freezing, and Serving Your Masterpiece
Once assembled, this rich coffee flavored cake is best kept covered at room temperature for a day. After that, I recommend storing it in the fridge for up to 5 days because of the mascarpone frosting. Let slices come to room temperature for about 30 minutes before serving for the best texture and flavor.
You can absolutely make it ahead. Bake the layers, let them cool completely, then wrap each one tightly in plastic wrap and foil. Freeze for up to 3 months. Thaw on the counter before frosting. The frosting itself can also be made ahead and stored in the fridge; just let it warm up a bit and re-whip it before using.
For serving, I love a simple garnish. A dusting of cocoa powder, some chocolate shavings, or even a few espresso beans on top looks beautiful. A scoop of vanilla ice cream on the side is never a bad idea. It’s the perfect contrast to the dark, moist cake.
Frequently Asked Questions
Go Bake Something Amazing
When you pull this coffee chocolate cake from the oven and your kitchen fills with that warm, comforting aroma of coffee and chocolate, you’ll feel it. That pride of making something truly special from scratch. This cake has been my go-to for birthdays, potlucks, and those days when only chocolate will do. It’s a recipe that builds confidence.
I’d love to see your creation. If you share it, tag me on Pinterest where I’m always pinning more dessert inspiration and variations. Now, go preheat that oven. You’ve got this.
Source: Nutritional Information
What’s the best way to brew coffee for a coffee chocolate cake?
Use strong-brewed coffee. If you have an espresso machine, that’s ideal. Otherwise, just make your regular drip coffee with an extra scoop of grounds. The intensity is key for deepening the chocolate flavor without adding bitterness.
Can I use a different cheese instead of mascarpone for the frosting?
Full-fat, brick-style cream cheese is the best substitute. Let it soften completely. The frosting will be tangier and a bit firmer, but still delicious. Avoid whipped or spreadable cream cheese, as the texture won’t be right.
How long does a rich coffee flavored cake like this stay fresh?
At room temperature, it’s perfect for 1 day. In the refrigerator, well-covered, it stays moist and delicious for up to 5 days. The coffee syrup soak really helps lock in the moisture over time.
Can I make this espresso chocolate dessert without sour cream?
Yes. Full-fat plain Greek yogurt is a direct, equal swap. For a dairy-free version, a plant-based sour cream alternative works, though the crumb might be slightly denser. The acidity is important for reacting with the baking soda.
Can I use all-purpose flour instead of cake flour?
Absolutely. This recipe is written for all-purpose flour and works beautifully. Cake flour will give a slightly more tender crumb, but it’s not a necessary swap. Just don’t pack your flour into the measuring cup.
Can I make this coffee chocolate cake in three layers?
You can, but you’ll need to adjust. Divide the batter between three 8-inch pans. The baking time will be less, probably around 20-25 minutes. Start checking early so you don’t overbake the thinner layers.