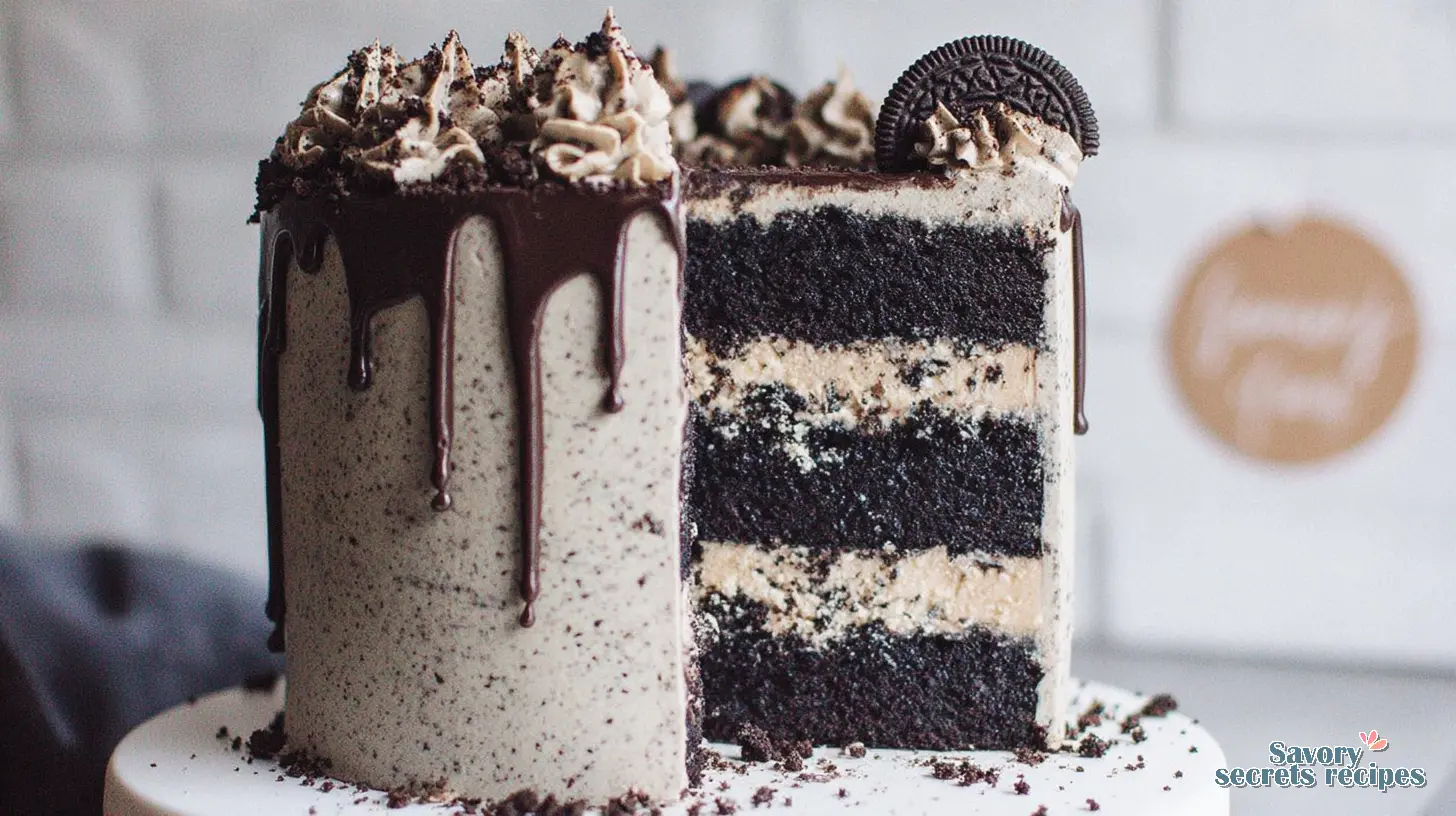
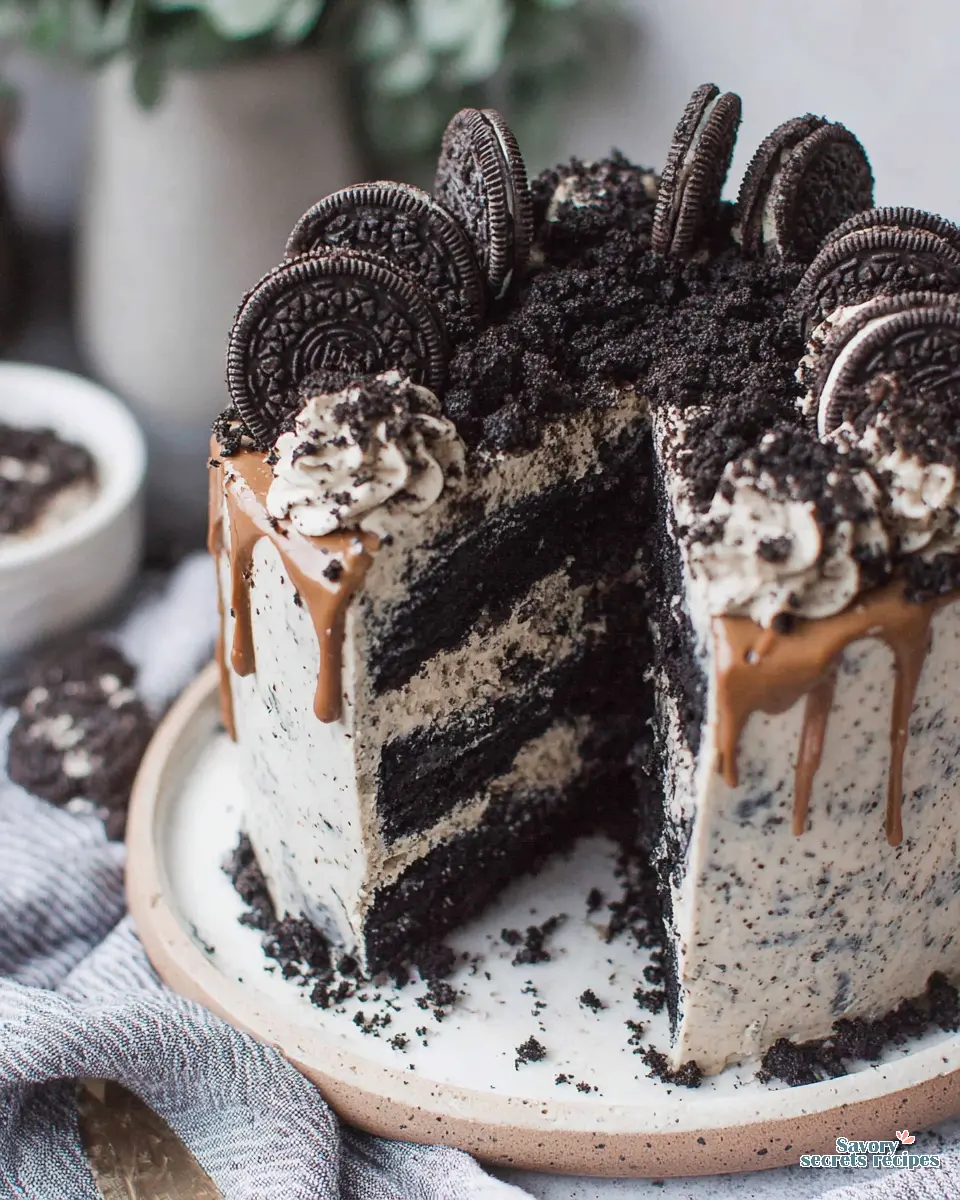
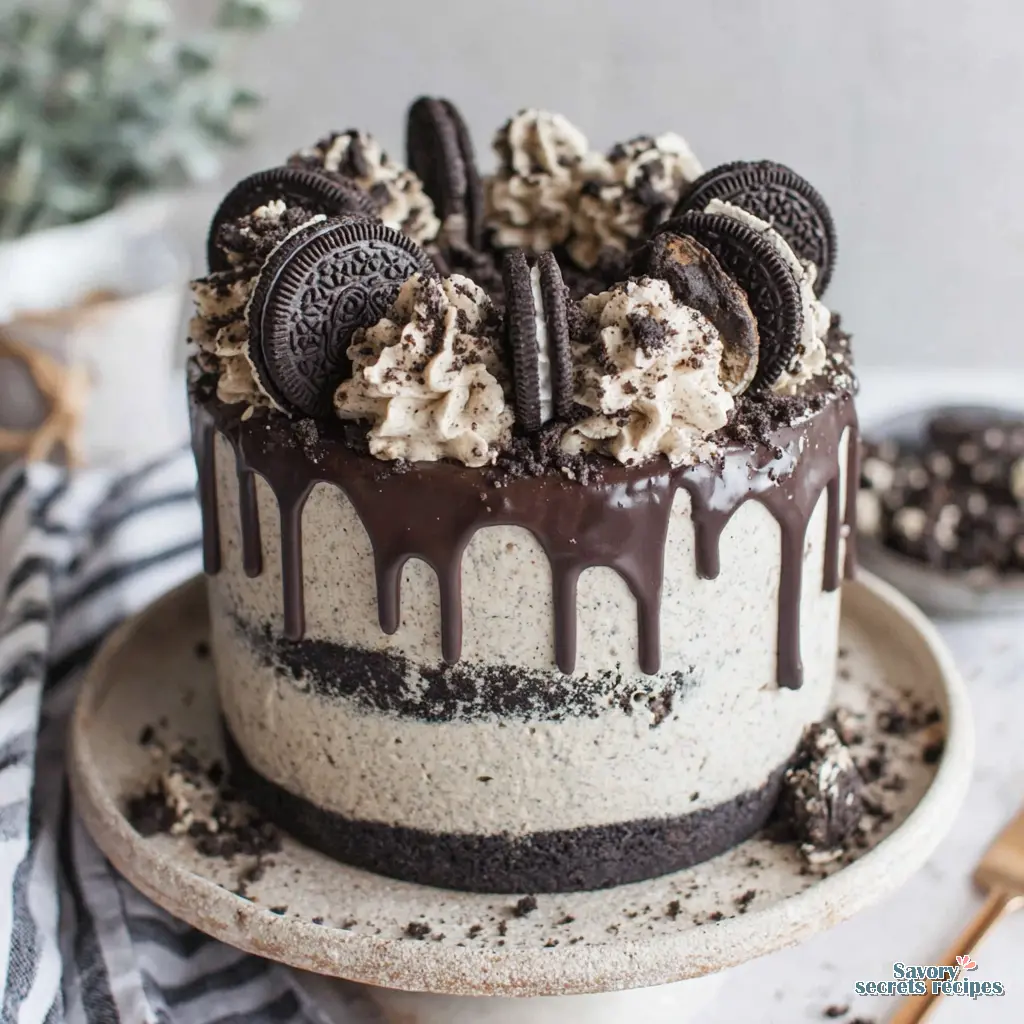
Easy Oreo Cookies and Cream Cake
Ingredients
Method
- Preheat oven to 325 degrees. Spray the bottoms of three 8-inch or four 6-inch round cake pans with cooking spray. Line the bottoms with parchment. Set aside.
- In a large mixing bowl, combine the flour, sugar, cocoa powder, baking soda, baking powder, and salt.
- In a medium bowl or measuring cup, combine the eggs, buttermilk, water, oil, and vanilla.
- With the mixer on low speed, gradually add the wet ingredients to the dry ingredients. Mix until smooth, about 30 seconds. Scrape down the sides of the bowl and mix again for another 10 to 20 seconds. Divide the batter equally among the three cake pans, placing about 16 ounces in each 8-inch pan or 12 ounces in each 6-inch pan.
- Bake the layers for 25 to 30 minutes, or until a wooden pick inserted into the center comes out with only a few moist crumbs. Let the cakes cool in their pans on a wire rack for 10 minutes. Then, turn them onto a rack to cool completely. Once completely cooled, wrap the layers in plastic wrap and chill them in the freezer for at least an hour. For storage longer than a week, wrap the layers in tin foil and place them in a zip-lock bag.
- In the bowl of a stand mixer fitted with the whisk attachment, whisk the heavy whipping cream on high for 3 to 5 minutes, until stiff peaks form. Transfer the cream to another bowl and set aside.
- In the now empty bowl of a stand mixer fitted with the paddle attachment, beat the cream cheese for a couple of minutes until smooth. Gradually add the powdered sugar. Beat for another couple of minutes until smooth.
- Fold in the whipped cream until no streaks remain. Then, fold in the crushed Oreos.
- Make this filling right before assembling the cake to prevent the cookies from getting soggy. If preparing ahead of time, omit the Oreos until ready to assemble.
- In a stand mixer fitted with a paddle attachment, cream the butter on medium-high speed for about two minutes.
- With the mixer on low speed, slowly add the sifted powdered sugar until incorporated. Scrape down the sides of the bowl and continue to mix for another minute.
- Add the heavy cream, one tablespoon at a time. Once the cream is incorporated, increase the speed to medium-high and beat the frosting for five minutes until it becomes lighter in texture and color.
- Stir in the cookie crumbs.
- Remove the bowl from the mixer. Use a wooden spoon to mix by hand and stir out any air bubbles.
- In a microwave-safe bowl, heat the cream for about 1 minute. Pour the hot cream over the chocolate and let it sit for about 5 minutes. Mix the chocolate and cream until smooth and shiny. If necessary, microwave the mixture for an additional 30 seconds.
- Add one drop of black food gel, if desired, to darken the drip to match the cookies.
- Let the ganache cool slightly before adding it to the cake.
- Apply the drip when the cake has been chilled.
- Place the first cake layer, top side up, in the center of the cake board. Pipe a rim of Oreo buttercream around the edge of the cake. Fill the center with about 1 cup of the cookies and cream filling.
- Place the second cake layer on top of the buttercream and filling. Repeat the piping and filling steps.
- Place the final cake layer, top side down.
- Crumb coat the entire cake with a thin layer of Oreo buttercream. Freeze for 10 to 15 minutes to set this frosting layer.
- Once the crumb coat is set, continue to frost the cake with the remaining frosting. Chill the cake again for another 10 minutes before adding the drip.
Notes
The Cookies and Cream Cake That Changed My Weeknights
You know, sometimes I get this craving for something utterly indulgent, something that just screams “celebration” without demanding an entire weekend in the kitchen. I’m talking about a cookies and cream cake, the kind that makes you do a happy little dance. I remember standing on a wooden stool in my teta’s kitchen in Heliopolis, watching her fold butter into dough for feteer meshaltet. She’d count the folds in Arabic and make me repeat them. I was seven and thought I was learning numbers. I was learning ratios.
That same precision, that understanding of “why,” is what makes this particular cookies and cream cake recipe so special. It’s rich, it’s moist, and it’s got that perfect crunch from all those crushed cookies. Honestly, it’s easier than you think to get that showstopper layered dessert look, even if layered cakes usually make you a little nervous.
During these mild Los Angeles spring months, when we’re all looking for something comforting but still bright for our gatherings, this cake is just perfect. It’s a delightful sweet treat that bridges the gap beautifully, whether you’re bringing it to a potluck or just enjoying it with family.
Why This Cookies and Cream Cake Recipe Works Wonders
I’ve seen a lot of cookies and cream cake recipes out there, and I’m still working out the best approach for some of them, but this one? This one nails it. The secret is in the balance: a wonderfully moist chocolate cake base that isn’t too sweet, paired with a creamy, dreamy cookies and cream frosting that’s bursting with flavor. It’s a rich cream cookie cake that feels incredibly luxurious.
My teta always said, “Your hands know before your eyes do,” and that’s especially true when you’re working with these ingredients. We’re using a specific technique for the cake layers that ensures a soft cookies cream sponge every single time. It’s not just about mixing things together, it’s about understanding how each ingredient contributes.
This approach helps prevent those common beginner concerns, like a dry cake or a frosting that won’t hold its shape. I mean, who hasn’t had a cake disaster? I certainly have. But this recipe builds confidence, giving you a really reliable result. You’ll get a homemade cookies and cream cake that truly impresses.
Gathering Your Essentials for a Stellar Cookies and Cream Cake
Every great cake starts with great ingredients. For this layered cookies cream dessert, we’re talking about specific items that really make a difference. I prefer working with weight measurements exclusively. Volume is too variable for the precision these doughs need, and I won’t publish a recipe without gram amounts.
For the cake layers, good quality dark cocoa powder is non-negotiable. It gives you that deep chocolate flavor that contrasts beautifully with the cream. And buttermilk, at room temperature, is a game-changer for moisture. The acidity tenderizes the crumb, giving you that moist cake everyone raves about.
When it comes to the frosting, we’re looking for quality cream cheese and unsalted butter. All refrigerated items should be at room temperature so your batter and frosting mix together easily and evenly. This isn’t being fussy, it’s the difference between smooth, stable frosting and a curdled mess. Clear vanilla extract is a nice touch if you want to keep your frosting looking bright white, but regular vanilla works just fine too.
Crafting Your Cookies and Cream Cake Layers
Creating the chocolate cake layers for this cookies and cream cake is probably the most detailed part, but trust me, it’s straightforward. We’re going to use a method that ensures a tender, even crumb. This might vary depending on your oven, but the principles remain the same.
Understanding the Reverse Creaming Method
This is where most recipes skip the detail, but it’s the detail that changes everything. Instead of creaming butter and sugar first, we’ll coat the dry ingredients with butter. This method helps to coat the flour in fat, which prevents gluten from overdeveloping. The result? A super soft, velvety cake crumb. It’s a technique that builds competence and delivers a truly moist cake.
The Magic of Whipped Egg Whites
Another crucial step is folding in whipped egg whites. Whip your eggs in a completely clean, dry, and grease-free bowl. And don’t even get a tiny bit of yolk in there with the whites, otherwise your whites may never reach stiff peaks! This adds incredible lightness and airiness to the batter. It’s a delicate process, but once you see it, you can’t unsee it. That tracks with what I’ve seen in my teta’s kitchen, where she’d always emphasize the texture of the dough.
When you’re adding your crushed cookie cake layers, try not to chop the Oreos too finely for the cake itself. You want some crunch in the cake after baking, so a coarser chop is key. Fold the cookie bits in last and try to evenly distribute them. I like to use a kitchen scale to make sure each pan has an equal amount of batter in it. If you don’t have one, try using a toothpick in the center to measure the height of the batter, like an oil gauge! Just as a hint, if you use cake strips when baking, you’ll get a flat top and more tender sides. Cake strips are just wet fabric you wrap around the edge of the cake pans. You can make your own or buy a set online. They really help prevent dry edges and domed tops, which makes assembling a layered dessert so much easier.
The Dreamy Oreo Whipped Cream Frosting
Now, for the part that really makes this a cookies and cream cake: the frosting. This isn’t just any frosting; it’s a rich, creamy, whipped dream that perfectly complements the chocolate cake layers. The combination of cream cheese and butter gives it that perfect tang and richness, while the heavy cream makes it incredibly light and pipeable.
When you’re preparing the Oreos for the frosting decoration, we want them totally pulverized. Use a food processor if you have one. Otherwise, when you pipe the swirls on top, the cookie pieces will clog the piping tip. Trust me on this. I’ve seen this go both ways, and a clogged tip is a frustration you don’t need when you’re in the middle of cake decorating.
Sifting your powdered sugar is another small step that makes a big difference. It prevents lumps and ensures a silky-smooth buttercream. This is exactly the texture we’re after. The smell shifts right before it’s done, and you’ll know you’ve got it when it’s light, fluffy, and holds its shape beautifully. It’s the perfect whipped cream filling for our cookies and cream creation.
Assembling Your Cookies and Cream Masterpiece
Alright, you’ve got your beautiful chocolate cake layers and your dreamy crushed cookie frosting. Now, we’re getting somewhere. Assembling a layered cookies cream dessert might seem daunting, but it’s all about taking it one step at a time. First, make sure your cake layers are completely cooled. Warm cake and frosting are not friends, believe me.
Start with a thin crumb coat. This is a thin layer of frosting that traps any loose crumbs. It’s not about perfection here, just about getting a base layer on. Chill the cake for about 15-20 minutes in the fridge to set that crumb coat. This is the detail that changes everything for a clean finish. Then, you can apply your main layer of frosting and really get that smooth, professional look.
I like to decorate my cookies and cream cake by pressing Oreo crumbs halfway up the sides and piping swirls on the top, but you can get as creative or simple with the decoration as you like. We’re using semi-sweet or dark chocolate chips for a simple ganache drip. Before you add the ganache for the drip, test the consistency on a plate you’re holding perpendicular to the floor. If the ganache is too thick, add a tablespoon of heavy whipping cream and you might need to heat the mixture as well. This attention to temperature matters more than time here, ensuring that beautiful, even drip.
Mira’s Expert Tips for a Flawless Cookies and Cream Cake
Baking, like life, has its little challenges, but every failed batch is just data. I mean, I once made kunafa for a potluck and didn’t drain the cheese enough. The whole thing was soggy! So, let’s learn from those moments. Here are some pro tips from bakers, the kind of baking tips that make a difference for your cookies and cream cake.
Common Mistakes & Fixes for Your Cookies and Cream Cake
Mistake: Your cake layers are dry.
Solution: This often happens from overbaking. Get an oven thermometer! I discovered that most American ovens run twenty degrees hotter than they claim when my first three batches of ghorayeba spread wrong. Pull the cake when a toothpick inserted into the center comes out with moist crumbs, not wet batter.
Mistake: The cookies in the cake are soggy.
Solution: You might be chopping the Oreos too finely for the cake batter. We want some crunch! Also, overmixing once the Oreos are added can break them down too much. Fold them in gently and last.
Mistake: Your frosting is runny or won’t hold its shape.
Solution: This is usually a temperature issue. Ensure your unsalted butter and cream cheese are slightly cold, not too soft. And make sure you’re using full-fat cream cheese, not the tub-style or low-fat varieties, which have too much water. Chilling the frosting for a bit before whipping can help too.
Mistake: Your cake has a domed top or uneven layers.
Solution: To get FLAT layers that are moist inside and out, try using cake strips! You can buy a set online or make your own from foil and paper towels at home. They help the cake bake more evenly, preventing the edges from setting too fast. Using a kitchen scale to divide batter evenly also helps.
Mistake: Your piping tip clogs when decorating.
Solution: This happens if your Oreos aren’t pulverized enough for the frosting decoration. Use a food processor to get them to a fine powder. This is the detail that changes everything for smooth piping.
Each ingredient serves a purpose, so for best results, I don’t recommend making substitutions unless explicitly stated. Whole milk and sour cream are strongly recommended for the best taste and texture in the cake. If you can’t find sour cream, full-fat, plain Greek yogurt will also work, but the cake may not taste as light. Same goes with a lower-fat milk, but you’ll notice a difference in richness.
Frequently Asked Questions
Storing and Serving Your Cookies and Cream Cake
Once you’ve put all that love into your cookies and cream cake, you’ll want to make sure it stays fresh and delicious. This cake will keep beautifully in an airtight container at room temperature for 1-2 days, or refrigerated for up to a week (though, unfortunate fact: refrigerators do tend to dry out cakes a bit!). You can also freeze a frosted cake for up to 2 months. Just thaw it overnight in the refrigerator and bring it to room temperature before serving for the best texture.
For serving, I like to let the cake sit at room temperature for about 30 minutes before slicing. This allows the frosting to soften slightly and the cake layers to become extra tender. It’s perfect for a spring gathering or just as a comforting dessert on a mild LA evening. The smell of toasted sesame takes me straight back to being eight years old, sitting on the counter while my mother made semsemeya, feeling like I was learning secrets, and this cake gives me that same feeling of joy.
Creative Variations for Your Cookies and Cream Cake
While this classic cookies and cream cake is a showstopper on its own, there are always ways to play around and make it your own. I’m working through the variables all the time in my own kitchen, trying new things.
If you’re feeling adventurous, you can definitely swap out the Oreo cookies for another flavor. Just avoid Double-Stuf varieties in the cake batter because it would throw off the texture and moisture balance. You could try different flavored cream cheese frosting too, though I think the classic is hard to beat. Or, for a simpler twist, consider a cupcake version. Just fold in about ¾ cup of chopped Oreo pieces into the batter before spooning it into liners, and halve the frosting recipe for close to 3 dozen cupcakes.
A full-fat plain yogurt would work instead of the sour cream in the cake, but the cake may not taste as light. And if you can’t find sour cream, full-fat, plain Greek yogurt will also work. These are small adaptations that still keep the integrity of the original recipe.
When you slice into that beautiful cookies and cream cake, you’ll feel such a surge of pride. It’s truly a rich cream cookie cake that’s worth every moment you put into it. This is exactly the texture we’re after, that perfect blend of moist chocolate, creamy frosting, and crunchy cookie bits. You’ve got this, and I can’t wait to see your creations!
Don’t forget to tag me when you make it! For more inspiration, check out my Pinterest boards.
Source: Nutritional Information
Can I make this Cookies and Cream Cake ahead of time?
Absolutely! You can make the cake layers in advance, wrap them up and store at room temperature for a day or in the fridge for three days. The frosting can also be prepared, covered, and refrigerated overnight. Assemble and frost the cookies and cream cake the next day when you’re ready to serve.
What’s a good filling for cookies and cream cake?
Our recipe already features a rich cream cheese and whipped cream frosting with crushed cookies, which is a fantastic filling! It’s got that perfect balance of creamy and crunchy. You could also add a layer of chocolate ganache between the cake layers for an extra decadent touch, or even a simple vanilla whipped cream if you prefer something lighter.
What are common mistakes when making Oreo cake?
Using Double-Stuf Oreos in the cake batter can throw off the texture, so stick to regular ones. Not pulverizing Oreos for frosting decoration can clog your piping tip. Overmixing the batter once Oreos are added can turn your cake grey. And, of course, not using room temperature ingredients will mean your batter won’t mix evenly. I’ve seen this go both ways!
Can I make this recipe in a different pan?
Yes, you can! This recipe is adaptable. If you’re going for a layered dessert, divide the batter between two or three round cake pans (8 or 9-inch). Bake at 350°F (177°C) for around 24–26 minutes. The frosting yields enough for filling and frosting a 2- or 3-layer cake. For cupcakes, fold in about ¾ cup of chopped Oreo pieces before spooning batter into liners. Halve the frosting recipe for about 3 dozen cupcakes.
Why is my Cookies and Cream Cake dry?
A dry cake is usually a sign of overbaking. Every oven is different, so keep a close eye on it towards the end of the baking time. An oven thermometer can be incredibly helpful here. Also, ensure your ingredients like buttermilk and eggs are at room temperature, as this helps them emulsify properly for a moist crumb.
How do I keep my cake bright white?
If you’re making a vanilla cake base (though this recipe uses cocoa powder for a chocolate base), clear vanilla extract is your secret weapon. Regular vanilla extract has a brownish tint that can slightly color your batter. For frosting, make sure your butter isn’t too yellow, and use clear vanilla if desired. This recipe’s chocolate cake base won’t be bright white, of course.
How do you make Oreo frosting?
Our Oreo frosting is a delicious blend of unsalted butter, cream cheese, heavy whipping cream, and sifted powdered sugar, with plenty of finely crushed Oreo cookies folded in. The key is making sure your butter and cream cheese are at the right temperature, and that your Oreos are pulverized to avoid clogs if you’re piping. It’s a rich cream cookie cake frosting that’s totally worth it.