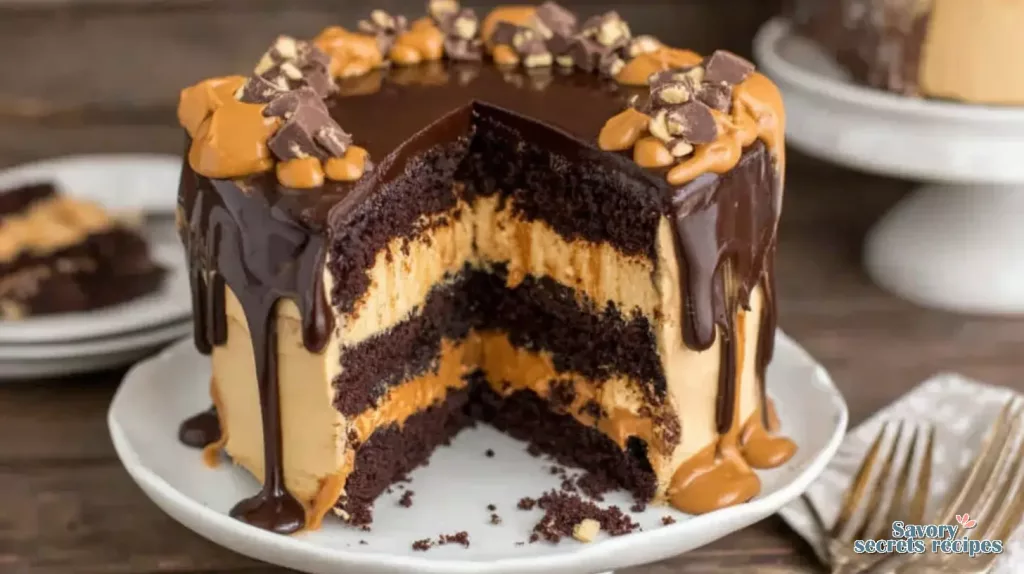
Classic Cherry Vanilla Layer Cake
Ingredients
Method
- Adjust an oven rack to the center and preheat to 350 degrees. Spray three 8-inch round cake pans with nonstick baking spray and set them aside.
- In a stand mixer bowl, combine flour, sugar, baking powder, and salt. Mix on low speed until just combined.
- Add butter one tablespoon at a time. Mix on low speed until all butter is incorporated, about 3 minutes.
- In a 4-cup liquid measuring cup, combine milk, Maraschino cherry juice, lemon juice, emulsion, and egg whites. Whisk to combine.
- Add about three-quarters of the egg mixture to the dry ingredients. Mix for 2 minutes on medium speed, scraping the bowl sides as needed. Add the remaining egg mixture and mix on low speed for 1 minute. Incorporate pink gel food color and mix until combined.
- Toss chopped cherries in a small amount of flour. Gently fold them into the cake batter.
- Divide cake batter evenly into the prepared pans. Bake for 20 to 25 minutes, or until a toothpick inserted into the center comes out with a few moist crumbs. Cool cakes in their pans on wire racks for 10 minutes. Invert cakes onto wire racks and cool completely.
- In a small saucepan, combine sugar and cornstarch.
- Add cherries, lemon juice, and water. Cook over medium heat.
- Bring to a simmer, stirring frequently to prevent burning. Reduce heat to low and simmer for about 10 minutes, stirring occasionally.
- Once thickened, remove from heat and stir in almond extract. Cool for 15 minutes before transferring to an airtight container. Store in the refrigerator.
- In a stand mixer bowl with the paddle attachment, beat butter, shortening, and salt on medium speed until light and fluffy, about 8 minutes. Add powdered sugar, heavy cream, and emulsion. Slowly mix until combined, about 1 minute.
- Increase mixer speed to medium-high. Beat until light and fluffy, about 6 minutes.
- Remove about 2 1/2 cups of frosting and reserve for piping. To the remaining frosting, add one or two drops of Soft Pink gel food coloring and mix until combined.
- Store frosting in an airtight container in the refrigerator for up to 3 days. Bring chilled frosting to room temperature and beat on low speed to soften. Alternatively, warm frosting in a heatproof container in the microwave in 10-second intervals, stirring after each, until smooth.
- Place a nonslip mat on your cake turntable. Place an 8-inch cake board on top. Spread a small amount of frosting in the center of the cake board to secure the cake. Center one cake layer on the board. Fit a piping bag with a round tip or coupler and fill with frosting. Pipe a frosting dam around the cake's edge. Spread about 1/2 cup filling over the top with an offset cake spatula, smoothing it to the frosting dam.
- Place the second cake layer on top. Pipe another frosting dam around the edge. Spread another 1/2 cup filling evenly over the top, extending it to the frosting dam. Place the last cake layer on top (bottom side up) and gently press to adhere.
- Apply a small amount of buttercream to the cake top. With an offset cake spatula, spread a thin layer of frosting over the top and sides, catching and sealing any loose crumbs. Refrigerate or freeze the cake for 15 to 30 minutes.
- Apply a large dollop of frosting to the cake top and spread evenly. Line an 8-inch round acrylic disc with parchment paper using a bit of frosting. Align the acrylic disc with the bottom cake board and gently press onto the cake top to adhere. Add more frosting to the cake sides, ensuring complete coverage of the bottom cake board. Gently press a cake scraper against the acrylic disc and bottom cake board. Slowly rotate the cake turntable completely to create a smooth finish on the cake side. Chill the cake in the refrigerator or freezer for 15 to 30 minutes.
- Insert a small offset spatula under the acrylic disc. Rotate the turntable until the disc releases. Peel off the parchment paper. Add more frosting to the cake top to fill any gaps if needed. Smooth the cake top with an offset cake spatula while rotating the turntable. Spread a small dollop of frosting on a 10-inch round cake board. Carefully transfer the cake to the board. Place the cake back on the cake turntable.
- Use a 3-inch round cutter to stamp semi-circle outlines from the cake's top edge.
- Use a cake scraper to stamp lines for shell placement between the stamped semi-circles.
- Fit a piping bag with Wilton piping tip #7 and fill with uncolored frosting. Carefully pipe swags on the stamped semi-circles. Pipe another smaller swag inside each, ensuring the joints meet.
- Fit a piping bag with Wilton piping tip #6B and fill with uncolored frosting. Pipe a single shell upward where the swag joints meet, covering the line indentations. Release pressure as you pull away to create a clean point on each shell. Place a royal icing rose or dragee on each shell's point.
- Fit a piping bag with piping tip #2D and fill with uncolored frosting. Pipe a shell border along the top and bottom edges of the cake. Pipe 8 small, even dollops of frosting on top for the cherries. Place a maraschino cherry on each dollop and serve.
Nutrition
Notes
The Science of a Seriously Moist Cherry Vanilla Layer Cake
You know, there’s nothing quite like the anticipation of cutting into a beautiful layer cake. That moment, right? But then, sometimes, you get that dreaded dry crumb. It’s a real disappointment, especially when you’ve put in the effort. I remember trying to make gulab jamun from scratch once, without properly understanding the milk solid ratio. They completely dissolved in the sugar syrup. My daughter, bless her heart, said they looked like “pink clouds in sweet water,” which was generous. I’d rushed it, didn’t let the khoya cook down enough, and paid the price.
That experience, honestly, taught me a lot about respecting the chemistry of baking. That’s why I’m so excited about this particular cherry vanilla layer cake. It’s not just pretty; it’s genuinely moist, packed with fresh cherry flavor, and has that lovely hint of vanilla that just sings. It’s a dessert that feels special, perfect for a spring gathering or a Mother’s Day treat, but it’s also surprisingly achievable.
I mean, we’re aiming for a showstopper here, but one that won’t leave you feeling stressed or like you’ve wasted precious ingredients. I’ve broken down the process so you’ll understand not just the steps, but *why* they matter. That tracks with what I’ve seen in my own kitchen: understanding the mechanism makes all the difference.
Why This Cherry Vanilla Layer Cake Recipe Works Wonders
This isn’t just another cherry vanilla cake recipe; it’s engineered for success. The thing is, when you’re making a layer cake, you want stability and incredible flavor, right? We’re starting with a soft vanilla sponge cake that’s built to stay moist, which is often the biggest hurdle for home bakers. I’ve tweaked the ratios to ensure a tender crumb every single time.
The secret to a moist layer cake, and this is where the science really comes in, involves a few key elements. First, using whole milk and unsalted butter at room temperature. The fats emulsify better, creating a smoother, more uniform batter. That said, I’d want to see more research before saying it’s the *only* way, but in practical terms, it works beautifully for texture. Also, the inclusion of fresh lemon juice in both the cake and the cherry compote for cake isn’t just for flavor; it helps balance the sweetness and brightens everything up.
Then there’s the fresh cherry dessert aspect. We’re using fresh, sweet cherries, which give you a burst of natural flavor without the artificial taste you sometimes get from canned options. The way we prepare them ensures they don’t make the cake soggy, which can be a common pain point. This recipe feels special yet approachable, and you’ll absolutely impress your friends and family.
Gathering Your Ingredients for Success
Alright, let’s talk ingredients. For a beautiful cherry vanilla layer cake, quality really does matter, but it doesn’t have to be complicated. We’re focusing on staples you can grab at Ralphs or Trader Joe’s, along with those lovely seasonal fresh cherries you might find at the Santa Monica Farmers Market this spring.
You’ll want cake flour for that delicate texture, superfine sugar that dissolves quickly, and good old baking powder and salt. For the fat, unsalted butter is key, and we’ll be using whole milk. The Princess Bakery Emulsion or vanilla extract is where that warm vanilla sponge cake flavor really shines. And, of course, large egg whites for structure.
For the vibrant cherry filling, we need pitted fresh or even frozen cherries, granulated sugar, cornstarch to thicken it up, a splash of lemon juice, water, and just a touch of almond extract. That almond note really enhances cherry, I think, and it’s a lovely pairing. For the buttercream, it’s more unsalted butter, shortening for stability, powdered sugar, heavy cream, Cherry Baking Emulsion, and a touch of pink gel food coloring for that aesthetic berry cake look.
Ingredient Shopping Notes
When you’re at the store, aim for fresh, sweet cherries. They’re coming into season now, and they’ll give you the best flavor and consistency. Avoid frozen or canned if you can help it; they can be too moist and lead to a watery product. If you do use frozen, make sure they’re thawed completely and drained well. Worth noting here, sometimes frozen cherries can release a lot of liquid, which you’ll need to account for. As for vanilla, pure, high-quality vanilla extract or vanilla bean paste for both cake and frosting will make all the difference. It’s not just a background flavor here.
Baking Those Soft Cherry Sponge Cake Layers
Making the cake layers for this cherry vanilla layer cake isn’t nearly as intimidating as it might seem. The biggest thing to remember is temperature. Bring all your cold ingredients, especially the unsalted butter, whole milk, and egg whites, to room temperature before you start. This isn’t just being fussy, it’s the difference between a smooth, emulsified batter and one that’s lumpy and prone to clumping. That tracks with what I’ve seen in countless kitchen experiments: consistent temperature leads to consistent results.
When you’re mixing the batter, don’t overmix! This is critical. You want to mix until just combined. Overmixing develops the gluten too much, and you’ll end up with a dense, rubbery cake, or worse, one that falls in the center. I mean, who wants a fallen cake after all that effort? We’re aiming for a soft cherry sponge cake, so gentle handling is key. Once the batter is ready, divide it evenly between your prepped 8-inch round cake pans. I like to use a kitchen scale for this, just to be precise; it helps ensure even baking.
Now, about doneness. The cake is done when a toothpick inserted into the center comes out with a few moist crumbs, but no raw batter. It’s a subtle distinction, but you’ll get a feel for it. Don’t let it bake until the toothpick is completely clean, as that usually means it’s overbaked and will dry out. I’m not entirely convinced that a completely clean toothpick is the best indicator for every cake, so a few moist crumbs is my preference for that perfect, tender texture.
Crafting That Perfect Cherry Compote for Cake
The cherry compote for cake is what truly makes this a sweet cherry vanilla dessert. It’s surprisingly simple to make, and the fresh cherry flavor is just incredible. You’ll start by pitting your fresh cherries. This is a step you really shouldn’t skip; it affects the flavor, freshness, and consistency, and trust me, nobody wants a cherry pit in their slice of cake. If you’re using frozen cherries, make sure they’re thawed and any excess liquid is drained off.
You’ll combine your pitted cherries with granulated sugar, cornstarch, lemon juice, and water in a saucepan. The cornstarch is our thickening agent here. Cook it over medium heat, stirring gently, until it thickens and the raw smell cooks off a bit. It should look glossy and coat the back of a spoon. This is where it gets complicated if you rush it; you want that cornstarch to cook thoroughly to avoid a starchy taste. Taste and adjust as you go, maybe a tiny bit more lemon juice if your cherries are super sweet.
Once it’s cooked, stir in that almond extract. That’s the little something extra that makes the cherry flavor pop. Let the compote cool completely before you even think about putting it on your cake. Warm compote will melt your frosting, and that’s just a tragic outcome for all your hard work. I mean, we want a layered cherry cream cake, not a cherry soup cake.
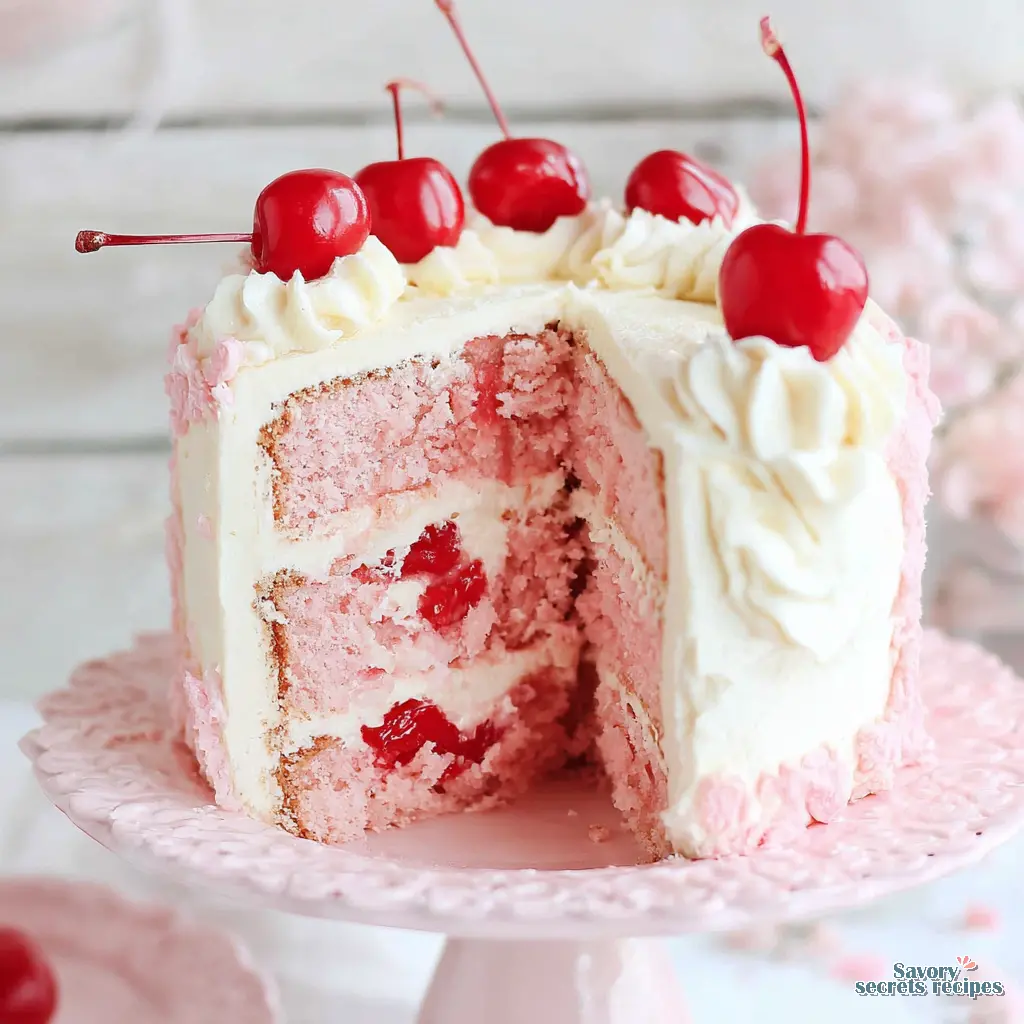
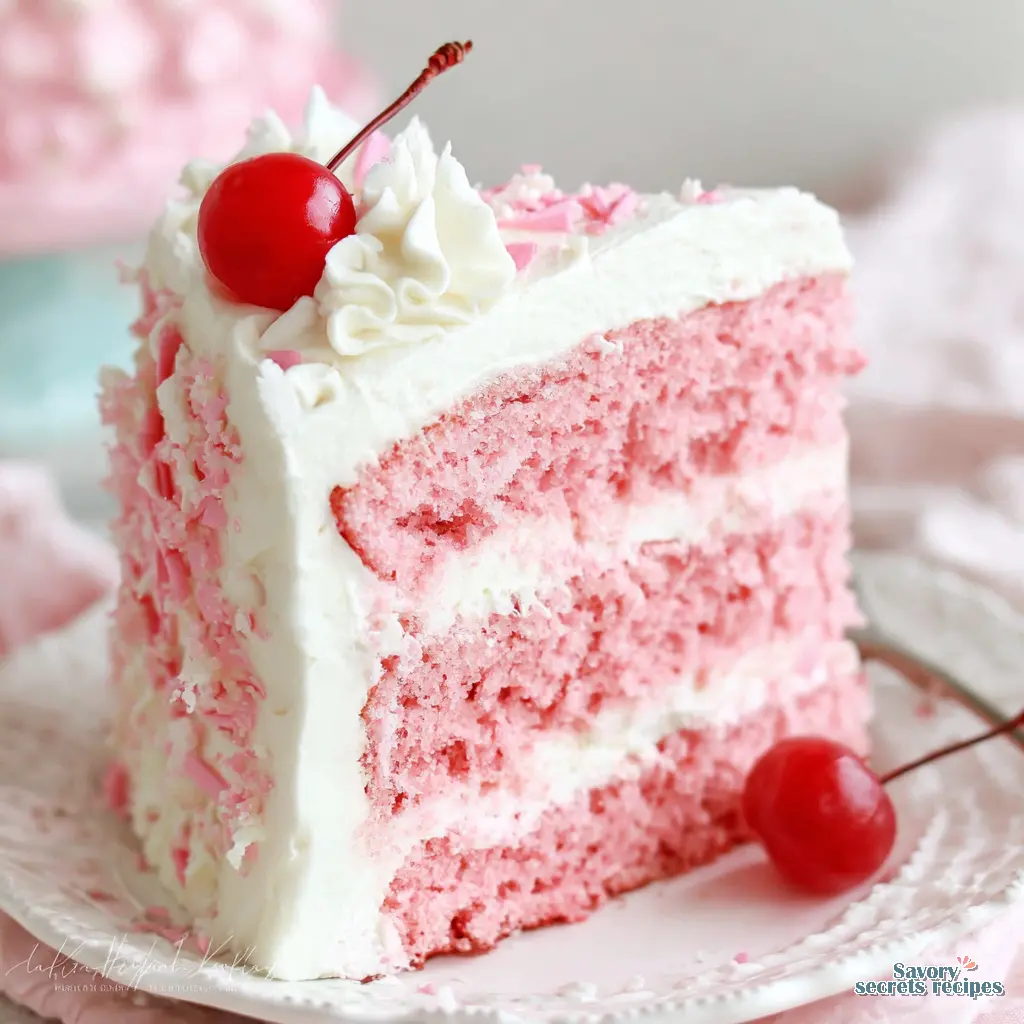
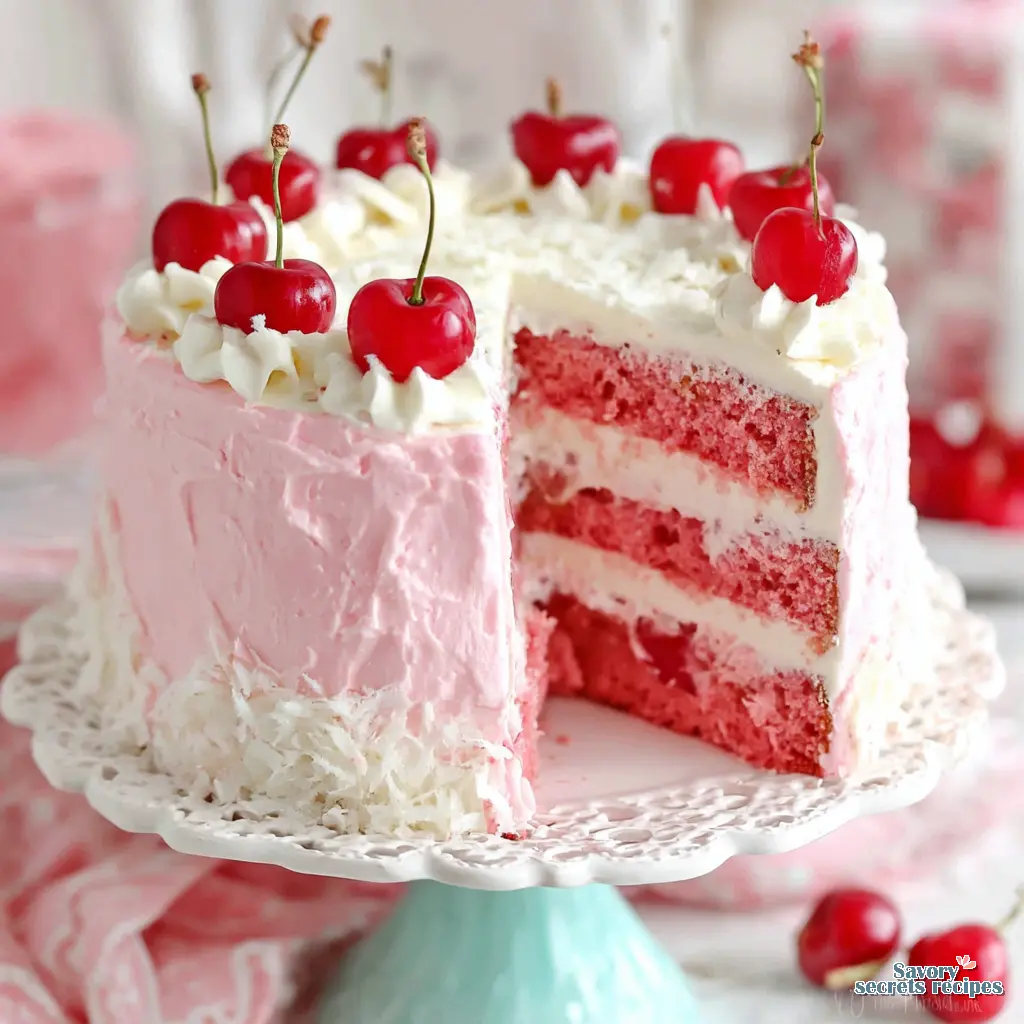
Assembling Your Masterpiece: Layer Cake Assembly Tips
Okay, the cakes are baked, the cherry compote is cooled, and now for the fun part: layer cake assembly! This is where your cherry vanilla layer cake truly comes to life. First things first, make sure your cake layers are completely cool. I can’t stress this enough. A warm cake will melt your frosting faster than an LA summer day melts ice cream. Once they’re cool, level any domed cake tops before frosting for stability and better presentation. A sharp serrated knife works wonders here.
Now, let’s talk frosting. We’re making a lovely vanilla buttercream, enriched with a bit of shortening for stability and that lovely Cherry Baking Emulsion for extra flavor. If your frosting seems a bit too thick, you can add a teaspoon of maraschino cherry juice or even a bit of heavy cream to adjust the consistency. For that beautiful aesthetic berry cake look, a touch of Americolor Soft Pink gel food coloring gives it a delicate pink tint.
When you’re assembling, place your first cake layer on an 8-inch round cake board or a nonslip mat on your cake turntable. Pipe a dam of frosting around the edge of the layer, then fill the center with your cooled cherry compote. Don’t overfill it, or it’ll squish out. Then gently place your next cake layer on top and repeat. Once all your layers are stacked, do a thin crumb coat of frosting all over the cake. This traps any loose crumbs. Chill the cake for about 15-20 minutes to let that crumb coat set. Then you can go in with your final layer of frosting, smoothing it out with an offset cake spatula and a cake scraper. This is genuinely interesting, the way a simple crumb coat prevents so much frustration later on.
Troubleshooting & Tips for Perfect Cherry Vanilla Cake
Baking can sometimes feel like a delicate balance, and even with the best intentions, things can go a little sideways. Fair enough. But usually, there’s a good reason, and a fix! Here are some common cake baking mistakes to avoid for your cherry vanilla layer cake:
Common Mistakes & Fixes
Mistake: My cake layers are dry.
Solution: This often happens from overbaking or overmixing. Remember to mix until just combined and remove the cake from the oven when a toothpick comes out with a few moist crumbs, not completely clean. Also, ensure your ingredients were at room temperature; cold ingredients don’t emulsify as well, leading to a less tender crumb.
Mistake: Cherries sank to the bottom of the cake.
Solution: This usually means your batter was too thin or the cherries were too heavy. You can lightly toss pitted cherries in a tablespoon of cake flour before folding them into the batter. This helps them suspend better. That tracks with what I’ve seen: a little flour creates friction and prevents sinking.
Mistake: My frosting is too soft/runny.
Solution: This could be due to warm butter, too much liquid, or an overly warm kitchen. Make sure your butter isn’t melted, just softened. If it’s too warm in your kitchen (and let’s be real, LA kitchens can get warm), chill your mixing bowl and frosting for 15 minutes, then re-whip. Adding a bit more powdered sugar can also help firm it up.
Mistake: The cake dome excessively.
Solution: Your oven might be too hot, or you might have too much leavening. Try reducing your oven temperature slightly (maybe 25°F) or using cake strips around your pans. Even heat distribution is key to flat tops, and that’s a good cake baking rule to remember.
Mistake: My cake stuck to the pan.
Solution: Ensure you’re properly prepping your pans with nonstick baking spray and parchment paper circles on the bottom. I’ve learned this the hard way: sometimes you think you’ve greased enough, but you haven’t. Let the cakes cool in the pans for about 10-15 minutes before inverting them onto a cake cooling rack.
Here are some additional moist layer cake tips. Always use fresh, sweet cherries for best results; avoid frozen or canned cherries if possible, as they can introduce too much moisture. Pit fresh cherries for the best flavor and consistency. Use pure, high-quality vanilla extract or vanilla bean paste for both cake and frosting. Bring cold ingredients to room temperature before mixing batter; this isn’t being fussy, it prevents clumping and ensures better mixing and texture. Mix batter until just combined, avoiding overmixing to prevent a dense, rubbery, or fallen cake. The cake is done when a toothpick inserted into the center comes out with a few moist crumbs or clean, but no raw batter. Adjust frosting consistency by adding a teaspoon of maraschino cherry juice or heavy cream if it’s too thick. Add a bit of Americolor Soft Pink gel food coloring for a pink tint to the frosting. Level domed cake tops before frosting for stability and better presentation. Chill the cake for four hours before serving to allow it to properly set. Let the cake sit at room temperature for 15-30 minutes before serving for optimal texture and flavor; butter cakes firm up when chilled, and flavors are harder to taste when very cold. This makes good sense when you think about it: cold dulls flavor perception. I’m impressed by how well this holds up across different cake types, honestly.
Cherry Vanilla Cake Variations for Every Craving
One of the beautiful things about a good cherry vanilla layer cake is how adaptable it is. Once you’ve got the basic vanilla sponge cake down, you can play around with it! This is where it gets complicated if you don’t understand the base, but since you do, let’s explore some options. For the frosting, you could use a vanilla buttercream with a cherry jam swirl instead of the compote, or even a less sweet whipped cream frosting. Just remember if you’re using whipped cream and the cake will be served longer than 24 hours, a bit of gelatin can help with stability.
What to do when cherries are not in season? If you don’t have fresh cherry season or just want something different, you could easily swap out the cherry filling for other fruit fillings like strawberry, raspberry, or even a bright lemon curd. I’ve found that the acidic notes in other fruits pair really well with vanilla. You can use sour cherries too; this will result in a less sweet cake and a different flavor profile, which can be lovely.
This cake can also be made into cupcakes. Just fill cupcake liners about two-thirds full and bake at 350°F (175°C) for around 20-25 minutes. For a bundt pan, grease and flour it really well, and bake at 325°F (160°C), but expect a longer bake time. I’d want to see more research before giving exact times for every pan, but typically bundt cakes take 50-60 minutes. If you want a one-layer vanilla cake, simply cut the recipe in half. For 6-inch round pans, you’d probably use about two-thirds of the batter per pan for two layers, or divide it among three 6-inch pans for thinner layers, checking doneness earlier. I mean, you could make cupcakes with leftover batter if you’re worried about overflow.
Storing Your Homemade Cherry Vanilla Layer Cake
So, you’ve made this gorgeous cherry vanilla layer cake, and now you’re wondering how to store it and how long it lasts. Fair enough, you want to protect your hard work! To keep it fresh, refrigerate the cake in an airtight container or covered with plastic wrap or a cake server lid. An unsliced cake can actually be stored uncovered if it’s frosted, as the frosting acts as a protective layer, but I usually cover mine to be safe.
This cake will last for about 3-4 days in the refrigerator. To be clear, the flavors are best within the first two days, but it’s still perfectly delicious after that. When you’re ready to serve, pull the cake out of the fridge about 15-30 minutes beforehand. Let it sit at room temperature for a bit; this allows the butter in the frosting and the cake itself to soften slightly, making it easier to cut and letting those beautiful cherry and vanilla flavors really shine through. That’s a high-value tip from competitors, and it makes good sense when you think about it: cold dulls taste perception.
Can cherry cake be frozen? Absolutely! To freeze plain cake layers, wrap them tightly in plastic wrap and then aluminum foil to prevent freezer burn. You can freeze a whole frosted cake by freezing it uncovered for about an hour until the frosting is firm, then wrapping it tightly. Individual slices can also be wrapped the same way. Label your frozen cakes with the date; they can be frozen for up to 3 months. Thaw frozen cake layers on the countertop for a few hours or in the fridge overnight before assembling. A whole frozen cake should thaw in the refrigerator overnight.
Frequently Asked Questions
Your Beautiful Cherry Vanilla Layer Cake Awaits
So, there you have it: a complete guide to creating a truly beautiful and delicious cherry vanilla layer cake. From understanding why room-temperature ingredients matter to troubleshooting common hiccups, you’ve got the tools and the knowledge now. You’ll know exactly how to achieve those moist layer cake tips and prevent those dreaded dry crumbs. The data on this is actually quite clear: a little understanding goes a long way in the kitchen.
When you make this, you’ll feel so much pride in presenting such a visually stunning and incredibly flavorful dessert. Your friends and family will be asking for the recipe, trust me. It’s the perfect spring dessert idea, whether it’s for Mother’s Day, a birthday, or just a lovely weekend treat. Don’t hesitate, grab those fresh cherries on your next Trader Joe’s run and give it a go!
I share tons of variations on Pinterest if you want ideas for your next baking adventure. I mean, there’s always a next baking adventure, isn’t there?
Source: Nutritional Information
How do you keep cherries from sinking in cherry cake?
To prevent cherries from sinking, lightly toss your pitted fresh cherries in about a tablespoon of cake flour before folding them into the batter. This creates a little extra friction, helping them suspend more evenly throughout your cherry vanilla layer cake as it bakes. It’s a simple trick, but it really works!
Can cherry cake be frozen?
Yes, this cherry vanilla layer cake can absolutely be frozen! You can freeze plain cake layers wrapped tightly in plastic wrap and foil for up to 3 months. A frosted cake should be frozen uncovered until firm, then wrapped. Thaw in the refrigerator overnight for best results.
Can I use plain yogurt instead of cherry yogurt?
Yes, you can use plain yogurt instead of cherry yogurt in this cherry vanilla layer cake recipe. However, keep in mind that doing so will result in a less intense cherry flavor within the cake itself. The cherry yogurt adds a subtle boost to the overall profile.
Can I use salted butter instead of unsalted butter?
You can use salted butter instead of unsalted butter for this cherry vanilla layer cake, but if you do, omit any additional salt called for in the recipe. Salt content varies between brands, so unsalted butter gives you more control over the final flavor balance.
Why do all the ingredients need to be at room-temperature?
Bringing ingredients like butter, milk, and eggs to room temperature ensures they emulsify properly, creating a smooth, uniform batter. This prevents clumping and promotes a finer, more tender crumb in your cake. It’s a foundational cake baking rule for moist results.
Can I use just regular buttercream instead of cream cheese buttercream?
Yes, you can absolutely use a regular vanilla buttercream for your cherry vanilla layer cake instead of cream cheese buttercream. The recipe provides instructions for a delicious buttercream already. Cream cheese frosting offers a slight tang, but a classic buttercream is always a good choice.
How can I tell when this cake is finished baking?
Your cherry vanilla layer cake is finished baking when a toothpick inserted into the center comes out with a few moist crumbs attached, but no wet batter. The cake edges should be lightly golden, and it should spring back gently when lightly touched. This ensures a moist layer cake.
How do I store this cake and how long does it last?
Store your cherry vanilla layer cake in an airtight container in the refrigerator for 3-4 days. For optimal flavor and texture, let it sit at room temperature for 15-30 minutes before serving. Unsliced and frosted, it can be stored uncovered, as the frosting acts as a protective layer.
Can this cake be made into cupcakes?
Yes, this cherry vanilla layer cake recipe can easily be adapted for cupcakes! Fill cupcake liners about two-thirds full and bake at 350°F (175°C) for approximately 20-25 minutes, or until a toothpick inserted comes out with moist crumbs. This yields about 24 standard cupcakes.
Can this cake be made into a layer cake?
This recipe is designed as a layer cake, specifically for 8-inch round pans. The instructions are tailored for creating a beautiful, multi-layered sweet cherry vanilla dessert. It’s perfect for a showstopping presentation!
Can this cake be baked in a bundt pan?
Yes, you can bake this cherry vanilla layer cake batter in a bundt pan. Ensure your bundt pan is thoroughly greased and floured. Bake at 325°F (160°C) for approximately 50-60 minutes, or until a cake tester comes out clean. Baking time will be longer than for layers.
Can I bake this cake in 6-inch round pans?
You can bake this cherry vanilla layer cake in 6-inch round pans. You’ll likely get three thicker layers. Reduce the baking time to about 25-30 minutes at 350°F (175°C), checking for doneness with a toothpick. You might have a bit of leftover batter for a couple of cupcakes.
What’s the best way to serve/eat this cake?
The best way to serve this cherry vanilla layer cake is slightly chilled, but not straight from the fridge. Let it sit at room temperature for 15-30 minutes before serving. This allows the butter in the cake and frosting to soften, enhancing both texture and the vibrant cherry vanilla flavors. Perfect.
What to do when cherries are not in season?
When fresh cherries aren’t in season, you can use high-quality frozen cherries for the compote. Thaw them completely and drain any excess liquid before using. Alternatively, consider other fruit fillings like raspberries or strawberries, which also pair beautifully with vanilla sponge cake.
Can I use sour cherries to make cherry cake?
Yes, you can use sour cherries like English Morello or Montmorency varieties for your cherry vanilla layer cake. This will result in a less sweet cake with a brighter, more tart flavor profile. You might want to slightly increase the sugar in the compote to balance the tartness, taste and adjust as you go.
Do I need to beat the egg whites separately?
No, this particular cherry vanilla layer cake recipe does not require beating the egg whites separately. The method here incorporates them directly into the batter to create a tender, moist crumb without the extra step of folding in meringue. It’s a straightforward approach for a soft cherry sponge cake.
Do I have to use whole milk?
While whole milk is recommended for the richest and moistest cherry vanilla layer cake, you can substitute it with 2% milk. Just be aware that the cake may not be quite as moist or tender due to the lower fat content. I’m not entirely convinced that the difference is huge, but it’s worth noting.
Can I use cake flour?
Yes, this recipe specifically calls for cake flour, as it contributes significantly to the soft and tender texture of the vanilla sponge cake. If you don’t have it, you can create a substitute by removing 2 tablespoons of all-purpose flour per cup and replacing it with 2 tablespoons of cornstarch.
How do I make a one layer vanilla cake?
To make a one-layer vanilla cake, simply halve all the ingredients in this cherry vanilla layer cake recipe. You can bake it in an 8-inch round pan for a slightly thicker single layer, or a 9-inch round pan for a thinner one. Adjust baking time accordingly, checking for doneness earlier.
How many will a 6 inch cake feed?
A 6-inch cherry vanilla layer cake, typically with three layers, will generally feed about 8-10 people. If you cut smaller slices, you might stretch it to 12. It’s a lovely size for a smaller gathering or an intimate celebration.