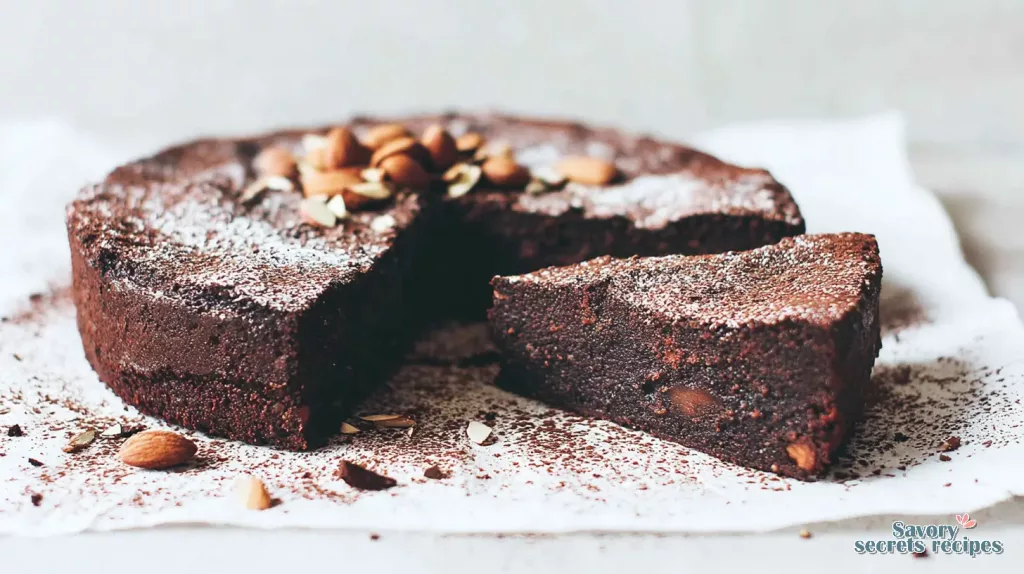
Chocolate Peanut Butter Cake with Creamy Frosting
Ingredients
Method
- Cream butter and sugar together in a mixer.
- Add eggs one at a time. Beat in vanilla.
- Combine all dry ingredients, including the pudding mix, in a separate bowl.
- Add the dry mix to the mixing bowl, alternating with the milk and buttermilk.
- Add the vegetable oil and mix until well combined and smooth.
- Pour into two greased and floured 8-inch cake pans.
- Bake at 350°F for 20-25 minutes, or until a toothpick inserted into the center comes out clean.
- Let cool for 10 minutes before removing from the pan.
- In a mixer, combine room temperature butter and peanut butter, then beat until fluffy.
- Beat in vanilla, then add powdered sugar a little at a time.
- Mix until the frosting is smooth and fluffy.
- Spread over the bottom layer of the cake.
- Top the frosting with the second cake layer.
- In a small saucepan, heat heavy whipping cream until just before it boils.
- Pour chocolate chips into a separate bowl.
- Add the hot heavy whipping cream to the chocolate chips and whisk until smooth.
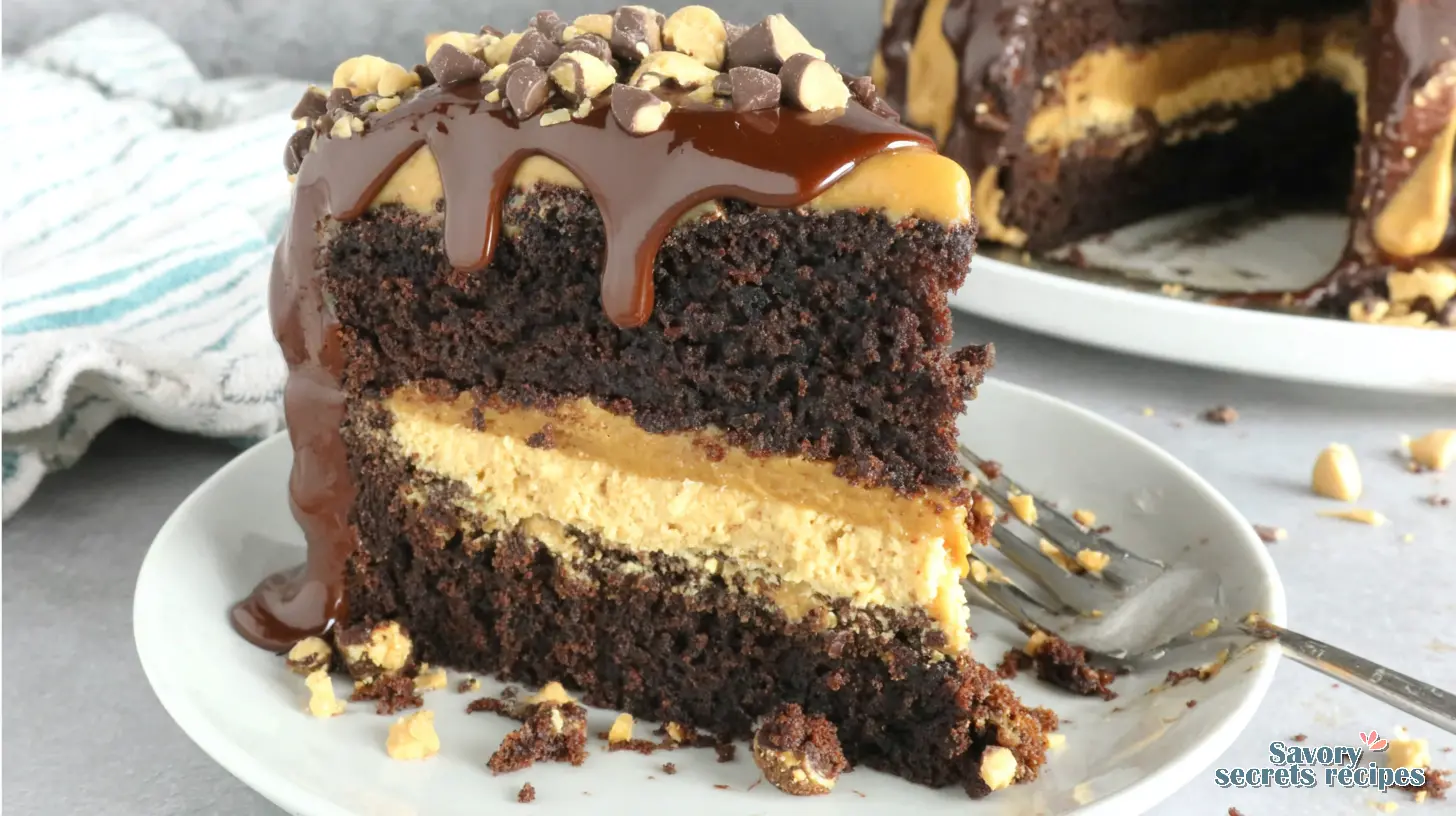
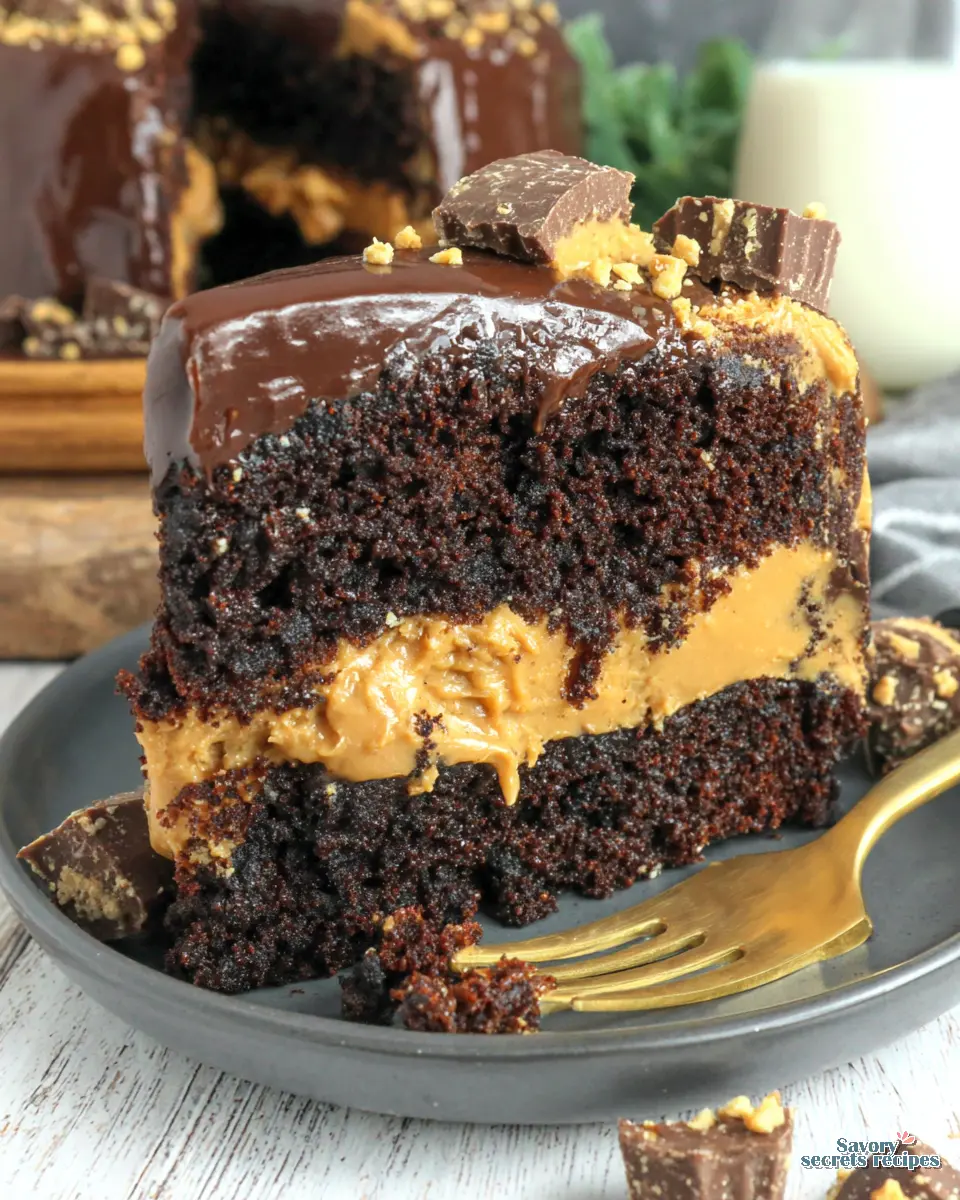
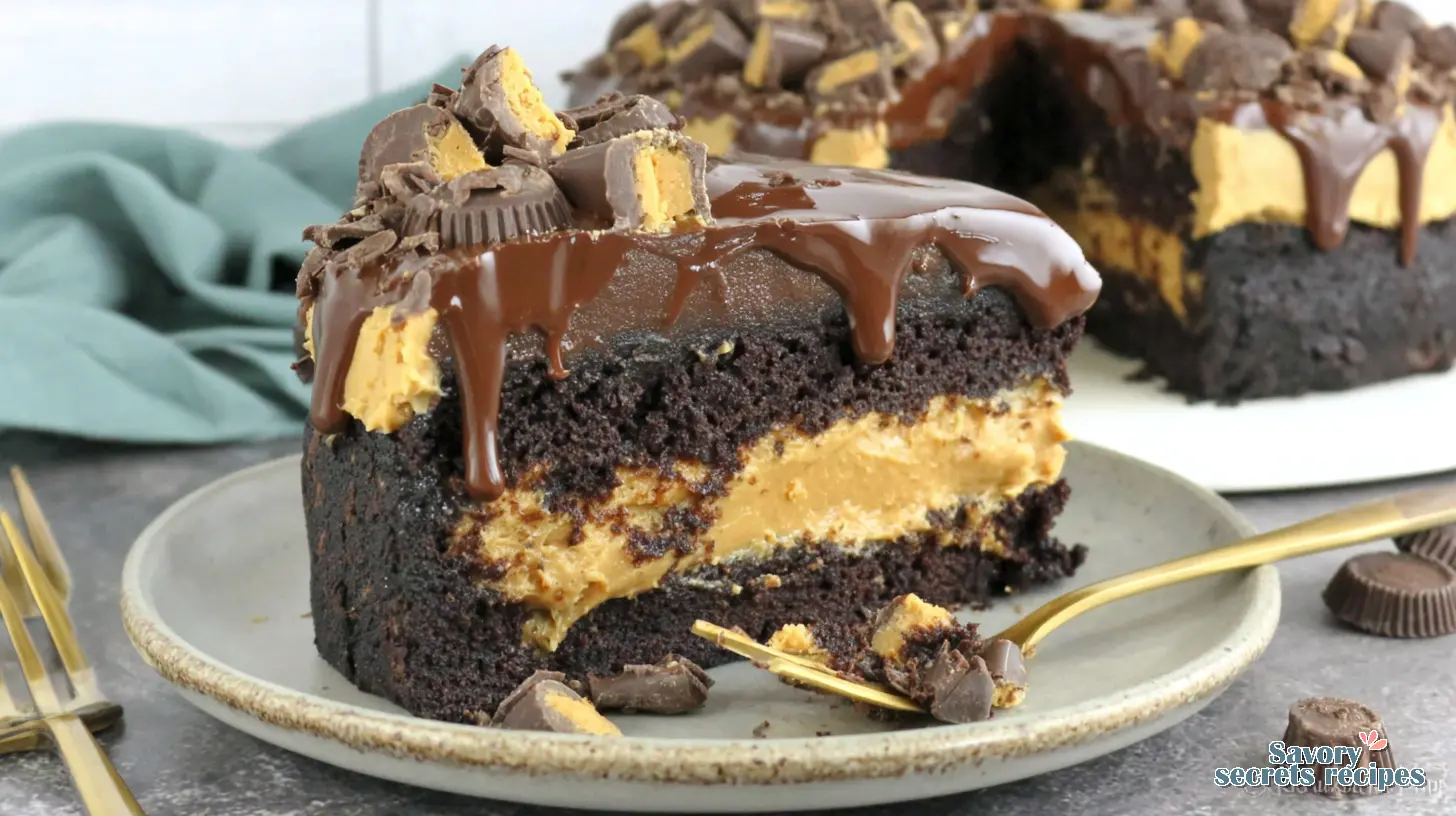
- Let cool for a few minutes, then pour over the cake, starting in the center and allowing it to spill over the sides.
- Leave plain, or top the cake with chopped peanut butter cups, peanut butter chips, chocolate chips, chocolate curls, etc.
Nutrition
Notes
Why You’ll Want This Chocolate Peanut Butter Cake Right Now
You know that craving, right? That specific, intense pull for something truly decadent. You’re probably picturing a fudgy chocolate cake, maybe with that smooth, creamy peanut butter frosting just waiting to hit your tongue. I get it. We’ve all been there, standing in front of the fridge, wondering if a spoonful of peanut butter and a chocolate bar can really hit the same spot. Here’s the thing about that, it usually doesn’t quite cut it.
I remember one time, I was filming a segment on caramelizing onions, and I thought I had it down. Fifteen minutes, I figured, that’s long enough, right? Played back the footage, and they were still blonde, barely softened. Had to reshoot the whole thing and actually wait the full forty minutes. Learned to trust the process, not the clock. It’s a bit like that with baking a truly great Chocolate Peanut Butter Cake. Shortcuts can be tempting, but the reward for doing it right? That’s exactly right.
This isn’t just another dessert recipe. This is *the* Chocolate Peanut Butter Cake recipe you’ll come back to, especially during these mild spring days in Los Angeles when you’re looking for a homemade dessert that feels like a celebration. We’re talking moist cake layers, that rich peanut butter dessert cake flavor, and a finish that’ll have everyone asking for seconds. You’ll definitely want to give this a go.
The Essential Ingredients for Your Chocolate Peanut Butter Cake
Making a showstopper like this Chocolate Peanut Butter Cake really starts with getting your ingredients in order. It’s not a huge deal, but worth noting: room temperature matters. Trust the process on this one. All your refrigerated items, like butter, eggs, and milk, should be sitting out for a good hour or so before you start. This makes for a smoother batter and a much creamier peanut butter frosting. I mean, it just mixes better, makes sense to me.
For the Cake Layers
We’re aiming for a super moist, fudgy chocolate cake here. You’ll need your all-purpose flour, granulated sugar, cocoa powder, baking soda, baking powder, and a good pinch of salt. That salt, by the way, a whole teaspoon, really brings out the chocolate flavor without making it taste salty at all. It’s kind of magic, actually.
For the wet ingredients, grab some eggs, milk, buttermilk, vegetable oil, and vanilla extract. And here’s a little secret: a small package of instant chocolate pudding mix. It doesn’t make it taste like pudding, but it’s a secret weapon for an unbelievably moist cake. I’ll take a look at any recipe that promises that extra moisture.
For the Creamy Peanut Butter Frosting
This is where the magic happens for the creamy peanut butter frosting. You’ll need soft butter, creamy peanut butter, powdered sugar, vanilla, and a touch of heavy whipping cream. The key step here is using processed creamy peanut butter, like Jif or Skippy, not the natural stuff. Here’s the thing about that: natural peanut butter can make your frosting separate or come out too thin and oily. We definitely don’t want that for our rich peanut butter dessert cake.
For the Chocolate Ganache Drizzle
To finish our Chocolate Peanut Butter Cake, we’ll make a simple chocolate ganache drizzle. All you need are good quality chocolate chips and heavy whipping cream. You can use high-quality dark or semi-sweet chocolate chips if you like, but when melting chocolate, I’d probably lean toward pure chocolate baking bars for the best results. That tracks.
How to Make Your Chocolate Peanut Butter Cake
Alright, let’s get into the actual baking. This layered cake recipe might seem like a few steps, but we’ll break it down. You’ve got this. The satisfaction of creating something this beautiful and delicious from scratch? Worth it.
Making the Chocolate Cake Layers
First, combine your dry ingredients. Sifting the cocoa powder and flour helps prevent lumps, which is just good practice for a smooth batter. Then, in a separate bowl, whisk together your wet ingredients. The buttermilk is required for this recipe, it adds a lovely tang and helps with the tender crumb. If you don’t have buttermilk, you can always make your own DIY version with milk and a little lemon juice or vinegar. That’s a solid approach.
Gradually add the dry to the wet, mixing until just combined. Don’t overmix, that’s where most people run into trouble with dry cakes. Overmixing develops the gluten too much, leading to a tough cake. This isn’t being fussy, it’s the difference between a moist cake and a dense one. You’ll know it’s ready when there are just a few streaks of flour left. Let it do its thing.
Pour your batter into prepared baking pans. If you’re using a convection oven, which has a fan, remember to bake at 320°F (160°C) as the fan bakes food faster. Otherwise, stick to 350°F (175°C). You’ll know the cakes are done when a toothpick inserted into the center comes out with just a few moist crumbs. The smell of that fudgy chocolate cake baking, you know, it’s just the best. Reminds me of sitting at the zinc bar at my uncle’s place after service, eating whatever the kitchen had made for staff meal. Simple and perfect.
Preparing the Creamy Peanut Butter Frosting
Now for the creamy peanut butter frosting. This is the good stuff. Start by creaming your softened butter until it’s light and fluffy. This is where the magic of “softened butter” comes in; it should be around 63°F (17°C), firmer than you think. This temperature is soft enough to whip into creamy fluffiness but firm enough so it doesn’t turn your frosting into slop. Trust me on this. Then, beat in your creamy peanut butter until it’s well combined.
Gradually add the powdered sugar, a little at a time, until it’s all incorporated and smooth. If you’re outside Australia, you don’t need to worry about the “soft icing sugar” versus “pure icing sugar” distinction. Just use regular powdered sugar. Finally, add the vanilla and heavy whipping cream, beating until the frosting is light and fluffy. If your frosting seems a bit firm or has a lot of air bubbles, it probably means your butter or cream was too cold. To fix this, gently heat the buttercream in the microwave for 5-second bursts, mixing between each burst until it softens up. Not a huge deal, but worth noting.
Simple 2-Ingredient Chocolate Ganache
This chocolate ganache drizzle is incredibly easy, but it adds such a nice touch to the Chocolate Peanut Butter Cake. Simply heat your heavy whipping cream until it’s simmering, then pour it over your chocolate chips. Let it sit for about 5 minutes to melt the chocolate, then whisk until smooth and glossy. The key step here is waiting. Wait 20-30 minutes for the ganache to thicken slightly before you pour or spoon it onto your cake. If it’s too thin, it’ll just run right off. That tracks.
Assembling & Decorating Your Cake
Okay, you’ve got your beautiful, moist chocolate cake layers, that incredible creamy peanut butter frosting, and a rich chocolate ganache. Now comes the fun part: putting it all together. This is where you really start to see your layered peanut butter chocolate cake come to life. Let me show you what I mean.
First, make sure your cake layers are completely cooled. This is critical. Trying to frost warm cakes is where most people run into trouble; the frosting will just melt and slide right off. Place your first cake layer on your serving plate or cake stand. Spread an even layer of peanut butter frosting over the top. Then, carefully place the second cake layer on top, lining it up as best you can. Repeat with the third layer.
Next, apply a thin layer of frosting all over the cake. This is your crumb coat. It locks in any loose crumbs and gives you a smooth base for your final frosting layer. Pop the cake into the fridge for about 15-20 minutes to let that crumb coat set. This isn’t being fussy, it’s the difference between a messy cake and a professional-looking finish. Fair enough?
Once the crumb coat is firm, apply the remaining peanut butter frosting for your final, smooth layer. Use an offset spatula to get those nice, even sides. Don’t worry if it’s not absolutely perfect; the homemade dessert charm is part of it. Finally, drizzle your thickened chocolate ganache over the top, letting it drip down the sides for a really decadent look. The smell of that fudgy chocolate cake with the creamy peanut butter and ganache? That’s the good stuff right there. It’s visually impressive, honestly.
Pro Tips for a Perfect Chocolate Peanut Butter Cake
Baking is a science, but it’s also about a few smart choices. These tips are things I’ve picked up over the years, some the hard way, some from my uncle Marc. They’ll help you nail this Chocolate Peanut Butter Cake every time.
For the chocolate flavor, I highly recommend using espresso powder and coffee in the cake batter. Here’s the thing about that: it won’t make your cake taste like coffee; rather, it deepens the chocolate flavor. It’s a game-changer, honestly. You could use regular cocoa powder, though you could use Dutch-processed for a slightly more intense chocolate flavor, but this recipe really requires natural cocoa powder for its acidity, so do not use Dutch-process for the cake layers.
The rule of thumb for baking is that butter gives things flavor, but oil keeps things moist. Butter hardens when cold, but oil stays liquid, which is why we use vegetable oil in our cake layers for that super moist cake. Makes sense to me. And remember that “softened butter” temperature? It’s key for both your cake batter and your buttercream. I’m not totally sure, but I think most home cooks would benefit more from a good instant-read thermometer than from any other single tool, for things like this.
Choosing the Right Peanut Butter
This is a big one for the creamy peanut butter frosting. You absolutely need processed creamy peanut butter, like Bega or Jiffy’s, which already has salt and sugar added. If you try to use natural unsweetened peanut butter, your frosting may be too loose and will likely separate. I learned this the hard way, trying to make a “healthier” version once and ending up with a runny mess. Trust the process on this one. If you are using natural unsalted butter, reduce the quantity of peanut butter slightly to prevent a loose frosting.
Delicious Chocolate Peanut Butter Cake Variations
This Chocolate Peanut Butter Cake is fantastic as is, but sometimes you want to mix things up. I like recipes that scale easily and don’t require you to buy an ingredient you’ll use once and never again. That tracks.
If coffee isn’t your thing, you can leave out the espresso powder and use extra hot water instead of hot coffee in the cake batter. For the buttermilk, if you’re in a pinch, you can substitute plain Greek yogurt. The cake won’t taste quite as rich, but it’s a fine substitute. Fair enough?
This decadent cake can also be made as a single layer rectangle cake, which is great for a crowd. Or, you can easily make it as a 2 or 3 layer 8-inch (20 cm) cake, or even a 2 layer 9-inch (22 cm) cake. It’s versatile like that. We also have a very similar recipe for cupcakes; feel free to fill them with this peanut butter frosting instead of frosting them, and top each with chocolate ganache. Or use that recipe for ganache-topped cupcakes, and replace the cream filling with this peanut butter frosting. Now we’re talking.
Common Mistakes & Fixes for Your Chocolate Peanut Butter Cake
Mistake: Dry cake layers.
Solution: You might be overmixing the batter or baking at too high a temperature. Don’t overmix and use an oven thermometer to ensure accuracy. The instant chocolate pudding mix also helps immensely with moisture.
Mistake: Runny or separated peanut butter frosting.
Solution: This is almost always due to using natural peanut butter or butter that’s too soft. Stick to processed creamy peanut butter and ensure your butter is “softened” to the right temperature, not melted. If it separates, sometimes gently warming it in 5-second microwave bursts and re-beating can help.
Mistake: Ganache is too thin or doesn’t set.
Solution: The ganache needs time to cool and thicken. Don’t pour it immediately after mixing. Wait 20-30 minutes, or even longer if your kitchen is warm. A quick stint in the fridge can also help, but don’t let it get too firm.
Mistake: Cake layers sticking to the pan.
Solution: Always grease and flour your pans thoroughly, or line them with parchment paper. This isn’t being fussy, it saves a lot of frustration. I’m still figuring out the balance between showing ideal technique and acknowledging that most people are cooking in imperfect conditions with limited time, but this one is worth the extra step.
Storage & Freezing Instructions for Your Chocolate Peanut Butter Cake
One of the best things about this Chocolate Peanut Butter Cake is how well it stores. You can absolutely make parts of it ahead of time. The baked cake layers, once completely cooled, can be wrapped tightly in plastic wrap and refrigerated for up to 2 days or frozen for up to 3 months. The peanut butter frosting can also be made in advance, covered, and refrigerated for up to 3 days. Same goes for the chocolate ganache; refrigerate it for up to 3 days.
If you’re freezing the cake layers, cut them in half horizontally after cooling, wrap each round well, and place them in a freezer ziplock bag. When you’re ready to use them, thaw them overnight in the refrigerator. The frosted cake also freezes well for up to 3 months. Just be sure to wrap it tightly to prevent freezer burn.
This cake can be kept at room temperature overnight. However, due to the cream in the frosting, it’s best to refrigerate it after a day. Always bring the cake to room temperature before serving because the buttercream frosting will go hard when cold. That first bite, when the pastry shatters and you get that warm, creamy filling? Worth it. The cake will stay fresh for about 5 days in the fridge. When ready to serve, let it sit out for about 30 minutes to soften up for the best texture and flavor. You’ll know it’s ready when the frosting is spreadable again. Cut slices to whatever size you desire, but 20 slices is a nice size, though it can easily serve 25 for a party cake.
Frequently Asked Questions
So, there you have it. This Chocolate Peanut Butter Cake is going to be your new go-to for any occasion that calls for something truly special. When you slice into this cake, you’ll see those perfectly moist layers, that generous spread of creamy peanut butter frosting, and the elegant drizzle of ganache. It’s a homemade dessert that looks like it took all day, but really, it’s quite approachable. You’ll feel that genuine satisfaction of creating something beautiful and delicious from scratch. Now that’s what I’m talking about.
I hope you give this recipe a try. If you do, I’d love to see your creations. Share your cake creations on social media; it’s always inspiring to see what you’re making! And for more inspiration, check out my Pinterest boards. Happy baking!
Source: Nutritional Information
<!– wp:rank-math/faq-block {"questions":[{"id":"faq-question-1776887566792","title":"How do you make a decadent Chocolate Peanut Butter Cake from scratch?","content":"Making a decadent Chocolate Peanut Butter Cake involves a few steps: moist chocolate cake layers, a rich peanut butter frosting, and a simple chocolate ganache. The key is using room temperature ingredients and not overmixing the cake batter for that fudgy texture. Trust the process on this one, it’s simpler than you might think.”,”visible”:true},{“id”:”faq-question-1776887566793″,”title”:”What makes the creamy peanut butter frosting so smooth in this layered peanut butter chocolate cake?”,”content”:”The secret to a smooth, creamy peanut butter frosting for this layered cake is using processed creamy peanut butter, not natural. Also, ensure your butter is softened to the correct temperature, around 63°F (17°C). This prevents separation and ensures a light, fluffy frosting that spreads beautifully on your Chocolate Peanut Butter Cake.”,”visible”:true},{“id”:”faq-question-1776887566794″,”title”:”Why use instant chocolate pudding mix in a Chocolate Peanut Butter Cake recipe?”,”content”:”Instant chocolate pudding mix is a clever trick for achieving an incredibly moist and tender Chocolate Peanut Butter Cake. It doesn’t add a strong pudding flavor, but rather enhances the cake’s texture, making it fudgy and rich. It’s a solid approach to prevent dry cakes, which is where most people run into trouble.”,”visible”:true},{“id”:”faq-question-1776887566795″,”title”:”How long can you store a Chocolate Peanut Butter Cake, and how should it be kept fresh?”,”content”:”You can store this Chocolate Peanut Butter Cake at room temperature overnight, but after that, it’s best to refrigerate it for up to 5 days due to the cream in the frosting. Always bring it to room temperature before serving for the best texture. You can also freeze individual unfrosted layers or the whole frosted cake for up to 3 months.”,”visible”:true},{“id”:”faq-question-1776887566796″,”title”:”Can I reduce the sweetness of a rich peanut butter dessert cake without changing its texture?”,”content”:”Reducing the sweetness in a rich peanut butter dessert cake can be tricky without affecting texture. For the cake, you could slightly reduce the sugar, but it might impact moisture. For the creamy peanut butter frosting, reducing powdered sugar is possible, but it may make the frosting less stable. I’d probably lean toward a slight reduction in frosting sugar first, as it’s less critical for structure.”,”visible”:true}]} –>