Rich Chocolate Raspberry Layer Cake Recipe
Ingredients
Method
- Prep: Preheat your oven to 350 ℉. Grease three 9-inch cake pans with shortening. Place a parchment circle in the bottom of each, then grease over that. Dust the inside of each pan well with flour, knocking out any excess.
- Make the Cake Batter: Measure the hot water into a 4-cup glass measuring cup or large bowl, then whisk in the cocoa until completely dissolved. Set aside to let come down to room temp. In a large mixing bowl, whisk together all the dry ingredients (including the sugars). Next, add the wet ingredients, including the room temp (not steaming hot!) cocoa and water mixture, and whisk until combined. There may be a few small lumps – that's fine.
- Bake the Cakes: Divide the cake batter evenly between the three pans (use a kitchen scale to weigh the full amount of batter, then divide by 3 to get it perfect!). Bake for 23 to 27 minutes, or until a toothpick inserted into the center pulls out moist crumbs. Let cakes cool in the pans on wire racks for 10 minutes before running a butter knife around the edge and inverting onto a cooling rack. Let cool completely.Tip: I recommend rotating cake pans halfway through since every oven will have hot spots and this ensures an even bake.
- Make the Raspberry Frosting: Beat butter in a large bowl until creamy, about 30 seconds. Mix in the powdered sugar in three additions, mixing between each until combined. Add the milk as needed to help things come together. Add the vanilla and salt and mix. Beat in the freeze dried raspberry powder & raspberry preserves. Beat in the cream cheese last, until well combined.
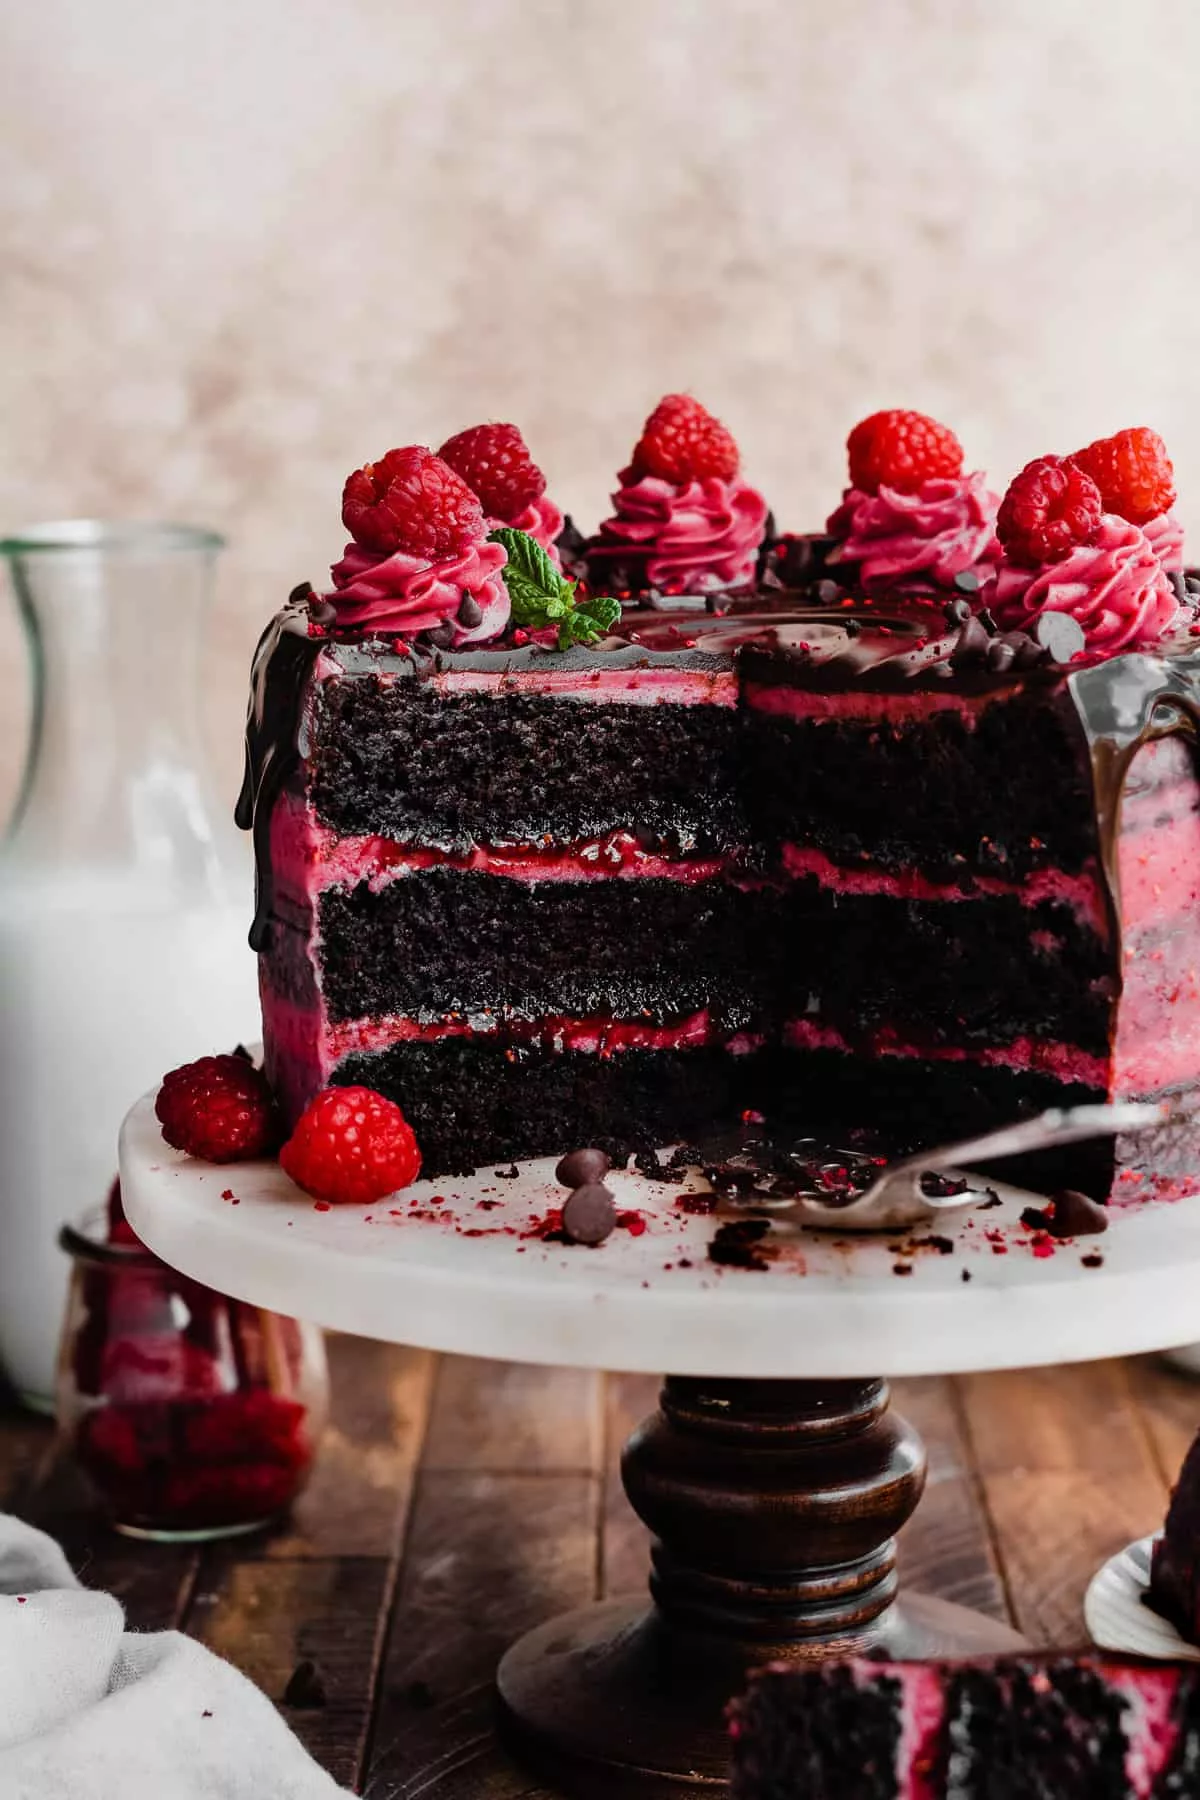
- Assemble the Cake: Place the first cake layer on a cake stand on top of a turntable. Spread 1 and 1/4 cups of frosting over the layer, going past the edge a smidge. Pipe a border around the cake layer, and pour 1/3 cup of raspberry preserves into the center. Spread evenly with an offset spatula, going to the edges of the border. Place the second cake layer on top and Spread any frosting "overhang" between the two layers to seal them together. Chill for 5-10 minutes to set things so the layers don't slide around. Repeat with the second layer. Add the final layer upside down for a flat top, and give the cake a thin layer of frosting on top and on the sides. Use a cake scraper to smooth out and remove excess. This is your crumb coat, so don't fret if it isn't perfect. Pop the cake in the fridge for 30 minutes or until the frosting is set. Then, frost the top and sides of the cake, smoothing things with the cake scraper or offset spatula. I left this cake semi-naked, which means I scraped off a more generous amount of frosting to let the cake peek through a bit. Chill the entire cake in the fridge for 30 minutes, or until set, before adding the chocolate drip.Tip: If your frosting is getting too soft at any point from sitting out, pop it back in the fridge for a bit to firm back up.
- Make the Chocolate Drip: Add finely chopped chocolate to a small bowl. Heat heavy cream in a small saucepan over medium heat until simmering. Pour over the chocolate, let sit for 4 minutes, then stir until completely smooth. Add 1-2 tsp vegetable oil to get a pourable consistency. Set cake on a turntable. Pour ganache into the center of the top of the cake, then spin the cake slowly while pushing ganache to the edges with an offset spatula to create drips. Let chill 20-30 minutes, until ganache is set.
- Serve + Store: Once ganache drip is set, pipe on swirls with remaining frosting and top with raspberries and chocolate chips. Slice and enjoy your life! Store leftovers in an airtight container in the fridge for 4-5 days.
- Make Ahead Tips: Cake layers can be made a day ahead. Bake them, let cool completely at room temperature, and then store them on dinner plates covered tightly with plastic wrap or foil. Store at room temp overnight.Raspberry frosting can be made a day ahead, covered tightly and stored in the fridge overnight. Beat it until creamy enough to spread before using.
Nutrition
Notes
Why This Raspberry Chocolate Layer Cake Recipe Works
I burned a batch of biscuits once because I was watching a brisket temp and forgot about the oven. The whole floor smelled like scorched flour for an hour. That tracks, right? Distraction is how mistakes happen, especially with something that feels as involved as a raspberry chocolate layer cake. But here’s the thing. This recipe works because it respects the process without making it a mystery. It gives you a stable, moist chocolate base, a raspberry filling that’s tart enough to cut through the sweetness, and a frosting that’s just solid. It’s built for success, not stress.
The balance is what you’re after. A rich chocolate cocoa sponge against that bright, fresh berry note. It’s the kind of dessert that looks like you spent all day in the kitchen, but really, it’s about understanding a few key moves. I learned about patience from my Uncle Raymond at his smoker in Goldsboro. You don’t open the chamber until the time is right. Same principle here. Let the layers cool. Let the filling set. Respect the time, and the result is exactly right.
Key Ingredients and What They Do
Let’s talk ingredients. I tend to look at a recipe as a system, where each part has a job. For this raspberry chocolate layer cake, that means a few things are non-negotiable, but fair enough, you can adapt others.
First, the cocoa and hot liquid. You’ll mix unsweetened cocoa powder with hot water or coffee. Why hot? It encourages the cocoa to bloom. That’s just a fancy way of saying it wakes up the flavor, making it deeper and more chocolatey. The cake won’t taste like coffee, I promise. It just tastes more like chocolate. That’s the one.
Then you’ve got your sour cream and buttermilk. Their acidity is a must. It reacts with the baking soda to give you a proper rise and a tender crumb. No buttermilk? Nothing for it but to make your own. Add a teaspoon of white vinegar or lemon juice to a measuring cup, then fill it to the half-cup line with milk. Let it sit for five minutes. Checks out.
For the filling, we’re using frozen raspberries. I love this because it means you can make this cake any time of year. The cornstarch is your thickener, but you’ve got to mix it with a little cold water first to make a slurry. If you just dump it in, you’ll get lumps. And don’t skip the lemon juice. It seems like a small thing, but without that hint of freshness, the filling tastes pretty flat.
The frosting is a cream cheese situation with freeze-dried raspberry powder and preserves mixed in. The powder gives an intense berry flavor without adding more liquid, which would thin out your frosting. Worth noting.
A Few Quick Wins Before We Dive In
Before you even preheat your oven, let’s lock in a few easy victories. These aren’t secrets, just good practice.
Make your raspberry filling first. It takes about fifteen minutes to cook, then it needs to cool and thicken completely in the fridge. Do this ahead, even the day before. One less thing to juggle while your cake layers are baking.
Use room temperature ingredients. I mean it. Eggs, butter, sour cream. Cold stuff doesn’t emulsify right, and your batter won’t come together as smoothly. It’s like trying to get a good bark on a brisket with a wet rub. The meat will tell you when it’s ready, and your batter will too.
Don’t pack your flour. Spoon it into your measuring cup and level it off with a knife. Packing it in is a sure way to end up with a dense, dry cake. Too much flour is a common culprit.
And finally, toss those mini chocolate chips in a little flour before folding them into the batter. It helps keep them from sinking straight to the bottom during the bake. A simple trick, but it works every time.
The Science of a Solid Build
I like to know why things work. It helps me fix them when they don’t. So let’s break down the science here, plain and simple.
The leavening in this raspberry chocolate layer cake comes from baking soda reacting with the acids in the sour cream, buttermilk, and cocoa. That reaction needs moisture and heat to produce gas bubbles, which make the cake rise. If your ingredients are cold, that reaction starts too slow. If you over-mix the batter after adding the dry ingredients, you develop too much gluten and pop those precious bubbles. The result? A tough, dense cake. Mix just until you don’t see dry flour. Let it ride.
The raspberry filling thickens with cornstarch. Cornstarch needs to reach a near-boil to activate fully. You’ll see it go from cloudy to clear and glossy, and then it’ll thicken as it cools. If it’s too runny after cooling, you can cook it a bit more or add a touch more cornstarch slurry. Temperature is data, texture is truth.
And the ganache? It’s just finely chopped chocolate melted by hot cream. The ratio matters. Too much cream and it won’t set up for dripping. Too little and it’s a thick paste. The vegetable oil in our recipe just loosens it up a touch for a smoother pour. Now we’re talking.
Assembling Your Masterpiece
This is where the magic happens, and where a lot of anxiety kicks in. I get it. But if you follow a couple of rules, you’ll be fine.
Start with level cake layers. If they’ve domed a bit, use a serrated knife to slice off the very top to create a flat surface. This gives you a stable stack. Place your first layer on a cake board or your serving plate. Pipe a dam. That’s a ring of your cream cheese frosting around the very edge of the layer. This is your retaining wall for the raspberry filling.
Spread your cooled filling inside that dam. Don’t overfill it. The filling should stay below the top of your frosting wall. Top with the next cake layer and repeat. Once stacked, apply a thin crumb coat of frosting over the entire cake. This isn’t the final look. It’s just to trap any loose crumbs. Then, refrigerate the cake for at least thirty minutes. This chills the frosting and sets the filling, making the final frosting step much cleaner.
After the chill, apply your final, thicker layer of frosting. Use an offset spatula to smooth it out. For the ganache drip, let it cool slightly so it’s warm but not hot. Pour a little in the center of the cake and gently push it to the edges with a spoon, letting it drip down the sides. It’s easier than it looks, I swear.
Common Mistakes & Fixes
Mistake: The raspberry filling seeps out the sides.
Solution: Your frosting dam wasn’t tall enough or the filling was too runny. Chill the filling thoroughly and don’t overfill the layers.
Mistake: The cake layers are dry and crumbly.
Solution: You likely over-measured the flour or over-mixed the batter. Spoon your flour, don’t pack it, and mix just until combined.
Mistake: The frosting is too soft to pipe.
Solution: Your cream cheese or butter was too warm. Chill the frosting bowl for 20 minutes, then re-whip. If it’s still soft, you can add a bit more powdered sugar.
Mistake: The ganache is too thick to drip.
Solution: It cooled too much. Gently re-warm it in 5-second bursts in the microwave, stirring between each, until it’s a pourable consistency.
Storage, Make-Ahead, and Serving
This raspberry chocolate layer cake is actually a great candidate for getting ahead of an event. The filling and frosting can be made up to a week in advance and kept in the fridge. Let them come to room temperature before using. The chocolate cake layers themselves can be baked, cooled, wrapped tightly in plastic wrap, and frozen for up to a month. I think frozen cakes are easier to frost, honestly.
Once assembled, cover the cake tightly and store it in the refrigerator. It’ll keep for up to five days. I like using a cake carrier for this. To serve, let it sit out at room temperature for about 30 to 45 minutes. This takes the chill off and lets the flavors and textures really shine. Cutting into a cold cake can be tough, and the chocolate will taste muted.
You can freeze the whole, frosted cake for up to a month. Freeze it uncovered on a tray until the frosting is solid, then wrap it tightly in a few layers of plastic wrap. Thaw it overnight in the fridge before serving.
Frequently Asked Questions
Go Bake That Masterpiece
When you pull this raspberry chocolate layer cake out of the fridge before serving, and you see those clean layers, that glossy ganache drip, you’ll feel a real sense of pride. It’s the same feeling I had the first time I got a smoke ring right on a brisket. That pink line meant I’d done everything correctly. This cake is your pink line.
It’s a showstopper for a birthday, Mother’s Day, or just because it’s Saturday. It tastes like patience and care, but it’s built on straightforward, reliable technique. You’ve got this. Now, go bake that masterpiece. And if you’re looking for more inspiration for special occasion desserts, I share a lot of my kitchen experiments and variations over on my Pinterest boards.
Source: Nutritional Information
Can I use store-bought raspberry jam for the filling in my raspberry chocolate layer cake?
You can, but I don’t love it. Store-bought jam is much sweeter and often has a different texture. It can make the cake overly sweet and might not set as well. The homemade filling’s tartness is key for balance. That’s what you’re after.
What’s the best way to decorate this chocolate raspberry cake?
Keep it simple. After the ganache drip, I like a pile of fresh raspberries and mini chocolate chips in the center. You can add some chocolate shavings around the base. The beauty is in the layers inside, so you don’t need to go overboard on the outside.
My raspberry filling is too runny. What can I do?
If it’s still warm, cook it a bit longer until it thickly coats the back of a spoon. If it’s cooled and runny, make a little more cornstarch slurry (1 tsp cornstarch + 1 tbsp water), whisk it into the filling, and re-cook until thickened.
How long will a raspberry chocolate layer cake with ganache stay fresh?
Properly stored in the fridge, it’s solid for 5 days. The flavors actually meld and get better after a day. Just make sure it’s covered tightly so it doesn’t pick up any fridge smells.
Can I use fresh raspberries instead of frozen for the filling?
Absolutely. Use the same weight. Fresh berries in season are fantastic. The cooking time might be a minute or two less since they aren’t starting from frozen. The result is a brighter, fresher tasting filling.
What can I use instead of espresso powder in the cocoa sponge?
Just leave it out. The hot liquid (water or coffee) is what’s important for blooming the cocoa. The espresso powder just deepens the chocolate flavor more. You won’t miss it if it’s not there.
Can I use a different sized cake pan for this layer cake recipe?
You can use two 9-inch pans, but your layers will be thinner. Bake time will be less, probably 25-30 minutes. Start checking early. For three 8-inch pans, the time will be even shorter. Always use a toothpick test.
Why is my chocolate raspberry cake dry?
Three likely causes: over-measured flour, over-mixed batter, or over-baked. Use the spoon-and-level method, mix just until combined, and set a timer. Ovens vary, so check a few minutes before the recipe says it’s done.